Finger Raises Plank: Forearm Strength, Wrist Stability, Form & Tips
Learn how to do the Finger Raises Plank to build forearm strength, finger control, wrist stability, and plank endurance with proper form, sets, mistakes, FAQs, and equipment.
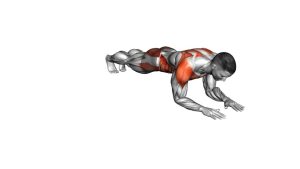
Finger Raises Plank
This exercise looks simple, but it requires excellent control. The goal is not to rush the fingers up and down. The goal is to keep your body locked in a strong plank while smoothly raising the fingers, briefly controlling the top position, then lowering them back to the floor without collapsing into the wrists. The movement should feel precise, steady, and controlled.
Quick Overview
| Body Part | Forearms |
|---|---|
| Primary Muscle | Forearm extensors, finger extensors, wrist stabilizers |
| Secondary Muscle | Forearm flexors, shoulders, chest, triceps, core, serratus anterior |
| Equipment | Bodyweight only; optional exercise mat |
| Difficulty | Beginner to Intermediate |
Sets & Reps (By Goal)
- Beginner wrist conditioning: 2–3 sets × 6–10 controlled reps
- Forearm endurance: 3–4 sets × 10–15 reps
- Grip and finger strength: 3–5 sets × 8–12 reps with a 1–2 second hold at the top
- Core and plank control: 2–4 sets × 20–40 seconds total work
- Warm-up activation: 1–2 light sets × 6–8 reps before calisthenics, push-ups, or upper-body training
Progression rule: First improve smooth control. Then increase reps, add a longer top hold, or narrow your foot stance. Do not progress if your wrists collapse, hips sag, or fingers slap the floor.
Setup / Starting Position
- Start in a high plank: Place your hands on the floor under your shoulders with arms straight.
- Spread the fingers: Open your fingers naturally and press the palms firmly into the floor.
- Set your feet: Keep feet about hip-width apart for balance. Wider feet make the exercise easier.
- Brace the core: Keep ribs down, glutes lightly engaged, and body in a straight line from head to heels.
- Stack the shoulders: Keep shoulders over wrists without shrugging toward your ears.
- Keep the neck neutral: Look slightly ahead of your hands, not straight down or far forward.
Tip: If the full plank version feels too intense, perform the same finger raise action from a knee plank or incline plank with your hands on a bench.
Execution (Step-by-Step)
- Lock in your plank: Create full-body tension before moving the fingers.
- Press through the palms: Keep the base of the palm connected to the floor as your main support point.
- Lift the fingers: Raise all fingers off the floor in a smooth, controlled motion while keeping the palms down.
- Hold briefly: Pause for 1 second at the top and feel the forearms engage.
- Lower with control: Return the fingers to the floor slowly instead of dropping them.
- Repeat without losing posture: Keep hips level, elbows straight, shoulders stable, and core braced through every rep.
Pro Tips & Common Mistakes
- Move slowly: Fast reps reduce forearm tension and make the exercise less effective.
- Do not bend the elbows: Keep arms straight so the work stays focused on the hands, wrists, and forearms.
- Avoid sinking into the wrists: Keep active pressure through the palms and maintain shoulder support.
- Keep the hips still: If the hips sway side to side, widen your feet or reduce reps.
- Do not slap the fingers down: The lowering phase builds control, so place the fingers back gently.
- Use a firm surface: A soft mat may make the movement unstable. Use a thin mat or firm floor if possible.
- Progress gradually: Fingers and wrists adapt slower than larger muscles, so avoid jumping into high volume too quickly.
FAQ
What muscles does the Finger Raises Plank work?
It mainly targets the forearm extensors, finger extensors, and wrist stabilizers. It also works the core, shoulders, chest, and triceps because you must hold a strong plank while moving the fingers.
Is the Finger Raises Plank good for grip strength?
Yes. While it does not train gripping the same way as heavy carries or pull-ups, it strengthens the hands and forearms by improving finger control, wrist stability, and endurance under bodyweight load.
Should my wrists hurt during this exercise?
No. You may feel muscular fatigue in the forearms and hands, but sharp wrist pain is not normal. If your wrists hurt, reduce the load by using a knee plank, incline plank, or shorter sets.
Can beginners do this exercise?
Yes, but beginners should start with easier versions. A wall plank, incline plank, or knee plank allows you to practice the finger raise motion with less bodyweight pressure on the wrists.
How often should I do Finger Raises Plank?
Start with 2–3 sessions per week. If your wrists and fingers recover well, you can use light sets more often as part of a warm-up or mobility routine.
Recommended Equipment
- Exercise Mat — provides floor comfort while keeping enough firmness for hand support
- Training Wrist Wraps — useful for extra wrist support during upper-body training
- Hand Grip Strengthener — helps build general grip strength and hand endurance
- Finger Extensor Trainer — directly trains finger opening strength and balances gripping work
- Push-Up Handles — helpful for reducing wrist extension during push-up and plank variations
Choose tools that support gradual progression. For this exercise, control and comfort are more important than heavy resistance.