V-Sit on Floor: Core Compression, Form, Sets, Tips & FAQ
Learn the V-Sit on Floor for stronger abs, hip flexors, waist control, and calisthenics compression strength. Includes setup, steps, sets, mistakes, FAQs, and equipment.
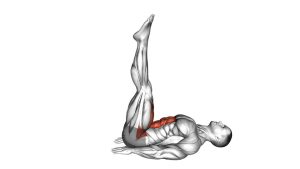
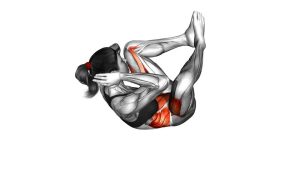
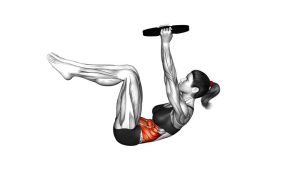
V-Sit on Floor
This movement looks simple, but it requires strong coordination between the rectus abdominis, hip flexors, obliques, and lower-back stabilizers. In the video, the athlete lifts the legs and torso into a sharp V position, maintains control through small balance corrections, then exits without dropping the legs suddenly. The best reps are smooth, quiet, and controlled.
Quick Overview
| Body Part | Core |
|---|---|
| Primary Muscle | Rectus abdominis |
| Secondary Muscle | Hip flexors, obliques, transverse abdominis, lower-back stabilizers, quadriceps |
| Equipment | No equipment required; optional exercise mat, yoga blocks, parallettes, or resistance band |
| Difficulty | Intermediate to advanced depending on leg position and hold duration |
Sets & Reps (By Goal)
- Beginner control: 3 sets × 8–12 second holds with bent knees and hands lightly on the floor.
- Core strength: 3–4 sets × 15–25 second holds with legs extended as much as possible.
- Calisthenics compression: 4–5 sets × 10–20 second strict holds, focusing on straight legs and tall posture.
- Endurance: 2–3 sets × 25–40 second holds using a slightly easier knee-bent version.
- Dynamic variation: 3 sets × 8–12 controlled V-sit raises or tuck-to-V extensions.
Progression rule: First increase control and hold time. Then straighten the knees more, lift the legs higher, reduce hand support, or move toward an unsupported full V-sit.
Setup / Starting Position
- Sit on the floor: Start seated with your legs extended in front of you and your spine tall.
- Place your hands beside your hips: Keep the fingertips or palms lightly on the floor for balance if needed.
- Brace your core: Gently pull the ribs down and tighten the abs before lifting your legs.
- Lean back slightly: Shift your torso backward while keeping the chest open and shoulders relaxed.
- Prepare the legs: Keep the knees bent for an easier version or straighten the legs for a harder version.
Tip: If your lower back rounds too much, start with a tuck V-sit. Clean posture matters more than leg height.
Execution (Step-by-Step)
- Brace first: Tighten your abs and keep your ribs from flaring upward.
- Lift both legs: Raise the feet off the floor while leaning the torso back slightly.
- Create the V shape: Bring your torso and thighs into a balanced angle so the body forms a strong V position.
- Keep the chest lifted: Avoid collapsing into a rounded, sunken posture.
- Hold with control: Maintain steady breathing and small balance corrections without kicking or swinging.
- Keep the legs active: Point or flex the feet, tighten the thighs, and avoid letting the legs drop suddenly.
- Exit slowly: Lower the legs and return the torso upright with control.
Pro Tips & Common Mistakes
Pro Tips
- Think “lift the chest and legs together”: This keeps the V shape balanced instead of turning it into a rounded crunch.
- Use your hands as training wheels: Light fingertip support is fine while learning, but avoid pushing hard through the arms.
- Keep the movement quiet: No bouncing, kicking, or swinging into position.
- Train short, clean holds: Multiple high-quality 10-second holds are better than one sloppy 40-second hold.
- Pair with hollow holds: Hollow body work improves the anti-extension strength needed for a better V-sit.
Common Mistakes
- Rounding the lower back too much: This reduces core compression quality and can irritate the back.
- Holding the breath: Breathe shallow but steady to maintain tension without bracing excessively.
- Letting the legs drop: Keep the hip flexors active and control the descent.
- Shrugging the shoulders: Keep the neck long and shoulders away from the ears.
- Trying the full version too early: Use bent knees until you can hold the position cleanly.
FAQ
What muscles does the V-Sit on Floor work?
It mainly works the rectus abdominis, with strong assistance from the hip flexors, obliques, transverse abdominis, and lower-back stabilizers.
Is the V-Sit on Floor good for waist training?
Yes. It trains waist control by forcing the obliques and deep core muscles to stabilize the torso while the legs stay elevated. It will not “spot reduce” fat, but it can improve core strength, shape, posture, and control.
Why do my hip flexors feel this more than my abs?
The hip flexors work hard because they hold the legs up. To shift more tension into the abs, brace the ribs down, slightly bend the knees, and avoid leaning too far back.
How can beginners modify the V-Sit?
Beginners can bend the knees, keep the hands on the floor, hold for shorter durations, or perform tuck holds instead of a full straight-leg V-sit.
Can the V-Sit help with L-sits and calisthenics?
Yes. It builds core compression, hip flexor strength, and body tension, which carry over well to L-sits, tuck sits, hanging leg raises, and other calisthenics skills.
Recommended Equipment
- Thick Exercise Mat — adds comfort and support for seated floor core work.
- Yoga Blocks — useful for elevating the hands and making V-sit progressions easier.
- Parallettes — excellent for progressing toward L-sits, tuck sits, and advanced compression holds.
- Resistance Bands Set — helpful for assisted leg raises, hip-flexor drills, and core activation work.
- Ab Wheel — strengthens anti-extension core control that supports better V-sit stability.
Tip: For this exercise, the most important item is a comfortable mat. Add parallettes or yoga blocks when you want to progress toward advanced calisthenics holds.