Dead Bug Waist Exercise: Core Stability, Form, Sets, Tips & FAQ
Learn the Dead Bug Waist exercise for deep core control, anti-extension strength, waist stability, and better lower-back positioning. Includes setup, step-by-step form, sets, mistakes, FAQs, and equipment.
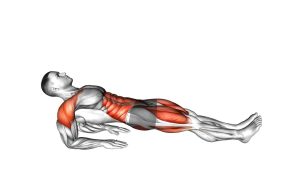
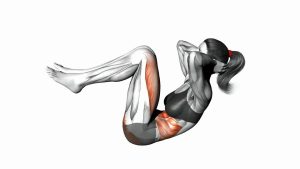
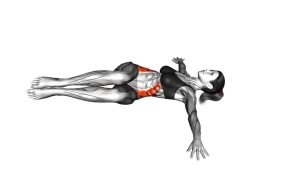
Dead Bug Waist
This exercise is excellent for beginners, athletes, desk workers, and anyone who wants a lower-back-friendly way to train the core. Unlike many crunch variations, the Dead Bug Waist does not require spinal flexion. Instead, it teaches your trunk to stay stable while the limbs create movement. That makes it useful for building stronger abs, improving posture awareness, and developing better control through the waist.
In the video, the movement begins from a supine position with both arms pointing upward and both legs lifted in a tabletop position. One arm lowers overhead while the opposite leg extends forward. Then both limbs return to the starting position before the other side repeats the same pattern. Each rep should feel slow, quiet, and controlled.
Quick Overview
| Body Part | Core |
|---|---|
| Primary Muscle | Abs, especially transverse abdominis and rectus abdominis |
| Secondary Muscle | Obliques, hip flexors, deep spinal stabilizers, shoulder stabilizers |
| Equipment | No equipment required; optional exercise mat |
| Difficulty | Beginner to intermediate, depending on range of motion and tempo |
Sets & Reps (By Goal)
- Core activation: 2 sets × 6–8 reps per side with slow control.
- Beginner core strength: 3 sets × 8–10 reps per side with a 2-second pause at extension.
- Waist stability: 3–4 sets × 10–12 reps per side while keeping the ribs down.
- Warm-up before lifting: 1–2 sets × 6–10 reps per side before squats, deadlifts, or full-body training.
- Rehab-style control: 2–3 sets × 5–8 reps per side using a short range and perfect lower-back position.
Progression rule: First improve control, then increase reps. After that, extend the arm and leg slightly lower. Never progress by sacrificing lower-back position.
Setup / Starting Position
- Lie on your back: Use a comfortable floor surface or exercise mat. Keep your head relaxed and your neck neutral.
- Lift your arms: Reach both arms straight toward the ceiling. Your hands should be stacked above your shoulders.
- Lift your legs: Bring both knees above your hips. Bend your knees to about 90 degrees so your shins are roughly parallel to the floor.
- Set your pelvis: Gently press your lower back toward the floor. Avoid forcing the spine flat with excessive tension.
- Control your ribs: Pull the front ribs slightly down toward the pelvis. This helps prevent your back from arching.
- Brace lightly: Tighten the abdominal wall as if preparing for a small cough. Keep your breathing calm.
Your starting position should feel stable before any limb moves. If you already feel your back arching in the start position, bring your knees slightly closer to your chest.
Execution (Step-by-Step)
- Start from the tabletop position: Keep both arms vertical, both knees bent, and your lower back gently connected to the floor.
- Exhale and brace: Breathe out softly as you prepare to move. This helps lock the ribs and pelvis into a stable position.
- Lower opposite limbs: Slowly lower one arm overhead while extending the opposite leg forward and downward.
- Keep the movement smooth: Move the arm and leg at the same speed. Do not let one limb drop faster than the other.
- Stop before the back arches: The leg does not need to touch the floor. Stop at the lowest point where you can still control your spine.
- Pause briefly: Hold the extended position for 1–2 seconds. Keep the abs engaged and the pelvis quiet.
- Return with control: Bring the arm and leg back to the starting position without rushing.
- Repeat on the other side: Switch to the opposite arm and opposite leg. Continue alternating sides for the target reps.
Pro Tips & Common Mistakes
Pro Tips
- Move slowly: A slow tempo makes the core work harder and reduces momentum.
- Exhale during extension: Breathing out helps keep the ribs down and the abs active.
- Use a shorter range first: Small clean reps are better than long sloppy reps.
- Keep the neck relaxed: Your head should stay on the floor. Avoid lifting your chin or tensing your jaw.
- Think “quiet hips”: Your pelvis should not rock from side to side as the limbs move.
- Control both directions: The return phase should be just as slow as the lowering phase.
Common Mistakes
- Arching the lower back: This shifts stress away from the abs and into the lower back.
- Dropping the leg too low: The leg should only lower as far as your core can control.
- Moving too fast: Speed often hides poor control and reduces core tension.
- Holding the breath: Breath-holding may create unnecessary pressure and stiffness.
- Letting the ribs flare: Rib flare usually means the abs lost control of the trunk.
- Using the hip flexors only: The movement should feel like core control, not just leg movement.
FAQ
What muscles does the Dead Bug Waist exercise work?
The Dead Bug Waist mainly works the abs, especially the transverse abdominis and rectus abdominis. It also trains the obliques, deep spinal stabilizers, hip flexors, and shoulder stabilizers. The key benefit is core stability rather than visible twisting or crunching.
Is the Dead Bug Waist good for beginners?
Yes. It is one of the best beginner-friendly core exercises because it teaches control without heavy spinal bending. Beginners should use a short range of motion and focus on keeping the lower back steady.
Should my lower back stay on the floor?
Your lower back should stay gently connected to the floor during the movement. It does not need to be crushed into the ground, but it should not arch strongly. If it lifts, reduce the leg range or keep the knees more bent.
How low should I extend my leg?
Extend the leg only as low as you can while keeping your spine stable. For some people, that means stopping halfway. For others, the heel can hover close to the floor. Control matters more than range.
Can I do Dead Bug Waist every day?
You can perform it often if the volume is moderate and the movement feels comfortable. For daily practice, use 1–3 easy sets and stop before fatigue causes poor form.
Is this exercise good for lower back pain?
It can be useful for improving core control, but it should not cause pain. If you have current lower-back pain, use a small range and move slowly. Stop if symptoms increase or spread.
Recommended Equipment (Optional)
- Thick Exercise Mat — adds comfort for your spine, hips, and shoulders during floor-based core work.
- Non-Slip Yoga Mat — helps keep your body stable while you focus on slow, controlled reps.
- Pilates Mini Ball — can be used between the knees or hands for extra feedback and core engagement.
- Resistance Bands Set — useful for advanced dead bug variations and anti-extension core drills.
- Adjustable Ankle Weights — optional progression tool for advanced users who already control the basic version perfectly.
Tip: Start with only a mat. Add resistance or ankle weights later only when your lower back stays stable through every rep.