Bent-Knee Lying Twist: Proper Form, Benefits, Sets, Tips & FAQ
Learn how to perform the Bent-Knee Lying Twist with proper form. Build oblique strength, waist control, core stability, and rotational mobility with step-by-step coaching cues.
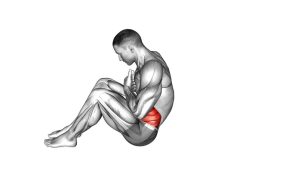
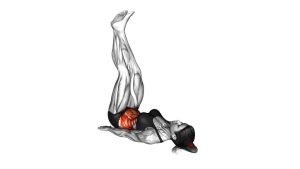
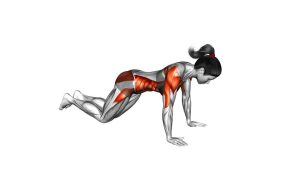
Bent-Knee Lying Twist
The Bent-Knee Lying Twist is especially useful for beginners because the bent-knee position shortens the lever of the legs, making the exercise easier to control than straight-leg twisting variations. It trains the internal and external obliques, supports rotational mobility, and helps build better awareness of the lower back, pelvis, and rib cage during core movement.
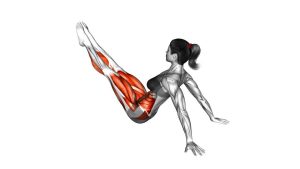
In the video, the athlete lies on her back with the arms extended out to the sides, knees bent, and legs lifted. She slowly lowers both knees toward one side, pauses briefly near the floor, then brings the knees back to the center before rotating to the opposite side. The shoulders remain grounded throughout the exercise, which keeps the rotation focused around the waist and hips instead of turning the entire upper body.
Quick Overview
| Body Part | Core |
|---|---|
| Primary Muscle | Obliques |
| Secondary Muscle | Rectus abdominis, transverse abdominis, hip flexors, lower-back stabilizers |
| Equipment | Bodyweight only; exercise mat optional |
| Difficulty | Beginner to intermediate |
Sets & Reps (By Goal)
- Beginner control: 2–3 sets × 8–10 reps per side with a slow tempo.
- Core endurance: 3–4 sets × 12–16 total reps while keeping the knees together.
- Oblique focus: 3 sets × 10–12 reps per side with a 1–2 second pause near the bottom.
- Warm-up mobility: 1–2 sets × 6–8 reps per side using a comfortable range of motion.
- Controlled finisher: 2–3 sets × 20 total alternating reps, only if form stays clean.
Progression rule: First improve control, range of motion, and breathing. After that, increase reps or add a longer pause near the bottom. Do not progress by swinging faster.
Setup / Starting Position
- Lie on your back: Start on a flat surface with your head, upper back, and shoulders resting comfortably on the floor.
- Open the arms wide: Extend your arms out to the sides in a “T” position with palms facing down. This gives you stability and helps keep the shoulders anchored.
- Lift and bend the knees: Bring both knees above the hips and bend them to around 90 degrees. Keep the knees close together.
- Brace the core: Gently tighten the abs as if preparing for a light punch to the stomach. Avoid holding your breath.
- Set the spine: Keep the lower back controlled. It does not need to be crushed into the floor, but it should not aggressively arch as the legs move.
- Keep the shoulders heavy: Press both shoulders gently into the floor before starting the twist.
A good starting position should feel stable and controlled. If your lower back lifts immediately, bring the knees closer to the chest or reduce the range of motion.
Execution (Step-by-Step)
- Start in the center: Keep your knees bent, thighs lifted, arms wide, and shoulders flat against the floor.
- Lower the knees to one side: Slowly rotate your hips and guide both knees toward the floor on one side.
- Control the descent: Do not let gravity drop your legs. Use your obliques to slow the movement and keep the knees together.
- Keep the upper body anchored: Your shoulders should stay down. If one shoulder lifts, you are rotating too far.
- Pause near the bottom: Stop before you lose control. The knees may touch the floor lightly, but they do not have to.
- Return to center: Pull the knees back using your core, not momentum. Move slowly until the knees are stacked above the hips again.
- Repeat on the opposite side: Rotate the knees to the other side with the same smooth speed and range.
- Continue alternating: Keep each rep controlled, balanced, and consistent from side to side.
Pro Tips & Common Mistakes
Pro Tips
- Think “ribs down, shoulders wide”: This helps keep the upper body stable while the hips rotate.
- Move like one unit: Keep both knees together so the pelvis rotates smoothly instead of twisting unevenly.
- Use a smaller range first: You do not need to touch the floor to get results. Controlled range matters more.
- Exhale as you return: Breathing out while bringing the knees back to center can help the abs engage better.
- Pause before reversing: A short pause removes momentum and increases oblique tension.
Common Mistakes
- Letting the shoulders lift: This reduces core tension and turns the movement into a full-body roll.
- Dropping the legs too fast: Fast reps usually shift stress into the lower back instead of the obliques.
- Arching the lower back: Keep the core lightly braced so the spine stays controlled.
- Separating the knees: Keep the knees close together to maintain clean hip rotation.
- Forcing end range: Going farther is not better if it causes pain, shoulder lifting, or loss of control.
- Holding the breath: Breathe steadily to avoid unnecessary tension in the neck, ribs, and lower back.
FAQ
What muscles does the Bent-Knee Lying Twist work?
The Bent-Knee Lying Twist mainly works the obliques, especially during the controlled lowering and return phases. It also uses the rectus abdominis, transverse abdominis, hip flexors, and lower-back stabilizers to keep the pelvis and spine controlled.
Is the Bent-Knee Lying Twist good for beginners?
Yes. It is beginner-friendly because the knees are bent, which makes the legs easier to control than straight-leg twist variations. Beginners should use a smaller range of motion and focus on keeping the shoulders down.
Should my knees touch the floor?
They can touch the floor lightly if you have the mobility and control, but it is not required. Stop the movement before your shoulder lifts, your lower back feels strained, or your knees separate.
Why do I feel this in my lower back?
You may be rotating too far, dropping the legs too quickly, or losing abdominal tension. Reduce the range, keep the knees closer to the chest, move slower, and focus on pulling the knees back with your obliques.
How often can I do Bent-Knee Lying Twists?
You can perform them 2–4 times per week as part of a core workout or warm-up. If you use them as a light mobility drill, you can do a smaller volume more frequently, as long as your lower back feels good.
Can this exercise reduce waist fat?
The Bent-Knee Lying Twist strengthens and tones the obliques, but it does not directly burn fat from only the waist area. For fat loss, combine strength training, nutrition, daily movement, and consistent calorie control.
Recommended Equipment
- Thick Exercise Mat — provides cushioning for the spine, hips, and shoulders during floor core work.
- Non-Slip Yoga Mat — helps keep your body stable while rotating the knees side to side.
- Small Pilates Ball — can be placed between the knees to improve control and keep the legs together.
- Adjustable Ankle Weights — useful only for advanced progressions when bodyweight control is already excellent.
- Foam Roller — helpful for warm-up mobility work around the hips, upper back, and core training sessions.
Start with only your bodyweight. Add equipment later only if it improves comfort, control, or progression.