Front Plank Exercise: Proper Form, Core Benefits, Sets, Tips & FAQ
Learn how to perform the Front Plank with perfect form to strengthen your abs, obliques, transverse abdominis, shoulders, glutes, and full-body stability. This complete guide covers setup, step-by-step execution, sets and hold times by goal, common mistakes, pro coaching cues, FAQs, and recommended equipment for safer core training.
Front Plank
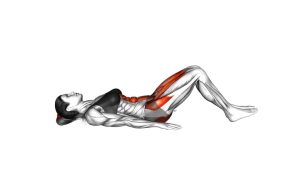
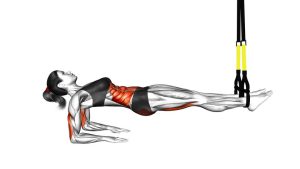
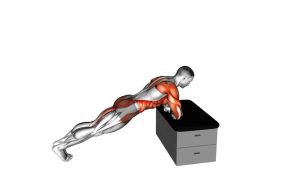
The Front Plank is one of the best bodyweight exercises for building core control because it teaches your midsection to stay firm while your limbs and spine remain supported. In the video, the exercise begins with a short setup phase where the hips are slightly elevated. Then the body settles into a cleaner plank line, with the elbows under the shoulders, legs extended, core engaged, and hips held level. From that point, the exercise becomes a controlled static hold.
This movement mainly targets the rectus abdominis, transverse abdominis, and obliques. However, it also demands support from the shoulders, glutes, quads, and upper back. Because the plank is an isometric exercise, quality matters more than duration. A short plank with tight alignment is more useful than a long plank with sagging hips, shoulder collapse, or lower-back strain.
Quick Overview
| Body Part | Abs |
|---|---|
| Primary Muscle | Rectus abdominis, transverse abdominis, and deep core stabilizers |
| Secondary Muscle | Obliques, shoulders, glutes, quads, serratus anterior, and upper back stabilizers |
| Equipment | No equipment required; optional exercise mat, yoga mat, timer, or elbow pad |
| Difficulty | Beginner to intermediate, depending on hold time and body control |
Sets & Reps (By Goal)
- Beginner core control: 2–3 sets × 10–20 seconds, resting 45–75 seconds between sets.
- General abs and waist training: 3–4 sets × 20–40 seconds, resting 45–90 seconds between sets.
- Core endurance: 3–5 sets × 40–60 seconds, using clean alignment for every hold.
- Warm-up activation: 1–2 sets × 10–20 seconds before squats, deadlifts, presses, or athletic training.
- Posture and stability practice: 2–3 sets × 15–30 seconds, focusing on breathing and neutral spine position.
Progression rule: Add 5–10 seconds only when your hips stay level, your ribs stay pulled down, and your lower back does not sag. When you can hold 45–60 seconds with perfect form, progress to harder variations such as plank shoulder taps, long-lever planks, weighted planks, or stability-ball planks.
Setup / Starting Position
- Place your forearms on the floor: Set your elbows directly under your shoulders. Keep your forearms parallel or slightly angled inward, depending on what feels most natural for your shoulders.
- Extend your legs behind you: Step both feet back until your body forms a long line. Keep your toes planted and press your heels gently backward.
- Stack your joints: Your shoulders should stay above your elbows. Your neck should stay neutral, and your head should not drop or lift excessively.
- Brace your core: Gently tighten your abs as if preparing for a light punch to the stomach. Pull your ribs down without rounding your upper back too much.
- Set your hips: Keep your hips in line with your shoulders and heels. Avoid lifting them too high or letting them sink toward the floor.
- Engage your glutes and quads: Squeeze your glutes lightly and tighten your thighs. This helps protect the lower back and creates full-body tension.
Setup cue: Think of your body as a strong plank of wood. Your waist should not collapse, your hips should not pike upward, and your spine should stay long from head to heels.
Execution (Step-by-Step)
- Start from the forearm position: Place your elbows under your shoulders and extend your legs fully behind you.
- Lift into the plank: Raise your knees and hips from the floor until your body forms a straight line from head to heels.
- Brace before holding: Tighten your abs, squeeze your glutes lightly, and press your forearms into the floor.
- Hold the line: Keep your hips level, your ribs controlled, and your lower back neutral. Do not let your stomach hang toward the floor.
- Keep your neck relaxed: Look down at the floor. Your chin should stay slightly tucked, and your head should remain in line with your spine.
- Breathe with control: Take slow breaths through your nose or mouth while keeping the abdominal wall tight. Avoid holding your breath for the entire set.
- Finish before form breaks: Lower your knees to the floor once you feel your hips dropping, shoulders collapsing, or lower back taking over.
Pro Tips & Common Mistakes
Pro Tips
- Push the floor away: Press your forearms down to keep your shoulders active and prevent chest collapse.
- Use a slight posterior pelvic tilt: Gently tuck your pelvis to reduce lower-back arching and increase abdominal tension.
- Keep the ribs down: Do not let the chest flare forward. Rib control helps the abs stay engaged.
- Squeeze the glutes lightly: Glute tension supports the pelvis and improves lower-back safety.
- Choose quality over duration: A clean 20-second plank is better than a shaky 90-second plank with poor alignment.
- Film yourself from the side: A side view makes it easier to check if your hips are too high or too low.
Common Mistakes
- Hips too high: This reduces core demand and turns the movement into a resting position.
- Hips sagging: This shifts stress into the lower back and weakens the anti-extension benefit.
- Looking forward: Lifting the head can strain the neck. Keep your gaze down.
- Holding your breath: Breath-holding creates unnecessary tension and limits endurance.
- Shoulders collapsing: Passive shoulders make the position unstable and uncomfortable.
- Chasing long holds too soon: Longer is not always better. Progress only when your form stays stable.
FAQ
What muscles does the Front Plank work?
The Front Plank mainly works the rectus abdominis, transverse abdominis, and obliques. It also trains the shoulders, glutes, quads, serratus anterior, and upper-back stabilizers because the whole body must stay firm during the hold.
Is the Front Plank good for abs?
Yes. The Front Plank is excellent for abs because it trains the core to resist extension. This helps build abdominal endurance, waist stability, and better control during other exercises. However, it should be combined with dynamic ab movements, proper nutrition, and progressive training for the best visible results.
How long should beginners hold a plank?
Beginners can start with 10–20 seconds per set. The hold should stop before the hips sag or the lower back feels strained. As control improves, increase the time gradually by 5–10 seconds.
Why do I feel planks in my lower back?
Lower-back discomfort usually happens when the hips drop, the ribs flare, or the glutes are relaxed. Shorten the hold, tighten your abs, squeeze your glutes lightly, and keep your pelvis slightly tucked.
Should I do planks every day?
You can practice short, low-fatigue planks frequently if your body tolerates them well. For harder plank training, use 2–4 sessions per week and allow recovery. Daily planks should stay clean, controlled, and pain-free.
Are forearm planks better than high planks?
Forearm planks often create more direct core demand because your body is closer to the floor. High planks also train the shoulders and wrists more. Both are useful, but the forearm plank is often the better choice for focused abs and waist stability.
How do I make the Front Plank harder?
You can make it harder by increasing hold time, narrowing your foot stance, using a long-lever position, adding a weight plate on your upper back, lifting one leg, or placing your forearms on a stability ball. Only progress when your basic plank is strong and pain-free.
Recommended Equipment
- Exercise Mat — gives your elbows and forearms a more comfortable surface during plank holds.
- Thick Yoga Mat — useful if you need extra cushioning for knees, elbows, or wrists during core training.
- Workout Interval Timer — helps you track plank holds, rest periods, and progressive time increases.
- Elbow Pads for Exercise — helpful for people who feel pressure on the elbows during forearm plank variations.
- Core Sliders — useful for advanced plank progressions such as body saws, plank knee tucks, and sliding mountain climbers.
Equipment tip: The Front Plank does not require any equipment, but a comfortable mat and a timer can make your training more consistent. For advanced progressions, core sliders can add controlled movement while keeping the same anti-extension focus.