Dumbbell Low Windmill: Proper Form, Core Benefits, Tips & FAQ
Learn the Dumbbell Low Windmill for stronger obliques, core control, hip mobility, and shoulder stability with form cues, sets, tips, FAQs, and gear.
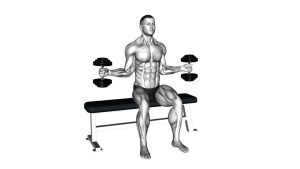
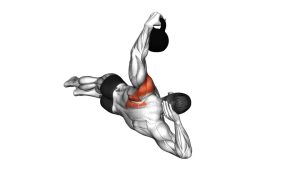
Dumbbell Low Windmill
This exercise works best when the movement stays smooth, slow, and balanced. Because the dumbbell remains on the low side, the drill strongly challenges the obliques, deep core stabilizers, hips, and shoulder stabilizers. Moreover, it teaches the body to control rotation and side-bending without collapsing through the waist.
Quick Overview
| Body Part | Obliques |
|---|---|
| Primary Muscle | Obliques |
| Secondary Muscle | Rectus abdominis, transverse abdominis, glutes, hamstrings, shoulders, upper back |
| Equipment | Dumbbell |
| Difficulty | Intermediate |
Sets & Reps (By Goal)
- Technique practice: 2–3 sets × 5–6 reps per side with a light dumbbell
- Core stability: 3–4 sets × 6–8 reps per side with slow control
- Strength and control: 3–5 sets × 5–8 reps per side with moderate load
- Mobility-focused warm-up: 1–2 sets × 5 reps per side using a very light weight
Progression rule: Add range and control before adding weight. Additionally, increase load only when the overhead arm stays stable and the torso moves without twisting or collapsing.
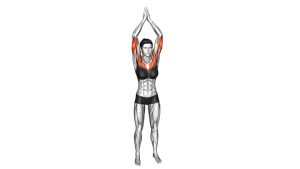
Setup / Starting Position
- Stand wide: Place your feet slightly wider than shoulder-width so you have a stable base.
- Hold the dumbbell low: Keep one dumbbell in the hand that will slide down the same-side leg.
- Reach the opposite arm overhead: Extend the top arm vertically and keep it steady.
- Brace gently: Tighten your core as if preparing for a controlled side hinge.
- Set your gaze: Keep the head controlled and avoid dropping suddenly into the movement.
Tip: Start with a lighter dumbbell than you would use for a normal side bend. This movement demands precision, not momentum.
Execution (Step-by-Step)
- Begin tall: Stand upright with the dumbbell at your side and the opposite arm extended overhead.
- Shift the hips: Push the hips slightly away from the dumbbell side as your torso begins to tilt.
- Slide the dumbbell down: Let the dumbbell travel close to your leg while keeping the movement slow.
- Keep the top arm stable: Maintain the overhead arm in a vertical line instead of letting it drift forward.
- Reach your controlled bottom position: Stop when you can no longer maintain a long spine and stable shoulder.
- Pause briefly: Hold the bottom position without bouncing.
- Return to standing: Drive through the feet, brace the core, and bring the torso back upright.
Pro Tips & Common Mistakes
- Move slowly: The windmill becomes more effective when every inch of the descent is controlled.
- Do not squat: Although the knees may soften slightly, the main action is a side hinge, not a knee bend.
- Keep the dumbbell close: Letting the weight drift away can increase stress and reduce control.
- Avoid rounding: Keep the chest open and the spine long throughout the movement.
- Control the overhead arm: Do not let the top shoulder collapse or wobble.
- Use both sides: Train the left and right sides evenly to build balanced oblique strength.
- Stop before compensation: A shorter clean range is better than a deeper unstable reach.
FAQ
What muscles does the Dumbbell Low Windmill work?
The Dumbbell Low Windmill mainly works the obliques. However, it also trains the deep core, glutes, hamstrings, shoulders, and upper back because the body must stabilize while the torso hinges sideways.
Is the Dumbbell Low Windmill good for abs?
Yes. It is especially useful for training the obliques and core stability. Instead of only flexing the abs, it teaches the core to control side-bending, rotation, and balance under load.
Should I use a heavy dumbbell?
Not at first. A light or moderate dumbbell is better because this exercise requires balance, shoulder control, and clean hip movement. Once your form is consistent, you can increase the weight gradually.
Why does my lower back feel this exercise?
Your lower back may take over if you round the spine, move too fast, use too much weight, or reach lower than your mobility allows. Reduce the load and keep the movement smaller until the obliques and hips control the motion.
Is this the same as a dumbbell side bend?
No. A side bend is usually a simpler up-and-down waist movement. By contrast, the Dumbbell Low Windmill uses a wider stance, a controlled hip shift, an overhead arm position, and more full-body stabilization.
Recommended Equipment
- Hex Dumbbell Set — ideal for progressive loading and stable dumbbell handling
- Adjustable Dumbbells — useful when you want multiple weight options without taking up much space
- Non-Slip Exercise Mat — helps improve foot grip and comfort during standing core exercises
- Weightlifting Gloves — improves grip security when holding the dumbbell during slow reps
- Mobility Stick — useful for practicing hinge alignment and shoulder positioning before loading
Tip: Choose equipment that helps your form stay stable. For this exercise, control matters more than using the heaviest dumbbell possible.