Standing Air Bike Exercise: Core Form, Oblique Tips, Sets & FAQ
Learn the Standing Air Bike to train abs, obliques, balance, and coordination with step-by-step form, sets by goal, mistakes, FAQs, and equipment.
Standing Air Bike
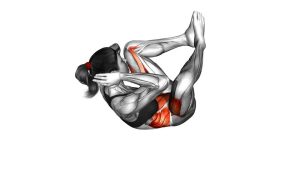
This exercise works best when the movement stays controlled, upright, and rhythmic. The knee should lift toward the torso while the opposite elbow travels diagonally toward it. However, the goal is not to collapse the chest or force the elbow to touch the knee. Instead, focus on a smooth cross-body crunch, light torso rotation, and steady balance through the standing leg.
Quick Overview
| Body Part | Core |
|---|---|
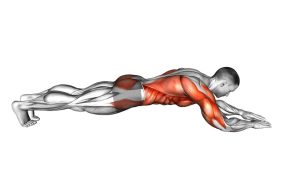
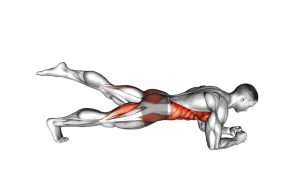
| Primary Muscle | Rectus abdominis |
| Secondary Muscle | Obliques, hip flexors, and balance stabilizers |
| Equipment | No equipment required |
| Difficulty | Beginner to intermediate, depending on tempo and knee height |
Sets & Reps (By Goal)
- Beginner core control: 2–3 sets × 8–10 reps per side with slow, clean movement.
- Core endurance: 3–4 sets × 12–20 alternating reps with steady breathing.
- Warm-up activation: 1–2 sets × 20–30 total reps at an easy pace.
- Fat-loss circuit training: 3–5 rounds × 30–45 seconds with controlled rhythm.
- Balance and coordination: 2–3 sets × 6–8 reps per side with a brief pause at the top.
Progression rule: First improve balance and control. Then increase reps, time, or tempo. Finally, raise the knee slightly higher only if your torso stays tall and your movement remains smooth.
Setup / Starting Position
- Stand tall: Place your feet about hip-width apart and keep your weight balanced.
- Set your posture: Lift the chest gently, keep the ribs controlled, and avoid leaning backward.
- Prepare your arms: Bring the hands near the sides of the head or move the opposite arm toward the lifting knee.
- Brace lightly: Tighten the core enough to stay stable, but do not hold your breath.
- Look forward: Keep your head neutral so the neck does not lead the crunch.
Start slowly if balance is challenging. For better control, perform the exercise near a wall or stable surface without leaning on it.
Execution (Step-by-Step)
- Lift one knee: Raise one knee toward the front of the body while staying tall through the spine.
- Rotate across: Bring the opposite elbow diagonally toward the lifted knee.
- Crunch lightly: Contract the abs and obliques as the elbow and knee move closer together.
- Pause briefly: Hold the top position for a short moment without forcing the elbow to touch the knee.
- Return with control: Lower the foot back down and bring the torso back to center.
- Switch sides: Repeat the same pattern with the opposite knee and opposite elbow.
- Continue alternating: Keep the rhythm smooth, balanced, and consistent from rep to rep.
Pro Tips & Common Mistakes
- Stay upright: Do not fold your whole torso forward just to reach the knee.
- Use controlled rotation: Rotate through the trunk slightly, but avoid twisting aggressively.
- Lift with control: Avoid swinging the knee upward with momentum.
- Keep the standing foot grounded: A stable base helps the core work more effectively.
- Do not rush: Faster reps can reduce core tension and turn the move into a loose march.
- Exhale during the crunch: Breathing out helps the abs contract naturally.
- Reset between reps: Return to a tall position before switching sides.
- Reduce range when needed: If balance breaks down, lift the knee lower and move slower.
FAQ
What muscles does the Standing Air Bike work?
The Standing Air Bike mainly works the abs, especially the rectus abdominis. In addition, the cross-body rotation trains the obliques, while the hip flexors help lift the knee. The standing leg also helps stabilize your balance.
Is the Standing Air Bike good for beginners?
Yes. It is beginner-friendly because it uses bodyweight only and does not require floor work. However, beginners should move slowly, use a moderate knee lift, and focus on posture before increasing speed.
Should my elbow touch my knee?
Not necessarily. The main goal is controlled cross-body core contraction. If your elbow and knee come close, that is enough. Forcing contact may cause excessive rounding or loss of balance.
Can I use the Standing Air Bike for cardio?
Yes, it can be used in a low-impact cardio circuit when performed continuously. Still, maintain clean form. If the movement becomes rushed or sloppy, slow down and return to controlled reps.
How is this different from a floor bicycle crunch?
A floor bicycle crunch is performed lying down and usually creates more direct abdominal flexion. By contrast, the Standing Air Bike is upright, lower impact, and adds more balance and coordination demand.
Why do I feel this in my hip flexors?
Some hip flexor involvement is normal because each rep includes a knee lift. However, if the hip flexors take over completely, slow down, brace the core, and avoid lifting the knee higher than you can control.
Recommended Equipment (Optional)
- Exercise Mat — useful for warm-ups, core circuits, and follow-up floor exercises.
- Adjustable Ankle Weights — optional progression for advanced users who can control the knee lift safely.
- Mini Resistance Bands — helpful for pairing this exercise with glute activation and lower-body warm-ups.
- Fitness Interval Timer — ideal for timed core circuits, warm-up rounds, and conditioning sessions.
- Balance Pad — advanced option for improving standing stability and coordination.
Tip: Equipment is optional for this movement. Start with bodyweight first, then add tools only when your balance, posture, and cross-body crunch pattern stay consistent.