Bodyweight Windmill: Form, Core Benefits, Sets, Tips & FAQ
Learn the Bodyweight Windmill for core control, oblique strength, hip mobility, and shoulder stability with safe form, sets, tips, FAQs, and equipment.
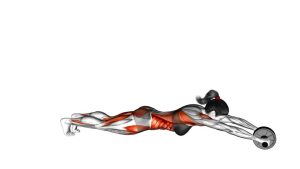
Bodyweight Windmill
The Bodyweight Windmill works best when the movement is slow, balanced, and precise. Instead of dropping straight forward, you hinge the hips back and lower the torso diagonally while keeping the chest open. Meanwhile, the top arm stays vertical as a visual guide. Because the exercise uses bodyweight only, it is useful as a warm-up drill, mobility movement, core-control exercise, or preparation for loaded windmill variations.
Quick Overview
| Body Part | Core |
|---|---|
| Primary Muscle | Obliques |
| Secondary Muscle | Hamstrings, glutes, shoulders, spinal stabilizers, and hip stabilizers |
| Equipment | None |
| Difficulty | Beginner to intermediate, depending on mobility and balance |
Sets & Reps (By Goal)
- Mobility warm-up: 2–3 sets × 5–8 reps per side with a slow, controlled tempo.
- Core control: 3–4 sets × 6–10 reps per side with a brief pause at the bottom.
- Hip hinge practice: 2–3 sets × 6–8 reps per side, focusing on pushing the hips back.
- Active flexibility: 2–3 sets × 5–6 reps per side with a 2–3 second bottom hold.
Progression rule: First improve control and range of motion. Then, increase reps gradually. Only progress to a loaded windmill when the bodyweight version feels stable on both sides.
Setup / Starting Position
- Stand wide: Place your feet wider than shoulder-width to create a stable base.
- Set the arms: Reach one arm overhead while the opposite arm hangs toward the same-side leg.
- Brace gently: Keep your ribs controlled, your spine long, and your shoulders relaxed.
- Open the chest: Turn the torso slightly so the raised arm can stay stacked above the shoulder.
- Choose your range: Before moving, decide whether you will reach to the thigh, shin, ankle, or floor.
Tip: A wider stance usually makes the movement easier to balance. However, the stance should still feel natural and controlled.
Execution (Step-by-Step)
- Start tall: Stand with one arm overhead and keep your eyes either forward or slightly toward the raised hand.
- Hinge the hips: Push your hips back as the torso begins to lower diagonally.
- Slide the lower hand: Let the opposite hand travel down the leg toward the shin, ankle, or foot.
- Keep the top arm stacked: Maintain the overhead arm in a vertical line instead of letting it drift forward.
- Rotate gently: Keep the chest open while lowering. Do not collapse toward the floor.
- Pause with control: Stop at your comfortable lowest point without bouncing or forcing range.
- Return slowly: Drive through the hips and core to rise back up along the same path.
- Reset before repeating: Stand tall again, stabilize your posture, and then begin the next rep.
Pro Tips & Common Mistakes
- Keep the top arm vertical: This helps maintain shoulder position and torso alignment.
- Move through the hips: If the lower back does all the work, reduce depth and hinge more deliberately.
- Avoid rushing: A slow tempo improves balance, mobility, and core tension.
- Do not force the floor reach: Touching the floor is not required. Clean range matters more than depth.
- Keep the chest open: Avoid turning the torso straight down toward the floor.
- Control the knees: Keep the legs mostly extended, but do not lock the knees aggressively.
- Use both sides evenly: Because mobility may differ side to side, match the weaker side’s range.
- Breathe calmly: Exhale slightly as you lower, then inhale or reset as you return upright.
FAQ
What muscles does the Bodyweight Windmill work?
The Bodyweight Windmill mainly targets the obliques and deep core stabilizers. Additionally, it involves the hamstrings, glutes, shoulders, hips, and spinal stabilizers because the movement requires balance, rotation, and controlled hinging.
Is the Bodyweight Windmill good for beginners?
Yes, beginners can use it when the range of motion is controlled. However, beginners should avoid forcing the hand to the floor. Instead, reaching to the thigh or shin is enough while learning the pattern.
Should my hand touch the floor?
Not necessarily. The goal is clean movement, not maximum depth. If touching the floor causes rounding, twisting discomfort, or loss of balance, stop higher and maintain better alignment.
Why does my lower back feel this exercise?
Your lower back may feel overloaded if you bend forward instead of hinging through the hips. Therefore, reduce your range, push the hips back, keep the core engaged, and avoid collapsing the chest downward.
Can I do Bodyweight Windmills every day?
You can perform light Bodyweight Windmills frequently as a mobility drill. Even so, keep the volume moderate and avoid daily high-effort sets if your hips, hamstrings, shoulders, or lower back feel sore.
Recommended Equipment (Optional)
- Exercise Mat — provides a comfortable and stable surface for bodyweight mobility work.
- Yoga Blocks — useful for shortening the reach if you cannot comfortably reach the floor.
- Foam Roller — helpful for warming up the upper back, hips, and hamstrings before windmills.
- Stretching Strap — supports hamstring and hip mobility work outside the exercise.
- Non-Slip Training Shoes — improves foot grip and stance stability during standing mobility drills.
Tip: Equipment is optional for the Bodyweight Windmill. However, blocks and a mat can make the exercise more comfortable, especially when mobility is limited.