Opposite Crunch: Proper Form, Core Benefits, Sets, Tips & FAQ
Learn the Opposite Crunch for stronger abs and better core control. Includes setup, step-by-step form, sets, mistakes, FAQs, and gear.
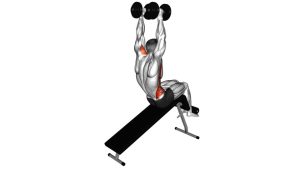
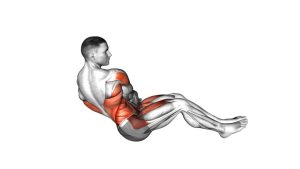
Opposite Crunch
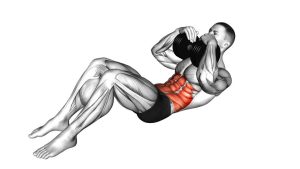
This exercise is best performed with slow, precise control. In the uploaded video, the movement starts from a partially compressed position: the arms reach upward, the knees stay bent, and the feet remain elevated. Then, the upper torso curls toward the thighs while the knees travel slightly closer to the chest. Because the movement is short, every rep should feel intentional rather than rushed.
Quick Overview
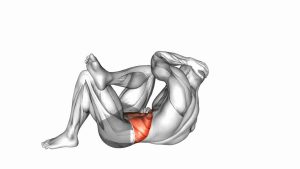
| Body Part | Core |
|---|---|
| Primary Muscle | Rectus abdominis |
| Secondary Muscle | Hip flexors, deep core stabilizers, obliques |
| Equipment | No equipment required. An exercise mat is optional for comfort. |
| Difficulty | Beginner to intermediate, depending on tempo and control |
Sets & Reps (By Goal)
- Core activation: 2–3 sets × 8–12 controlled reps, resting 30–45 seconds.
- Muscle endurance: 3–4 sets × 12–20 reps, using a smooth and steady tempo.
- Strength-focused control: 3–5 sets × 6–10 slow reps with a 1–2 second squeeze at the top.
- Beginner practice: 2 sets × 6–8 reps, keeping the knees bent and the range small.
Progression rule: First improve control and breathing. Then, add reps, slow the lowering phase, or pause longer at the top before increasing total volume.
Setup / Starting Position
- Lie on your back: Position your body flat on the floor or on an exercise mat.
- Lift your legs: Bend your knees and bring them above your hips, keeping the feet elevated.
- Reach your arms upward: Extend both arms toward the ceiling, roughly above the shoulders.
- Set your ribs down: Lightly brace your abs so the lower back does not excessively arch.
- Keep the head calm: Let the neck follow the torso naturally without yanking the chin forward.
In the video, the exercise starts from a compact position rather than a fully stretched position. Therefore, the focus should remain on controlled compression and a clean abdominal squeeze.
Execution (Step-by-Step)
- Brace gently: Before moving, tighten your core just enough to keep your ribs and pelvis controlled.
- Curl the upper body: Lift your head and shoulders off the floor as your chest moves toward your thighs.
- Draw the knees inward: At the same time, bring your knees slightly closer to your chest.
- Reach toward the feet: Allow your arms to travel forward as your torso compresses.
- Squeeze at the top: Pause briefly when your abs feel fully shortened.
- Lower with control: Return your shoulders and legs toward the starting position without dropping or swinging.
Pro Tips & Common Mistakes
- Think “ribs to pelvis”: This cue helps you crunch from the abs instead of simply lifting the head.
- Keep the reps short and clean: Since the exercise is already compact, quality matters more than range.
- Avoid leg swinging: Use your abs to guide the knees inward rather than using momentum.
- Do not pull the neck: The arms should reach forward, but they should not yank the upper body.
- Control the return: The lowering phase builds control, so avoid collapsing back to the floor.
- Breathe out as you crunch: Exhaling during the squeeze can improve abdominal contraction.
- Keep the lower back managed: If your back arches during the return, shorten the leg movement.
FAQ
What muscles does the Opposite Crunch work?
The Opposite Crunch mainly targets the rectus abdominis, especially because the torso and pelvis move toward each other. Additionally, the hip flexors and deep core muscles assist with leg position and control.
Is the Opposite Crunch good for lower abs?
Yes, it can strongly involve the lower portion of the abs because the knees move inward and the pelvis curls slightly. However, the entire rectus abdominis works together during the movement.
Should my shoulders leave the floor?
Yes. During the crunch phase, your head and shoulders should lift as your chest moves toward your thighs. Nevertheless, avoid forcing the neck forward or using a jerky motion.
Why do I feel this in my hip flexors?
Some hip flexor involvement is normal because your legs stay lifted. However, if the hip flexors dominate, reduce the range, bend the knees more, and focus on curling the pelvis instead of swinging the legs.
Is this exercise beginner-friendly?
Yes, it can be beginner-friendly when performed slowly with bent knees and a small range of motion. For beginners, fewer reps with better control are more useful than high-volume rushed sets.
Recommended Equipment (Optional)
- Exercise Mat — provides cushioning for your back during floor-based core work.
- Thick Yoga Mat — useful if you need extra comfort for the spine and hips.
- Ab Workout Mat — supports repeated crunch variations with better floor comfort.
- Core Sliders — helpful for pairing this exercise with other core stability movements.
- Mini Resistance Bands — useful for adding glute and hip activation work alongside ab training.
Tip: Equipment is not required for the Opposite Crunch. However, a comfortable mat can make the movement easier to practice consistently, especially when training on a hard floor.