V-Up with Clap: Proper Form, Core Benefits, Sets, Tips & FAQ
Learn the V-Up with Clap for stronger abs, hip flexors, and core control. Step-by-step form, sets by goal, mistakes, FAQs, and gear.
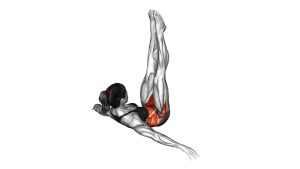
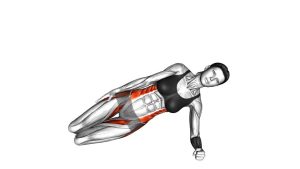
V-Up with Clap
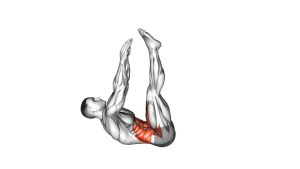
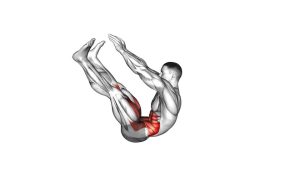
This exercise works best when the upper body and lower body rise at the same time. Because the movement combines spinal flexion, hip flexion, and balance on the glutes, it demands strong core tension from start to finish. Therefore, every rep should feel controlled, crisp, and coordinated rather than rushed.
Quick Overview
| Body Part | Core |
|---|---|
| Primary Muscle | Rectus abdominis |
| Secondary Muscle | Hip flexors, obliques, quadriceps, deep core stabilizers |
| Equipment | No equipment required; exercise mat optional |
| Difficulty | Intermediate to advanced |
Sets & Reps (By Goal)
- Core strength: 3–4 sets × 8–12 reps with controlled lowering
- Muscular endurance: 2–4 sets × 12–20 reps at a smooth, steady tempo
- Bodyweight conditioning: 3–5 rounds × 20–30 seconds, resting 30–60 seconds
- Technique practice: 2–3 sets × 5–8 slow reps with a brief pause at the top
Progression rule: First, improve control and reduce swinging. Then, add reps or slow the lowering phase before increasing total volume.
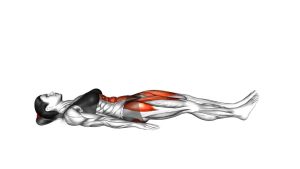
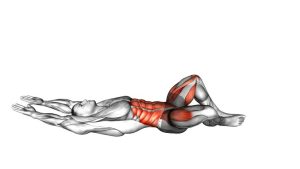
Setup / Starting Position
- Lie on your back: Start on the floor with your legs extended and your arms reaching overhead or slightly behind you.
- Create core tension: Brace your abs gently and keep your lower back from arching aggressively.
- Keep the legs together: Extend both knees and point the toes slightly if comfortable.
- Prepare the arms: Keep your arms long so they can travel forward toward the feet during the lift.
- Begin from a hover if possible: For a harder version, keep the heels slightly off the floor between reps.
Tip: If the full version feels too difficult, bend your knees slightly or reduce the range of motion until your core stays in control.
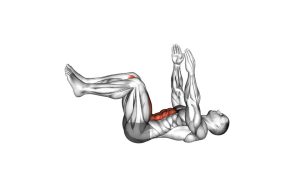
Execution (Step-by-Step)
- Brace before you move: Tighten your abs lightly and keep your ribs from flaring upward.
- Lift together: Raise your legs and upper body at the same time instead of lifting one side first.
- Reach toward the feet: Bring your hands forward as your legs rise, creating a strong V-shape at the top.
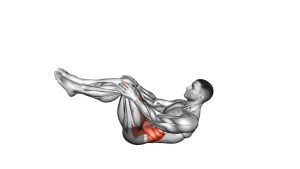
- Clap at peak contraction: When your hands reach near your feet, clap once while balancing on your glutes.
- Lower with control: Open the body back toward the floor while keeping the legs together and the abs engaged.
- Reset without collapsing: Return close to the starting position, then begin the next rep without using momentum.
Pro Tips & Common Mistakes
- Move both halves together: The torso and legs should rise as one coordinated unit.
- Avoid throwing the arms: Use the arms to reach, not to yank your body upward.
- Control the descent: Lowering slowly builds more core strength than dropping back to the floor.
- Do not overarch the lower back: If your back lifts excessively at the bottom, shorten the range.
- Keep your neck neutral: Avoid pulling the head forward or straining through the throat.
- Clap lightly: The clap is a timing cue, not a reason to lose posture or balance.
- Use bent knees when needed: A slight knee bend can help you maintain better control.
FAQ
What muscles does the V-Up with Clap work?
The V-Up with Clap mainly works the rectus abdominis. In addition, it trains the hip flexors, obliques, quadriceps, and deep core stabilizers because the legs and torso must lift together.
Is the V-Up with Clap beginner-friendly?
Not usually. It is better for intermediate and advanced exercisers. However, beginners can modify it by bending the knees, reducing the range, or performing standard crunches first.
Should my feet touch the floor between reps?
They can touch lightly if you need a reset. However, keeping the feet slightly elevated increases core tension and makes the exercise harder.
Why does my lower back hurt during V-Ups?
Lower-back discomfort often happens when the abs lose control and the lower back arches during the descent. Therefore, reduce the range, bend the knees, or switch to an easier core variation.
How do I make the V-Up with Clap harder?
Slow down the lowering phase, pause longer at the top, keep your legs straighter, or avoid resting between reps. Still, only progress when your form stays clean.
Recommended Equipment (Optional)
- Exercise Mat — adds floor comfort during repeated V-up reps
- Ab Mat — useful for core training support and abdominal range practice
- Ankle Weights — optional progression for advanced users only
- Core Sliders — helpful for related core progressions and bodyweight ab drills
- Foam Roller — useful for warm-ups, mobility work, and recovery after core sessions
Tip: Equipment is optional for this exercise. For most people, a quality mat is the most useful tool because the V-Up with Clap is performed directly on the floor.