Lying Cross Ankle Tap: Core Form, Oblique Tips, Sets & FAQ
Learn the Lying Cross Ankle Tap to train abs and obliques with controlled cross-body crunches, elevated legs, form cues, sets, tips, FAQs, and gear.
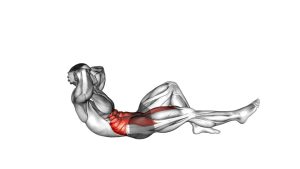
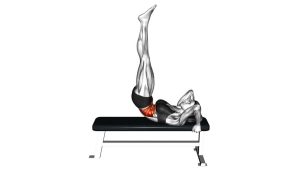
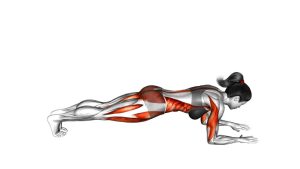
Lying Cross Ankle Tap
This movement works best when each repetition stays controlled, compact, and deliberate. Instead of rushing side to side, lift the shoulders slightly, rotate through the trunk, and reach toward the ankles with a smooth cross-body motion. Additionally, keep the legs steady so the movement comes from the core rather than from swinging the lower body.
Quick Overview
| Body Part | Obliques |
|---|---|
| Primary Muscle | Rectus abdominis and obliques |
| Secondary Muscle | Hip flexors, transverse abdominis, and deep core stabilizers |
| Equipment | No equipment required; exercise mat optional |
| Difficulty | Beginner to Intermediate |
Sets & Reps (By Goal)
- Core control: 2–3 sets × 8–12 reps per side with slow, clean movement.
- Oblique endurance: 3–4 sets × 12–16 total alternating reps with steady breathing.
- Beginner practice: 2 sets × 6–8 reps per side with short rests as needed.
- Bodyweight abs finisher: 2–3 rounds × 20–30 seconds while keeping the legs stable.
Progression rule: First improve control and range. Then add reps, time, or slower pauses at the top before increasing difficulty.
Setup / Starting Position
- Lie on your back: Start on a mat with your spine supported and your head facing upward.
- Lift the legs: Raise both legs off the floor with the knees slightly bent, keeping the ankles close together or lightly crossed.
- Set the arms: Keep the arms near your sides or reaching toward the legs so your hands can travel toward the ankles.
- Brace the core: Gently tighten the abs before lifting the shoulders. This helps protect the lower back.
- Keep the movement small: Prepare for a short crunch and cross-body reach, not a full sit-up.
Tip: If the legs are too difficult to hold up, bend the knees more and reduce the lever length.
Execution (Step-by-Step)
- Lift the upper body: Curl the shoulders slightly off the floor while keeping the lower back controlled.
- Rotate across the body: Turn the torso toward one side and reach the hands toward the opposite ankle area.
- Tap or reach near the ankle: Move deliberately toward the ankle without yanking the neck or swinging the legs.
- Return to center: Lower slightly and bring the torso back to a neutral lifted position.
- Repeat on the other side: Rotate the opposite direction and reach toward the other ankle area.
- Continue alternating: Keep the tempo smooth until all reps are complete.
Pro Tips & Common Mistakes
- Reach with the ribs, not just the hands: Rotate the torso so the obliques do the work.
- Avoid pulling the neck: Keep the neck long and let the core lift the shoulders.
- Control the legs: The elevated legs should stay steady instead of bouncing with each tap.
- Do not over-crunch: A short, controlled lift is enough to create strong abdominal tension.
- Keep breathing: Exhale during the reach and inhale as you return toward center.
- Reduce range if needed: If your lower back lifts too much, bend the knees more or tap closer to the calves.
FAQ
What muscles does the Lying Cross Ankle Tap work?
The exercise mainly targets the abs and obliques. Because the legs stay lifted, the hip flexors and deep core stabilizers also assist throughout the movement.
Is the Lying Cross Ankle Tap good for beginners?
Yes, it can work for beginners when the range is small and controlled. However, beginners should bend the knees more and rest when the lower back starts to arch.
Should my ankles be crossed during the exercise?
In the video, the ankles appear close together or lightly crossed. Therefore, you can keep them lightly crossed if comfortable, but avoid forcing the legs into an uncomfortable position.
Why do I feel this in my hip flexors?
Some hip flexor activity is normal because the legs stay elevated. However, if the hip flexors dominate, bend the knees more, slow down, and focus on pulling the ribs toward the pelvis.
How can I make the Lying Cross Ankle Tap harder?
You can slow the tempo, pause briefly near each ankle, or keep the legs slightly straighter. Still, only progress if your lower back remains controlled.
Recommended Equipment (Optional)
- Exercise Mat — adds comfort and support for floor-based core training.
- Non-Slip Yoga Mat — helps keep your body stable during alternating ankle taps.
- Light Ankle Weights — optional progression for advanced users only.
- Core Sliders — useful for pairing this move with other core stability exercises.
- Ab Training Mat — provides extra lumbar support for some floor-based abdominal drills.
Tip: Equipment is optional for this movement. For best results, master control with bodyweight before adding resistance.