Side Two Front Toe Touching: Form, Core Benefits, Sets & Tips
Learn Side Two Front Toe Touching for stronger abs, obliques, hip flexors, and core control with step-by-step form, sets, tips, FAQs, and gear.
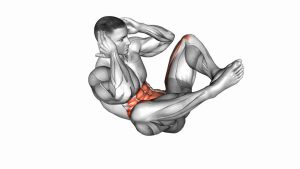
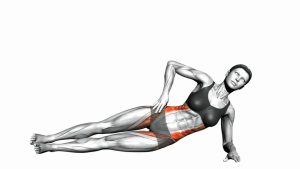
Side Two Front Toe Touching
This movement is useful for home workouts, bodyweight core circuits, athletic warm-ups, and abdominal conditioning routines. Because the arm reaches toward the opposite raised foot, the exercise adds a light rotational demand that helps the obliques work harder than they would during a basic straight crunch. The lower body also stays active because each leg must lift, lower, and switch without losing control.
For best results, keep your reps smooth and deliberate. The shoulders should lift because the abs are curling the torso, not because the neck is pulling forward. The working leg should rise with control, while the non-working leg stays long and stable. A clean rep looks quiet, balanced, and coordinated.
Quick Overview
| Body Part | Core |
|---|---|
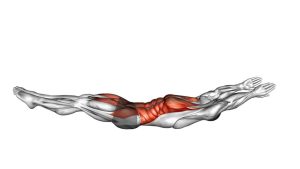
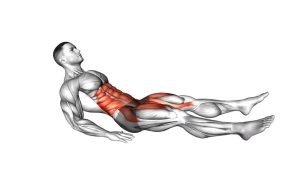
| Primary Muscle | Rectus abdominis |
| Secondary Muscle | Obliques, hip flexors, transverse abdominis, deep core stabilizers |
| Equipment | No equipment required; optional exercise mat |
| Difficulty | Beginner to Intermediate |
Sets & Reps (By Goal)
- Core activation: 2 sets × 8–10 reps per side with slow control.
- General ab training: 3 sets × 10–15 reps per side with 45–60 seconds rest.
- Muscular endurance: 3–4 sets × 16–24 total alternating reps.
- Beginner practice: 2 sets × 6–8 reps per side using a smaller leg raise.
- Core circuit finisher: 30–45 seconds of continuous alternating reps.
Progression rule: Add reps only when your lower back stays controlled and your shoulders lift without neck pulling. Quality should come before speed.
Setup / Starting Position
- Lie on your back: Use a mat if the floor feels uncomfortable. Keep your body long and centered.
- Extend your legs: Start with both legs straight. Keep them close together or slightly separated for balance.
- Position your arms: Place your arms out to the sides or slightly overhead, depending on the variation shown.
- Brace lightly: Draw the ribs down and gently tighten the abs before the first rep.
- Keep the neck neutral: Avoid forcing the chin into the chest. Let the upper back lift through abdominal effort.
If the full straight-leg version feels too hard, bend the knees slightly or reduce the height of each reach.
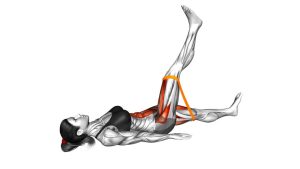
Execution (Step-by-Step)
- Begin from the floor: Lie flat with your legs extended and your arms ready to reach. Take a breath in before moving.
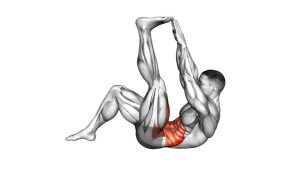
- Lift one leg: Raise one straight leg toward the ceiling while keeping the opposite leg controlled near the floor.
- Reach toward the toes: Curl your upper back off the floor and reach the opposite hand toward the raised foot.
- Touch or reach close: Aim for the toes, ankle, or shin. Do not force the range if your hamstrings are tight.
- Lower with control: Return the arm and leg toward the starting position without dropping suddenly.
- Switch sides: Lift the opposite leg and reach with the opposite hand in the same smooth pattern.
- Continue alternating: Keep the rhythm steady while maintaining abdominal tension from rep to rep.
Pro Tips & Common Mistakes
Pro Tips
- Lead with the ribs: Think about bringing the ribs toward the pelvis instead of throwing the arm upward.
- Use a controlled exhale: Exhale as you reach. This helps the abs contract more effectively.
- Keep the leg active: Point or flex the foot lightly so the raised leg stays straight and controlled.
- Reach across the body: The cross-body reach helps the obliques contribute to the movement.
- Move evenly: Match the range, speed, and control on both sides.
Common Mistakes
- Pulling the neck: Keep the neck relaxed and let the abs lift the shoulders.
- Swinging the leg: A fast leg swing reduces core control and may stress the hip flexors.
- Arching the lower back: Brace gently and lower the leg only as far as you can control.
- Holding the breath: Use steady breathing to maintain rhythm and reduce tension.
- Chasing the toes aggressively: Touching the foot is less important than clean abdominal control.
FAQ
What muscles does Side Two Front Toe Touching work?
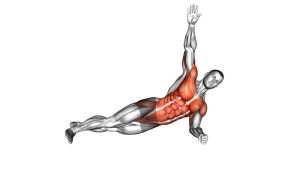
It mainly works the rectus abdominis. It also trains the obliques, hip flexors, and deep core stabilizers because the movement includes alternating leg lifts and cross-body reaching.
Is Side Two Front Toe Touching good for beginners?
Yes, but beginners should use a smaller range of motion. You can bend the knees slightly, reach toward the shin instead of the toes, or perform fewer reps until your core control improves.
Should my lower back stay flat?
Your lower back should stay controlled and should not aggressively arch away from the floor. A small natural curve is normal, but losing control means the range is too large or the tempo is too fast.
Do I need to actually touch my toes?
No. Reaching close to the toes is enough. If your hamstrings are tight, touch the shin or ankle instead. The main goal is abdominal contraction, not flexibility.
How can I make the exercise harder?
Slow down the lowering phase, add a brief pause at the top, increase total reps, or keep the non-working leg slightly above the floor. Only progress when your back and neck stay comfortable.
Recommended Equipment
- Exercise Mat — adds cushioning for your spine, hips, and shoulders during floor-based core training.
- Non-Slip Yoga Mat — helps keep your body stable while alternating the legs and reaching across the body.
- Adjustable Ankle Weights — useful for advanced progression after you master clean bodyweight reps.
- Small Pilates Ball — can support modified core drills or add variety to ab training routines.
- Core Sliders — helpful for building additional core control with related bodyweight exercises.
Tip: Start with only a mat. Add resistance tools later when your reps stay smooth, controlled, and pain-free.