Lying 90-Degrees Leg Tap Crunch: Form, Core Benefits & Tips
Learn the Lying 90-Degrees Leg Tap Crunch for stronger abs, better core control, clean tabletop form, safe reps, common mistakes, and FAQs.
Lying 90-Degrees Leg Tap Crunch
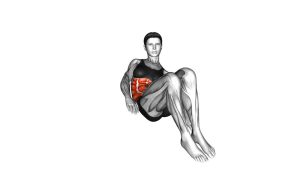
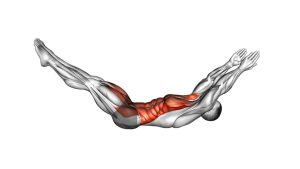
This movement is ideal for training the rectus abdominis while also improving tabletop core control. Because the legs stay lifted, the core must stabilize the pelvis as the upper body curls forward. As a result, the exercise can feel more demanding than a basic crunch, even though the range of motion stays compact.
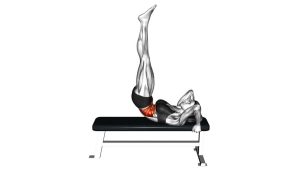
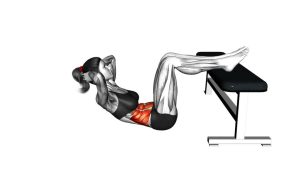
During the video, the exercise is performed with the subject lying on her back, knees bent, hips flexed, and arms reaching toward the lower thighs or knees. The legs remain mostly fixed throughout the movement. Meanwhile, the upper shoulders lift and lower in a steady rhythm without a full sit-up, hip swing, or twisting action.
Quick Overview
| Body Part | Abs |
|---|---|
| Primary Muscle | Rectus abdominis |
| Secondary Muscle | Deep core stabilizers, hip flexors as stabilizers, obliques for light anti-rotation support |
| Equipment | No equipment required; optional exercise mat for comfort |
| Difficulty | Beginner to intermediate, depending on control and hold time |
Sets & Reps (By Goal)
- Beginner core control: 2–3 sets × 8–12 reps with slow, clean movement
- Ab strength and endurance: 3–4 sets × 12–18 reps with steady breathing
- Core activation warm-up: 1–2 sets × 8–10 reps before a main workout
- Time-under-tension focus: 2–3 sets × 20–30 seconds using short continuous reps
Progression rule: First improve control and breathing. Then, add reps or extend the set duration. Avoid progressing by pulling harder through the neck or swinging the arms.
Setup / Starting Position
- Lie on your back: Use a flat floor surface and keep your spine comfortable against the ground.
- Raise your legs: Bring your hips and knees into a 90-degree tabletop position.
- Set your arms: Reach both arms upward and slightly forward toward your knees or lower thighs.
- Lift slightly: Begin with your head and upper shoulders lightly elevated if that position feels controlled.
- Brace gently: Keep your ribs down and avoid arching your lower back away from the floor.
Tip: Your legs should act like a stable reference point. Therefore, avoid pulling the knees toward the chest during the crunch.
Execution (Step-by-Step)
- Start in tabletop: Keep your hips and knees bent around 90 degrees while your arms reach toward your legs.
- Curl the upper body: Lift your shoulders slightly higher off the floor by contracting your abs.
- Reach forward: Move your hands toward your knees or lower thighs without yanking the neck forward.
- Pause briefly: Hold the top position for a moment while keeping the legs still.
- Lower with control: Return the shoulders toward the floor slowly, but avoid fully relaxing between reps if you want continuous tension.
- Repeat smoothly: Continue with the same small range, steady tempo, and stable leg position.
Pro Tips & Common Mistakes
- Keep the legs fixed: The knees should stay stacked over the hips instead of drifting closer to the chest.
- Use a compact crunch: This is not a full sit-up. Instead, focus on lifting the shoulder blades slightly.
- Reach, don’t swing: Let the arms guide the crunch without creating momentum.
- Control the lowering phase: Lower slowly so the abs keep working through the full rep.
- Avoid neck pulling: Keep the neck relaxed and let the torso drive the movement.
- Keep breathing: Exhale as you crunch up, then inhale as you lower down.
- Protect the lower back: If your lower back arches, shorten the set or bring the knees slightly closer only if needed for control.
FAQ
What muscles does the Lying 90-Degrees Leg Tap Crunch work?
This exercise mainly targets the rectus abdominis, especially through the crunching action of the upper torso. In addition, the deep core muscles help stabilize the pelvis while the legs stay in the tabletop position.
Is this the same as a reverse crunch?
No. In a reverse crunch, the pelvis and legs usually move more actively. However, in this exercise, the legs stay mostly fixed while the upper body performs a short forward crunch.
Should my feet tap the floor during this exercise?
Based on the visible movement, the legs remain lifted in a 90-degree position. Therefore, this version does not show the feet tapping the floor. The main action is the upper-body crunch and reach.
Why do I feel this in my neck?
Neck tension often happens when the head leads the movement instead of the abs. To fix this, reduce the range, keep your gaze steady, and think about lifting the shoulders with your ribs rather than pulling your chin forward.
Can beginners do this exercise?
Yes, beginners can use this exercise if they can hold the tabletop position without lower-back discomfort. However, they should start with fewer reps, slower movement, and shorter sets.
Recommended Equipment (Optional)
- Exercise Mat — provides cushioning for the spine and improves comfort during floor crunches
- Thick Yoga Mat — useful if you need extra padding under the back and hips
- Pilates Mat — a supportive option for controlled ab exercises and low-impact core training
- Ab Workout Mat — helps make repeated crunch movements more comfortable on hard floors
- Core Sliders — optional tool for progressing into other core stability drills after mastering this exercise
Tip: Equipment is optional for this exercise. However, a comfortable mat can help you focus on abdominal control instead of floor pressure.