Dead Bug with Stability Ball: Core Form, Sets, Tips & FAQ
Learn the Dead Bug with Stability Ball for stronger abs, better core control, and stable movement. Includes setup, steps, sets, mistakes, FAQs, and gear.
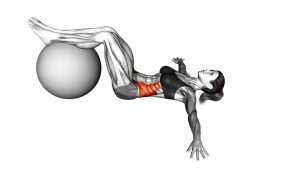
Dead Bug with Stability Ball
This exercise works best when every rep stays slow, quiet, and controlled. Because the ball sits between the hands and knees, it gives immediate feedback: if the torso rotates, the hips shift, or the core relaxes, the ball may move or lose pressure. Therefore, this variation is excellent for building abdominal control, improving coordination, and practicing a stable tabletop position.
Quick Overview
| Body Part | Core |
|---|---|
| Primary Muscle | Rectus abdominis and deep core stabilizers |
| Secondary Muscle | Obliques, hip flexors, transverse abdominis, and shoulder stabilizers |
| Equipment | Stability ball and exercise mat |
| Difficulty | Beginner to intermediate, depending on range of motion and control |
Sets & Reps (By Goal)
- Core activation: 2 sets × 6–8 reps per side with slow control.
- Beginner strength: 2–3 sets × 8–10 reps per side with a short pause in the extended position.
- Core endurance: 3 sets × 10–14 reps per side while keeping the ball steady.
- Warm-up preparation: 1–2 sets × 6–8 reps per side before strength training.
- Control-focused training: 3–4 sets × 5–8 reps per side with a 2–3 second lowering tempo.
Progression rule: First increase control, then increase range. Once your lower back stays stable and the ball does not shift, extend the arm and leg slightly farther.
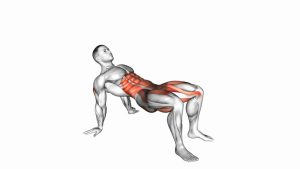
Setup / Starting Position
- Lie on your back: Start flat on the floor with your head, upper back, and hips supported.
- Bring the legs to tabletop: Bend the hips and knees to about 90 degrees, as shown in the video.
- Place the ball: Hold the stability ball between both hands and both knees.
- Press gently: Apply light pressure into the ball so it stays centered above your torso.
- Set the core: Brace the abs gently and keep the lower back stable against the floor.
- Keep the neck relaxed: Let the head rest on the floor instead of lifting or straining it.
The starting position should feel balanced. If the ball rolls or your knees drift, reset before starting the next rep.
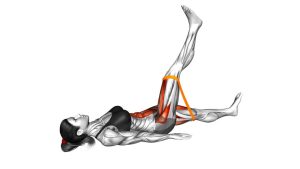
Execution (Step-by-Step)
- Begin in the ball hold: Keep both hands and both knees pressing lightly into the stability ball.
- Choose one side: Keep one hand and the opposite knee connected to the ball.
- Extend the free arm and opposite leg: Slowly reach one arm overhead while the opposite leg lowers toward the floor.
- Control the range: Lower only as far as you can without arching your lower back.
- Pause briefly: Hold the extended position for a moment while the ball remains steady.
- Return to center: Bring the moving arm and leg back to the ball with control.
- Reset pressure: Re-establish contact between both hands, both knees, and the ball.
- Repeat on the other side: Extend the opposite arm and leg, then continue alternating sides.
Pro Tips & Common Mistakes
- Press the ball lightly: Use enough pressure to stabilize the ball, but avoid crushing it aggressively.
- Move opposite limbs: The visible pattern is one arm and the opposite leg extending together.
- Keep the lower back stable: Do not let the spine arch as the leg lowers.
- Avoid rushing: A slower tempo makes the exercise more effective and easier to control.
- Do not drop the leg too low: Lowering farther is not better if your pelvis tilts or your back lifts.
- Keep the head down: The video shows a relaxed head position, so avoid neck tension.
- Control the return: The comeback phase matters as much as the extension phase.
- Maintain symmetry: Both sides should move with the same speed, range, and control.
FAQ
What muscles does the Dead Bug with Stability Ball work?
It mainly trains the abs and deep core stabilizers. Additionally, the obliques, hip flexors, and shoulder stabilizers assist because the body must keep the ball steady while the opposite arm and leg move.
Is the Dead Bug with Stability Ball beginner-friendly?
Yes, it can be beginner-friendly when the range of motion is small. However, it becomes more challenging when the arm reaches farther overhead and the leg lowers closer to the floor.
Should my lower back stay on the floor?
Your lower back should stay stable and controlled. If it arches noticeably as the leg lowers, reduce the range of motion and focus on keeping the ribs and pelvis steady.
Why use a stability ball for the dead bug?
The ball adds feedback and coordination. Because one hand and the opposite knee must keep pressure on it, the exercise encourages better core tension and cleaner movement control.
How fast should I perform each rep?
Use a slow tempo. A good target is 2–3 seconds to extend, a short pause, and 2–3 seconds to return. As a result, you can feel the abs working without relying on momentum.
What is the most common mistake?
The most common mistake is lowering the leg too far and allowing the lower back to arch. Another common mistake is losing ball pressure during the extension.
Recommended Equipment (Optional)
- Stability Ball — the main tool for this dead bug variation and core control practice.
- Thick Exercise Mat — adds floor comfort for the back, hips, and shoulders.
- Mini Pilates Stability Ball — useful if a full-size ball feels too large for your arm and knee position.
- Non-Slip Yoga Mat — helps keep the body steady during controlled floor exercises.
- Core Sliders — optional progression tool for other anti-extension core exercises.
Tip: Choose a ball size that allows your knees and hands to press into it without forcing your shoulders, hips, or neck into an uncomfortable position.