Medicine Ball Roll Plank: Core Stability, Form, Sets & Tips
Learn the Medicine Ball Roll Plank to build core stability, shoulder control, and anti-extension strength with safe form, sets, tips, FAQs, and equipment.
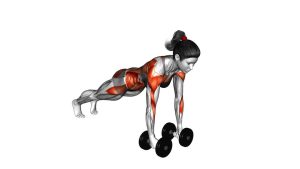
Medicine Ball Roll Plank
This exercise is best used when you already have a strong standard plank and want a more challenging anti-extension core exercise. The unstable medicine ball forces your trunk and shoulders to work together. Keep the movement small, smooth, and controlled. The ball should roll because you control it, not because your body is falling forward.
Quick Overview
| Body Part | Core |
|---|---|
| Primary Muscle | Rectus abdominis and transverse abdominis |
| Secondary Muscle | Obliques, serratus anterior, anterior deltoids, chest, triceps, hip flexors, glutes |
| Equipment | Medicine ball |
| Difficulty | Intermediate to Advanced |
Sets & Reps (By Goal)
- Core stability: 3–4 sets × 6–10 slow rolls per side/direction
- Strength control: 3–5 sets × 8–12 total reps with a 2-second pause in the extended position
- Conditioning finisher: 2–3 sets × 20–30 seconds of controlled rolling
- Beginner progression: 2–3 sets × 5–8 small-range reps from the knees or with wider feet
Progression rule: First improve control and body alignment. Then increase range, rep count, or time under tension. Do not progress by rolling farther if your lower back starts to arch.
Setup / Starting Position
- Place a medicine ball on the floor: Choose a firm ball that does not collapse under your body weight.
- Set your hands on the ball: Place both hands firmly on top or slightly around the sides of the ball.
- Step into a high plank: Extend both legs back until your body forms a straight line from head to heels.
- Set your feet wide enough: A wider stance gives more balance; a narrower stance increases difficulty.
- Brace your core: Pull your ribs down, squeeze your glutes lightly, and keep your neck neutral.
- Lock in shoulder position: Push the floor/ball away slightly so your shoulder blades stay stable and your chest does not sink.
Start with a small range of motion. The medicine ball creates instability, so control matters more than distance.
Execution (Step-by-Step)
- Begin in a strong high plank: Keep your hands on the ball, arms straight, core tight, and hips level.
- Roll the ball slightly forward: Let your shoulders move forward with the ball while your body stays long and firm.
- Resist lower-back extension: Keep your ribs down and do not allow your hips to drop toward the floor.
- Pause briefly: Hold the forward position for a moment while maintaining control through your abs and shoulders.
- Pull the ball back: Use your core, lats, chest, and shoulders to guide the ball back under your shoulders.
- Reset your plank: Return to the starting position without bouncing, twisting, or letting the ball roll away.
- Repeat with control: Continue for the target reps or time while keeping every roll smooth and stable.
Pro Tips & Common Mistakes
- Keep the roll small at first: A short controlled roll is better than a long unstable one.
- Brace before moving: Set your ribs, abs, and glutes before the ball starts rolling.
- Do not let the hips sag: Hip sagging turns this into a lower-back stress exercise instead of a core exercise.
- Avoid shrugging: Keep your shoulders strong but not jammed toward your ears.
- Control the return: Do not snap the ball back. Pull it back smoothly and reset your plank.
- Use a stable ball size: A very small or very soft ball can make the exercise harder to control.
- Widen your feet for balance: This is the easiest way to reduce unwanted twisting.
- Do not rush reps: This movement is designed for tension, control, and stability—not speed.
FAQ
What muscles does the Medicine Ball Roll Plank work?
It mainly works the abs and deep core muscles, especially the transverse abdominis and rectus abdominis. It also trains the obliques, shoulders, serratus anterior, chest, triceps, glutes, and hip flexors for full-body plank stability.
Is the Medicine Ball Roll Plank good for abs?
Yes. It is excellent for abs because it challenges your core to resist spinal extension while your hands roll on an unstable surface. This makes it more demanding than a regular plank.
Is this exercise beginner-friendly?
It is not ideal for complete beginners. You should first master a standard high plank. Beginners can modify it by using a very small roll range, placing the knees on the floor, or keeping the feet wider.
How far should I roll the medicine ball?
Roll only as far as you can while keeping your ribs down, hips level, and lower back neutral. For most people, a small forward roll is enough to create a strong core challenge.
Why does my lower back hurt during this exercise?
Lower-back discomfort usually means your core is losing tension or your hips are sagging. Reduce the range, widen your feet, squeeze your glutes, and keep your ribs pulled down.
Can I use this exercise as a warm-up?
Yes, but keep the range short and the reps low. It works well before upper-body training, core workouts, or athletic sessions that require trunk stability.
Recommended Equipment
- Medicine Ball — the main tool for performing the rolling plank variation
- Non-Slip Exercise Mat — improves floor grip and protects knees, wrists, and feet during setup
- Wrist Support Wraps — helpful for users who need extra wrist support during plank-based exercises
- Core Sliders — useful for related anti-extension and plank progression exercises
- Push-Up Handles — useful for building wrist-friendly plank and shoulder stability strength
Choose equipment that helps you maintain clean alignment. For this exercise, stability and control are more important than using the heaviest or hardest medicine ball.