Side Plank Beginner: Proper Form, Core Benefits, Sets & Tips
Learn the beginner side plank for stronger obliques, core stability, and better body control with step-by-step form, sets, mistakes, FAQs, and gear.
Side Plank
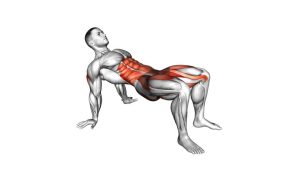
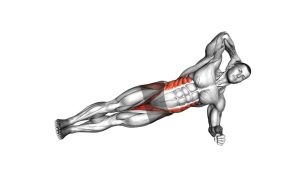
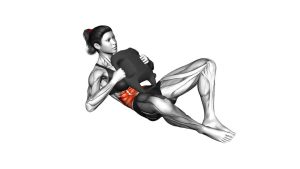
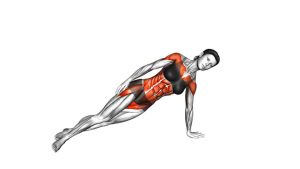
This exercise is useful for beginners because it teaches the core to resist side bending. That makes it different from crunches or sit-ups, which mainly involve spinal flexion. During the side plank, the body must stay long and firm from the feet through the hips, ribs, shoulders, and head. The supporting elbow stays under the shoulder, the forearm presses into the floor, and the hips lift until the torso forms a straight diagonal line.
The movement shown in the video is slow and controlled. The exerciser starts on her side, supports herself on one forearm, lifts the hips, holds the top position, and lowers with control. This makes the drill excellent for home workouts, beginner core training, posture support, and general athletic stability.
Quick Overview
| Body Part | Core |
|---|---|
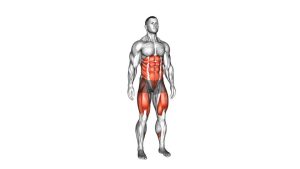
| Primary Muscle | Obliques |
| Secondary Muscle | Transverse abdominis, glutes, quadratus lumborum, shoulder stabilizers, hip stabilizers |
| Equipment | Exercise mat only |
| Difficulty | Beginner |
Sets & Reps (By Goal)
- Beginner core control: 2–3 sets of 10–20 seconds per side, resting 30–60 seconds between sides.
- Core endurance: 3–4 sets of 20–40 seconds per side, using smooth breathing and steady hip height.
- Warm-up activation: 1–2 sets of 10–15 seconds per side before lower-body, upper-body, or full-body training.
- Posture and stability practice: 2–3 sets of 15–25 seconds per side, performed 2–4 times per week.
- Progression goal: Build toward 45–60 seconds per side before moving to harder variations.
Progression rule: Increase hold time only while your hips stay lifted, your shoulder stays stacked, and your breathing remains calm. If the hips drop or the neck tightens, shorten the hold and rebuild control.
Setup / Starting Position
- Lie on your side: Place your body in one long line with your legs extended and stacked.
- Set the lower forearm: Place your elbow directly under your shoulder. Keep the forearm flat on the floor.
- Stack the shoulder: Avoid letting the shoulder collapse toward the ear. Press the floor away gently.
- Position the feet: Stack the feet, or place the top foot slightly in front if you need more balance.
- Brace the core: Lightly tighten the abs as if preparing to resist a gentle push from the front and side.
- Set the head and neck: Keep the head in line with the spine. Do not look down or crane the neck forward.
- Prepare to lift: Keep the ribs down, glutes lightly active, and hips ready to rise as one unit.
Beginner tip: If the full-leg version feels too difficult, bend the knees and perform the side plank from the knees first. This keeps the same core pattern but reduces the load.
Execution (Step-by-Step)
- Press through the forearm: Push the forearm into the floor and create a stable base through the elbow, shoulder, and upper back.
- Lift the hips: Raise your hips away from the mat until your body forms a straight line from feet to head.
- Stack the body: Keep the shoulders, ribs, hips, knees, and ankles aligned. Avoid rolling forward or backward.
- Hold the position: Maintain steady tension through the obliques and glutes while breathing slowly.
- Keep the neck neutral: Look straight ahead or slightly forward. The head should not drop toward the floor.
- Control the hips: Do not let the bottom hip sag. Lift through the side waist and keep the pelvis level.
- Lower with control: Bring the hips back to the floor slowly instead of collapsing down.
- Switch sides: Repeat the same hold on the opposite side with the same alignment and duration.
Pro Tips & Common Mistakes
Pro Tips
- Push the floor away: This protects the shoulder and prevents sinking into the joint.
- Think long, not high: Lift the hips enough to create a straight body line. Do not over-arch.
- Use your glutes: Light glute tension helps keep the pelvis stable and prevents twisting.
- Breathe through the hold: Short, tense breaths make the exercise harder to control.
- Start with shorter holds: Clean 15-second holds are better than shaky 45-second holds.
Common Mistakes
- Letting the hips sag: This reduces oblique work and may stress the lower back.
- Placing the elbow too far away: Keep the elbow under the shoulder for better support.
- Rolling the torso forward: Keep the chest open and the body stacked.
- Shrugging the shoulder: Maintain space between the shoulder and ear.
- Holding the breath: Breathe steadily to keep the core engaged without excessive tension.
- Looking down: Dropping the head can create neck strain. Keep the neck aligned with the spine.
FAQ
Is the side plank good for beginners?
Yes. The side plank is excellent for beginners when performed with short holds and clean alignment. It teaches the core to stabilize the spine, hips, and shoulders without needing equipment.
Where should I feel the beginner side plank?
You should mainly feel the side of your waist, especially the obliques. You may also feel your shoulder, glutes, and outer hip muscles working to stabilize your body.
How long should I hold a side plank?
Beginners can start with 10–20 seconds per side. Once you can hold that with steady hips and relaxed breathing, gradually build toward 30–45 seconds.
Why do my hips drop during the side plank?
Hip dropping usually means the hold is too long, the obliques are fatigued, or the setup is unstable. Shorten the hold, press through the forearm, and focus on lifting the bottom hip away from the floor.
Can I do side planks every day?
You can practice light side plank holds often, but most beginners do best with 2–4 sessions per week. Give your core and shoulders time to recover if you feel soreness or fatigue.
What is the easiest side plank variation?
The easiest version is the bent-knee side plank. Bend both knees, support yourself on the forearm, and lift the hips while keeping the shoulders, hips, and knees aligned.
Recommended Equipment
- Exercise Mat — provides cushioning for the elbow, hip, and side body during floor-based core work.
- Thick Yoga Mat — useful if your elbow or hip feels uncomfortable on hard floors.
- Forearm Plank Pad — adds extra support under the elbow for side plank holds.
- Mini Resistance Bands — helpful for future side plank progressions and hip-stability drills.
- Workout Interval Timer — helps track accurate hold times without constantly checking your phone.
Equipment note: The beginner side plank does not require equipment, but a supportive mat can make the exercise more comfortable and easier to practice consistently.