One-Leg Quarter Squat: Form, Benefits, Sets, Tips & FAQ
Learn the One-Leg Quarter Squat for quad strength, balance, knee control, and single-leg stability with step-by-step form, sets, tips, FAQs, and equipment.
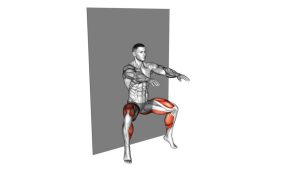
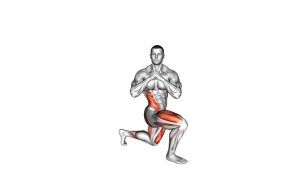
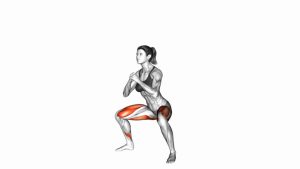
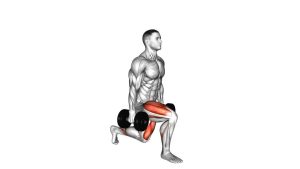
One-Leg Quarter Squat
This movement is best performed with a slow tempo and strict balance. Unlike a pistol squat, the One-Leg Quarter Squat does not require deep hip and ankle mobility. Instead, it focuses on a short, knee-dominant bend that keeps tension on the front thigh while teaching the body to control the knee, ankle, and hip on one side.
Use this exercise as a balance drill, a quad activation movement, a lower-body warm-up, or an early progression toward more demanding single-leg squat patterns. Quality matters more than depth. A shallow, stable rep is more valuable than a deep rep with knee collapse, heel lifting, or uncontrolled wobbling.
Quick Overview
| Body Part | Quads |
|---|---|
| Primary Muscle | Quadriceps |
| Secondary Muscle | Glutes, hamstrings, calves, hip stabilizers, ankle stabilizers, core |
| Equipment | Bodyweight only; optional wall, chair, suspension trainer, or resistance band for balance support |
| Difficulty | Beginner to Intermediate depending on balance, knee control, and single-leg strength |
Sets & Reps (By Goal)
- Balance and control: 2–3 sets × 6–10 reps per leg with a slow 2–3 second descent.
- Quad activation: 2–4 sets × 8–12 reps per leg with light tension and clean knee tracking.
- Warm-up preparation: 1–2 sets × 6–8 reps per leg before squats, lunges, or leg presses.
- Strength endurance: 3–4 sets × 10–15 reps per leg using a controlled tempo and short rest.
- Rehab-style control: 2–3 sets × 5–8 slow reps per leg, only in a pain-free range.
Progression rule: First improve balance, then increase reps, then increase depth slightly. Do not progress to deeper single-leg squats until the knee stays aligned and the heel remains grounded.
Setup / Starting Position
- Stand tall: Begin in an upright position with your feet hip-width apart and your posture stacked.
- Shift onto one leg: Place your bodyweight over the working leg and keep the full foot connected to the floor.
- Lift the opposite leg: Extend the non-working leg slightly forward and keep it off the ground throughout the rep.
- Brace lightly: Tighten your core just enough to keep your torso stable without holding your breath.
- Set your arms: Keep your arms by your sides, forward for balance, or lightly touch a wall if needed.
- Align the knee: Point the working knee in the same direction as the toes before starting the descent.
If balance is difficult, begin near a wall or stable chair. Use support only as a guide, not as a way to pull yourself through the movement.
Execution (Step-by-Step)
- Start on one leg: Stand tall on the working leg while keeping the opposite leg lifted forward.
- Begin the descent: Bend the working knee slightly and lower into a quarter squat range.
- Keep the heel grounded: Maintain pressure through the heel, midfoot, and big toe base.
- Track the knee: Let the knee move naturally over the toes without collapsing inward.
- Control the bottom: Pause briefly at the lowest point without bouncing or dropping quickly.
- Drive upward: Push through the working foot and extend the knee to return to standing.
- Reset at the top: Regain full balance before starting the next repetition.
Pro Tips & Common Mistakes
- Use a short range first: This is a quarter squat, so do not force deep knee flexion before you control the shallow version.
- Keep the knee aligned: The working knee should follow the toes instead of drifting inward.
- Do not rush the descent: Lower slowly to build control and avoid collapsing into the bottom position.
- Keep the heel down: If the heel lifts, reduce depth or work on ankle mobility and foot pressure.
- Avoid excessive forward lean: A slight hip shift is normal, but the torso should not fold aggressively.
- Control the free leg: Keep the lifted leg steady instead of swinging it for momentum.
- Use support when needed: A wall or chair can help you learn the pattern without losing balance.
- Progress gradually: Increase depth only when each rep stays quiet, controlled, and pain-free.
FAQ
What muscles does the One-Leg Quarter Squat work?
The main muscle worked is the quadriceps. The glutes, calves, hamstrings, hip stabilizers, ankle stabilizers, and core also assist by helping you balance and control the single-leg position.
Is the One-Leg Quarter Squat the same as a pistol squat?
No. A pistol squat uses a deep single-leg squat range, while the One-Leg Quarter Squat uses a much shorter range. It is easier to learn and is often used as a progression toward deeper single-leg squat variations.
How deep should I go?
Lower only into a shallow quarter-squat range. Most people should aim for a controlled knee bend of roughly 30–45 degrees. The exact depth depends on your balance, comfort, and ability to keep the knee aligned.
Why do I lose balance during this exercise?
Balance can be limited by weak foot stabilizers, poor hip control, rushing the movement, or shifting weight unevenly. Start near a wall, move slowly, and keep the full foot connected to the floor.
Should my knee move past my toes?
It is normal for the knee to move forward slightly, especially in a knee-dominant squat. The key is to keep the heel grounded, the knee aligned with the toes, and the movement pain-free.
Is this exercise good for beginners?
Yes, but beginners should use a small range of motion and support if needed. It is a useful drill for learning single-leg balance, quad control, and clean knee tracking before progressing to lunges, step-downs, or pistol squat variations.
Recommended Equipment (Optional)
- Exercise Balance Pad — useful for progressing foot and ankle stability once basic form is controlled
- Suspension Trainer — provides assisted support for practicing single-leg squat control
- Resistance Bands Set — helpful for warm-ups, hip activation, and assisted single-leg progressions
- Adjustable Step Platform — useful for step-downs and controlled single-leg squat progressions
- Workout Knee Sleeves — provides light warmth and support during lower-body training
Tip: Equipment is optional. Master the bodyweight version first, then use tools to support balance, improve control, or progress difficulty.