Ring High Row: Proper Form, Muscles Worked, Sets, Tips & FAQ
Learn how to perform the Ring High Row with proper form to build the upper back, rear delts, and scapular control. Includes setup, step-by-step execution, sets by goal, common mistakes, FAQ, and recommended equipment.
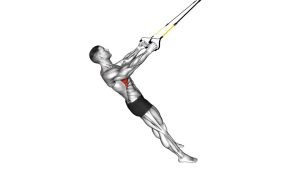
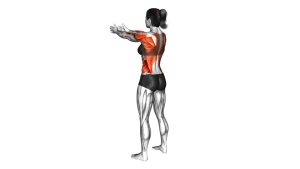
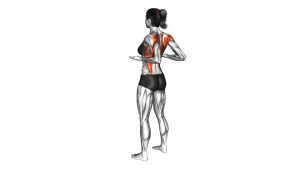
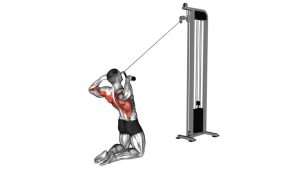
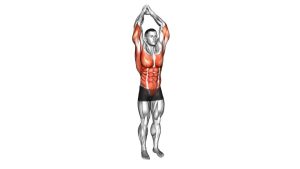
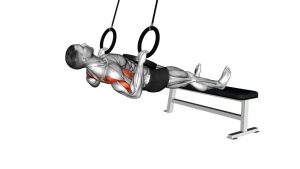
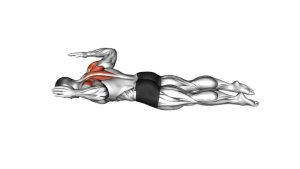
Ring High Row
This exercise works best when you keep the body rigid, the chest lifted, and the motion smooth from start to finish. The goal is not just to pull yourself toward the rings, but to create a deliberate squeeze through the upper back at the top. During well-executed reps, you should feel the shoulder blades drawing together while the rear shoulders and upper-back muscles stay engaged.
Quick Overview
| Body Part | Upper Back |
|---|---|
| Primary Muscle | Rhomboids, mid trapezius, rear deltoids |
| Secondary Muscle | Biceps, forearms, lats, core stabilizers |
| Equipment | Gymnastic rings or suspension trainer anchored overhead |
| Difficulty | Beginner to Intermediate, depending on body angle and foot position |
Sets & Reps (By Goal)
- Technique practice: 2–3 sets × 8–10 reps with a moderate body angle and controlled tempo
- Muscle building: 3–4 sets × 8–15 reps with a strong pause at the top
- Posture and upper-back endurance: 2–4 sets × 12–20 reps with smooth, strict form
- Warm-up activation: 1–2 sets × 10–12 easy reps before pull-ups, rows, or upper-body sessions
Progression rule: First increase control, pause quality, and total reps. Then make the exercise harder by lowering your body angle, elevating the feet, or adding a longer squeeze at the top.
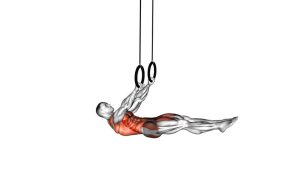
Setup / Starting Position
- Adjust the rings: Set the rings or suspension handles to a height that allows you to lean back with straight arms.
- Grip the handles: Use a neutral grip with palms facing each other.
- Walk the feet forward: Lean back until your body angle matches your strength level. The more horizontal you are, the harder the movement becomes.
- Brace the body: Keep the head, torso, hips, and legs in one straight line. Tighten the core and glutes to prevent sagging.
- Start long: Let the arms fully extend and allow the upper back to stretch slightly without collapsing through the shoulders.
Tip: Beginners can keep the torso more upright. More advanced lifters can place the feet farther forward or elevate them to increase resistance.
Execution (Step-by-Step)
- Set the body line: Begin with straight arms, chest open, and the core fully engaged.
- Lead with the upper back: Start the rep by drawing the shoulder blades back and down rather than yanking with the arms.
- Pull high: Drive the elbows outward and back as you pull your upper chest toward the rings.
- Squeeze at the top: Pause briefly when the rings reach chest or upper-rib level and the shoulder blades are fully retracted.
- Lower under control: Extend the arms slowly and return to the stretched start position without losing full-body tension.
Pro Tips & Common Mistakes
- Pull toward the upper chest: A higher line of pull shifts more emphasis to the rear delts and upper back.
- Keep the body rigid: Avoid bending at the hips or letting the ribs flare as you row.
- Control the eccentric: Lowering too fast reduces tension and makes the movement less effective.
- Do not shrug: Keep the shoulders away from the ears to maintain better scapular mechanics.
- Avoid excessive elbow tuck: This turns the exercise into a more lat-dominant standard row instead of a high row.
- Use a pause: A one-second squeeze at the top improves muscle recruitment and cleans up technique.
- Progress gradually: Harder angles are excellent, but only when you can still keep clean scapular control.
FAQ
What muscles does the Ring High Row work the most?
The exercise mainly targets the rhomboids, mid traps, and rear delts. The biceps, forearms, and core also assist throughout the movement.
What makes a high row different from a regular ring row?
A standard ring row usually keeps the elbows closer to the body, which shifts more work to the lats. A high row uses a higher pull path with the elbows traveling outward, placing more emphasis on the upper back and rear shoulders.
Is this exercise good for posture?
Yes. It can be very effective for improving upper-back strength and scapular control, both of which support better posture when trained consistently.
How can I make Ring High Rows harder?
Lower your body angle, elevate your feet, slow the lowering phase, or add a pause at the top of every rep. Each of these changes increases the challenge without changing the exercise itself.
Can beginners do Ring High Rows?
Absolutely. Beginners can make the movement easier by standing more upright and using a shorter range of motion until strength and control improve.
Recommended Equipment (Optional)
- Double Circle Wood Gymnastics Rings — excellent for ring rows, pull-ups, dips, and general bodyweight upper-back training
- TRX GO Suspension Trainer System — portable alternative to rings for rows, face-pull patterns, and full-body suspension work
- Doorway Pull-Up Bar — useful as a practical anchor point for rings or suspension straps in a home gym
- ProsourceFit Multi-Grip Doorway Pull-Up Bar — a compact home-gym option that can support vertical pulling and some hanging setup variations
- Resistance Bands with Door Anchor — helpful for warm-ups, rear-delt activation, and extra upper-back volume alongside ring rows
Tip: Rings or a suspension trainer give the closest match to the movement in your video, while a doorway bar and resistance accessories help build a more complete home pulling setup.