Ab Roller Crunch: Proper Form, Core Benefits, Sets & Tips
Learn the Ab Roller Crunch for stronger abs, better core control, and safer rollout mechanics. Includes setup, steps, mistakes, FAQs, and equipment.
Ab Roller Crunch
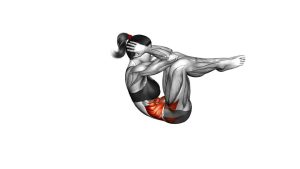
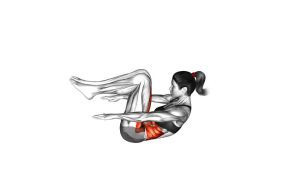
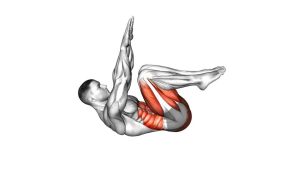
The Ab Roller Crunch mainly targets the rectus abdominis, while the deeper core muscles help keep the lower back stable. During the forward phase, your body tries to arch as the wheel moves away. However, the goal is to keep your ribs pulled down, your pelvis controlled, and your torso firm. Then, as you roll back in, the abs shorten to bring the wheel closer without turning the movement into a shoulder-dominant pull.
This exercise is best performed with slow control, clean breathing, and a range of motion that matches your current core strength. Although it looks simple, the ab roller can become very demanding when the body extends too far. Therefore, beginners should start with shorter rollouts, while stronger trainees can gradually increase distance and hold time.
Quick Overview
| Body Part | Core |
|---|---|
| Primary Muscle | Rectus abdominis |
| Secondary Muscle | Transverse abdominis, obliques, hip flexors, serratus anterior, shoulders, lats |
| Equipment | Ab roller / ab wheel and a comfortable knee pad or exercise mat |
| Difficulty | Intermediate; beginner-friendly only when performed with a short range of motion |
Sets & Reps (By Goal)
- Core strength: 3–4 sets of 6–10 controlled reps with 60–90 seconds of rest.
- Muscle building: 3–5 sets of 8–12 reps using a slow return and strong abdominal squeeze.
- Beginner control: 2–3 sets of 4–8 short-range reps, stopping before the lower back arches.
- Core endurance: 2–4 sets of 10–15 smooth reps with a moderate rollout distance.
- Warm-up activation: 1–2 sets of 5–8 easy reps before larger compound lifts.
Progression rule: First increase control, then increase rollout distance. After that, add reps or slow the tempo. Never progress by forcing a longer range while your lower back loses position.
Setup / Starting Position
- Place your knees on a mat: Use a soft pad so your knees stay comfortable and stable during the movement.
- Hold the ab roller with both hands: Grip the handles firmly, but avoid squeezing so hard that your shoulders and neck tense up.
- Start in a kneeling position: Keep the wheel in front of your knees with your arms extended but not aggressively locked.
- Brace your core: Pull your ribs down slightly and gently tuck your pelvis so your lower back does not arch.
- Set your head position: Look down toward the floor and keep your neck aligned with your spine.
- Create full-body tension: Lightly squeeze your glutes, tighten your abs, and keep your shoulders packed before you roll forward.
A strong starting position makes the entire exercise safer. If you begin with a loose core or arched back, the rollout will usually become harder to control.
Execution (Step-by-Step)
- Begin from the kneeling setup: Keep your knees planted, hands on the roller, and torso slightly leaned forward.
- Brace before moving: Exhale lightly, tighten your abs, and keep your ribs from flaring upward.
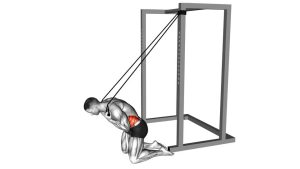
- Roll the wheel forward: Let your arms travel in front of you as your body lengthens from the knees toward the hands.
- Control the extension: Move slowly and stop before your hips sag or your lower back arches.
- Reach your working range: Pause briefly at the farthest point you can control with strong abdominal tension.
- Start the crunch return: Pull the wheel back by contracting your abs and slightly rounding through the upper torso.
- Bring the wheel toward the knees: Allow the hips to flex naturally, but do not simply sit back without using your core.
- Finish in the compact position: Return to the start with control, reset your brace, and begin the next rep only when stable.
Pro Tips & Common Mistakes
Pro Tips
- Use a shorter range at first: A clean half rollout is better than a long rollout with a collapsing lower back.
- Keep the ribs down: This cue helps prevent excessive lumbar extension during the forward phase.
- Think “abs pull me back”: The return should come from the core instead of the shoulders or arms alone.
- Move with a steady tempo: Roll out for 2–3 seconds, pause briefly, then return for 2–3 seconds.
- Use your glutes lightly: Gentle glute tension helps keep the pelvis controlled and reduces lower-back stress.
- Breathe with control: Exhale during the return so the abs can contract more strongly.
Common Mistakes
- Letting the lower back sag: This shifts stress away from the abs and onto the lumbar spine.
- Rolling too far too soon: Excessive range can break your brace and make the exercise unsafe.
- Pulling only with the arms: If the shoulders dominate, the movement loses its crunch effect.
- Sitting back too much: Returning by pushing the hips backward reduces abdominal tension.
- Shrugging the shoulders: Keep the neck relaxed and the shoulders stable throughout the rep.
- Rushing the return: Fast reps often hide poor control, especially near the hardest part of the movement.
FAQ
What muscles does the Ab Roller Crunch work?
The Ab Roller Crunch mainly works the rectus abdominis. It also trains the transverse abdominis, obliques, hip flexors, serratus anterior, lats, and shoulders because these muscles help stabilize the body during the rollout and return.
Is the Ab Roller Crunch good for beginners?
It can be used by beginners if the range of motion is short and controlled. However, full rollouts are usually more advanced. Start with small reps, keep your back neutral, and progress only when your core can control the movement.
Why does my lower back hurt during ab roller crunches?
Lower-back discomfort often happens when the hips drop, the ribs flare, or the rollout goes beyond your current core strength. Reduce the distance, brace harder, and stop each rep before your spine begins to arch.
Should I round my back during the Ab Roller Crunch?
A slight upper-back rounding during the crunch return is normal and can help the abs contract. However, you should avoid collapsing, jerking, or losing control through the lower back.
How many ab roller crunches should I do?
Most lifters do well with 2–4 sets of 6–12 reps. Quality matters more than high reps. Once your form stays clean, you can increase reps, slow the tempo, or roll slightly farther.
What is the difference between an ab roller rollout and an ab roller crunch?
A standard rollout focuses heavily on resisting extension as the body lengthens. The Ab Roller Crunch still includes that rollout phase, but it adds a stronger abdominal crunch during the return.
Recommended Equipment
- Ab Roller Wheel — the main tool for performing the Ab Roller Crunch with smooth forward and backward motion.
- Ab Roller with Knee Pad — useful for protecting the knees and improving comfort during kneeling reps.
- Exercise Mat — provides stable floor support for knees, hands, and general core training.
- Wide Ab Roller Wheel — offers extra stability for users who want more balance during controlled rollouts.
- Resistance Bands Set — helpful for assisted ab roller progressions or pairing with upper-body and core work.
Tip: Choose an ab roller with comfortable handles and smooth wheel rotation. If you are still learning, a wider wheel or knee pad can make the exercise easier to control.