Seated Leg Raise: Proper Form, Benefits, Sets, Tips & FAQ
Learn the Seated Leg Raise to strengthen lower abs and hip flexors with safe form, controlled reps, coaching cues, common mistakes, and equipment tips.
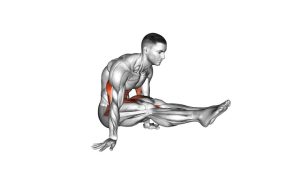
Seated Leg Raise
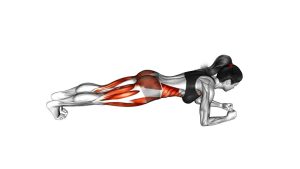
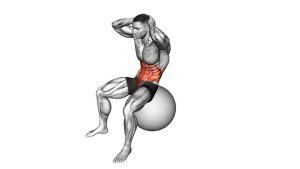
The Seated Leg Raise works best when every repetition starts with tension. First, sit tall and place your hands slightly behind your hips for support. Then, lean back just enough to challenge your core without collapsing your chest. From there, raise both legs together, pause briefly, and lower them under control. As a result, the abs must stabilize the pelvis while the hip flexors lift the legs.
Although this exercise looks simple, it becomes very effective when the tempo stays strict. Therefore, avoid rushing the lowering phase or bouncing at the bottom. Instead, keep the heels hovering near the floor between reps so your core stays engaged. In addition, maintain steady breathing and avoid using your arms to push aggressively into the ground.
Quick Overview
| Body Part | Abs |
|---|---|
| Primary Muscle | Rectus abdominis, especially lower-ab emphasis through pelvic control |
| Secondary Muscle | Hip flexors, transverse abdominis, obliques, and deep trunk stabilizers |
| Equipment | No equipment required; optional exercise mat or flat bench |
| Difficulty | Beginner to Intermediate, depending on leg position, tempo, and range of motion |
Sets & Reps (By Goal)
- Beginner core control: 2–3 sets of 8–12 reps with a short range and slow tempo.
- Muscle endurance: 3–4 sets of 12–20 reps while keeping the heels off the floor between reps.
- Lower-ab focus: 3–4 sets of 10–15 reps with a 2-second pause at the top and a slow descent.
- Warm-up activation: 1–2 sets of 8–10 smooth reps before heavier lower-body or core work.
- Advanced control: 3–5 sets of 8–12 reps using straighter legs, slower eccentrics, or longer pauses.
Progression rule: First improve control. Then increase reps. After that, increase hold time, straighten the legs more, or slow down the lowering phase.
Setup / Starting Position
- Sit on a stable surface: Use the floor, an exercise mat, or the edge of a flat bench.
- Place your hands behind you: Keep your palms on the floor or bench with fingers pointing forward or slightly outward.
- Lean back slightly: Angle your torso backward enough to challenge your abs, but do not round your lower back excessively.
- Extend your legs forward: Keep the knees mostly straight, with a soft bend if your hamstrings or hips feel tight.
- Brace your core: Pull the ribs down gently and keep the pelvis controlled before the first rep begins.
- Set your shoulders: Keep the shoulders away from the ears and avoid shrugging while supporting your body.
- Lift your heels slightly: Start with the heels hovering above the floor so the abs stay active immediately.
Tip: If the movement feels too hard, bend the knees more and shorten the range. If it feels too easy, straighten the legs and slow down each lowering phase.
Execution (Step-by-Step)
- Brace before moving: Take a controlled breath, tighten your abs, and keep your chest lifted. This prevents the lower back from taking over.
- Lift both legs together: Raise your legs smoothly from the hips. Meanwhile, keep your knees mostly extended and avoid kicking with momentum.
- Control the top position: Pause briefly when your legs reach a comfortable height. At this point, your abs should feel active and your torso should stay stable.
- Lower slowly: Bring the legs down with control instead of letting gravity drop them. This eccentric phase is where much of the core benefit happens.
- Stop before resting: Lower the heels close to the floor, but do not fully relax. Keeping the feet hovering maintains constant tension.
- Repeat with the same rhythm: Continue the next rep only after your torso is stable and your breathing stays controlled.
Pro Tips & Common Mistakes
Pro Tips
- Use a slow lowering phase: Lower for 2–4 seconds to increase core tension and improve control.
- Keep the heels hovering: This prevents full relaxation and keeps the abs working between reps.
- Breathe steadily: Exhale as you lift and inhale as you lower, especially during longer sets.
- Stay tall through the chest: A lifted chest helps reduce excessive spinal rounding.
- Scale with knee bend: More knee bend makes the exercise easier, while straighter legs make it harder.
- Train both control and endurance: Use moderate reps for strength control and higher reps for ab endurance.
Common Mistakes
- Swinging the legs: Momentum reduces ab tension and turns the movement into a hip swing.
- Dropping the feet: A fast descent removes the most valuable part of the exercise.
- Arching the lower back: This usually means the range is too large or the legs are too straight.
- Pushing too hard with the arms: The hands should support balance, not do the work for your core.
- Holding the breath: Breath-holding increases unnecessary tension and can reduce control.
- Chasing height over quality: A smaller controlled lift is better than a high, sloppy swing.
FAQ
What muscles does the Seated Leg Raise work?
The Seated Leg Raise primarily trains the rectus abdominis with strong lower-ab involvement. In addition, it works the hip flexors, obliques, transverse abdominis, and trunk stabilizers.
Is the Seated Leg Raise good for beginners?
Yes. It is beginner-friendly when performed with bent knees, a short range of motion, and slow reps. However, beginners should avoid forcing straight-leg reps before they can control the pelvis and lower back.
Should my feet touch the floor between reps?
Ideally, the heels should hover slightly above the floor. This keeps the abs under tension. However, if your form breaks down, you can briefly reset between reps until your strength improves.
Why do I feel this exercise in my hip flexors?
Feeling the hip flexors is normal because they help lift the legs. Still, your abs should stabilize the pelvis. If the hip flexors dominate completely, bend your knees more, slow down, and shorten the range.
How can I make the Seated Leg Raise harder?
To increase difficulty, straighten your legs more, slow the lowering phase, pause longer at the top, or perform the movement on a bench with a greater range of motion.
How can I make the Seated Leg Raise easier?
Bend your knees, keep the reps smaller, and allow a brief reset at the bottom. Also, sit more upright so your core has less leverage to control.
Can I do Seated Leg Raises every day?
You can perform them frequently if volume stays moderate and recovery feels good. Nevertheless, if your hip flexors or lower back feel irritated, reduce frequency and focus on cleaner reps.
Recommended Equipment
- Exercise Mat — provides comfort and grip when performing seated leg raises on the floor.
- Flat Workout Bench — allows a stable seated setup and can increase range of motion for harder variations.
- Adjustable Ankle Weights — useful for advanced progressions once bodyweight reps are fully controlled.
- Core Sliders — helpful for other core variations that complement seated leg raise training.
- Resistance Bands Set — useful for hip flexor activation, core warm-ups, and full-body home workouts.
Equipment is optional for this exercise. However, a mat or bench can improve comfort, while ankle weights should only be added after your reps stay smooth and pain-free.