Bodyweight Standing Around the World (Wall-Supported): Form, Benefits, Sets & FAQ
Learn how to perform the Bodyweight Standing Around the World (Wall-Supported) for better shoulder mobility, control, and posture. Includes setup, execution, sets by goal, mistakes, FAQs, and recommended equipment.
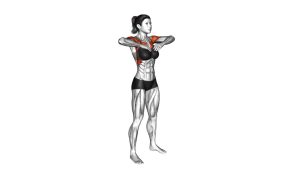
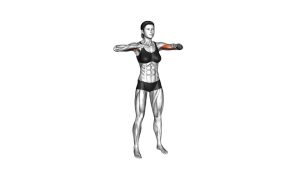
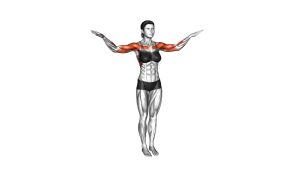
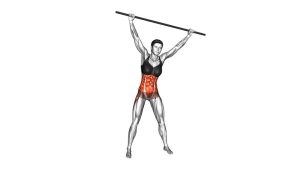
Bodyweight Standing Around the World (Wall-Supported)
This drill works best as a warm-up, mobility primer, or light activation exercise before pressing, upper-body training, posture work, or shoulder-focused sessions. It is not about speed or fatigue. The goal is to create clean circular movement while keeping the ribcage stacked, shoulders relaxed, and arms moving through a pain-free arc.
Quick Overview
| Body Part | Shoulders |
|---|---|
| Primary Muscle | Anterior deltoid |
| Secondary Muscle | Lateral deltoid, rotator cuff, serratus anterior, upper traps (light stabilization) |
| Equipment | Bodyweight, wall |
| Difficulty | Beginner |
Sets & Reps (By Goal)
- Warm-up before upper-body training: 1–3 sets × 6–10 slow circles in each direction
- Shoulder mobility practice: 2–4 sets × 8–12 reps with smooth, controlled tempo
- Posture / movement-quality work: 2–3 sets × 6–8 reps with a 1–2 second pause overhead if comfortable
- Recovery / light activation day: 1–2 sets × 8–10 easy reps, staying well below fatigue
Progression rule: First improve circle quality, control, and pain-free range. After that, add reps or slow the tempo. Do not force bigger circles if shoulder position breaks down.
Setup / Starting Position
- Stand tall near a wall: Keep your back close to the wall so it can guide posture and discourage leaning.
- Set your stance: Feet about hip-width apart, knees soft, weight evenly distributed.
- Brace lightly: Keep ribs down and core engaged so the lower back does not arch as the arms rise.
- Start with arms by your sides: Elbows mostly straight, hands relaxed, shoulders down.
- Neck stays neutral: Avoid jutting the head forward or shrugging as the arms move.
Tip: If overhead motion feels limited, begin with a smaller circle and stay in the range you can control cleanly.
Execution (Step-by-Step)
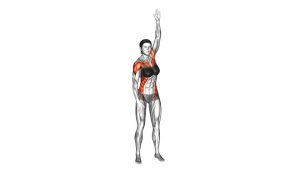
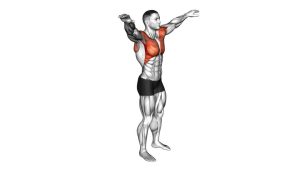
- Lift the arms forward: Raise both arms in front of the body in a smooth front-raise pattern.
- Continue overhead: Reach upward without shrugging. Keep the ribcage stacked and avoid arching your back.
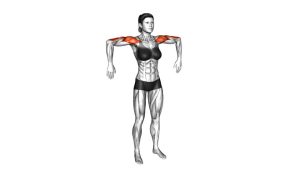
- Open out to the sides: From overhead, let the arms travel outward in a wide arc.
- Lower along the sides: Bring the arms back down under control until they return to the starting position.
- Reverse the direction: For balance and mobility, perform circles both forward and backward when appropriate.
Pro Tips & Common Mistakes
- Use the wall as feedback: Let it help you stay tall rather than leaning or swinging.
- Move slowly: Controlled circles train the shoulders better than fast arm swings.
- Keep the shoulders down: Avoid letting the traps dominate the movement.
- Don’t force full overhead range: Stay within a pain-free arc and build range gradually.
- Keep elbows long but not locked hard: Softly extended arms usually feel smoother.
- Train both directions: Forward and reverse circles can expose different mobility limitations.
- Avoid turning it into a backbend: Rib flare and lumbar arch usually mean you are compensating for limited shoulder mobility.
FAQ
What is this exercise mainly used for?
It is mainly used for shoulder mobility, movement control, and warm-up preparation. It helps the shoulders move through a large arc while reinforcing better posture and smoother overhead mechanics.
Should I do this before or after a workout?
Most people benefit from doing it before training as part of a warm-up. It can also be used on recovery days or between sets of upper-body work to practice cleaner motion.
Should the movement be fast or slow?
It should be slow to moderate and controlled. Speed usually makes people swing the arms, shrug the shoulders, or arch the back.
What if I feel pinching at the top?
Reduce the circle size, slow down, and stop before the painful range. If pinching continues, avoid forcing overhead positions and consider having your shoulder mechanics assessed by a qualified professional.
Can beginners use this exercise?
Yes. It is very beginner-friendly because it uses bodyweight only and the wall provides useful posture feedback. Start with smaller circles and focus on quality first.
Recommended Equipment (Optional)
- Shoulder Resistance Bands — useful for adding light activation work before or after mobility drills
- Therapy Bands for Shoulder — ideal for very light rehab-style tension and rotator cuff prep
- Yoga Strap — great for assisted shoulder mobility and range-of-motion drills
- Core Sliders — helpful for pairing this drill with shoulder stability and serratus-focused work
- Exercise Mat — useful for floor-based shoulder mobility, warm-ups, and recovery work
Tip: This exercise does not require equipment, but the right accessories can help build a more complete shoulder mobility and activation routine.