Chest-Biased Pike Push-Up: Form, Muscles Worked, Sets, Tips & FAQ
Learn how to do the Chest-Biased Pike Push-Up with proper form to target the upper chest, front delts, and triceps. Includes setup, execution, sets by goal, common mistakes, FAQ, and recommended Amazon equipment.
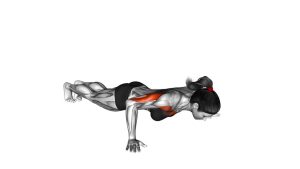
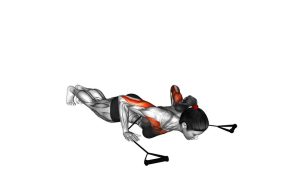
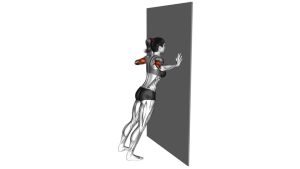
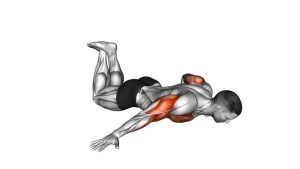
Chest-Biased Pike Push-Up
This variation works best when you keep the movement controlled and avoid turning it into either a regular push-up or an overly vertical shoulder press. The sweet spot is a strong inverted body angle with a deliberate forward lean that lets the upper chest contribute more through the pressing arc. You should feel the exercise across the clavicular chest fibers, front shoulders, and triceps without collapsing through the neck or lower back.
Quick Overview
| Body Part | Chest |
|---|---|
| Primary Muscle | Upper chest (clavicular head of the pectoralis major) |
| Secondary Muscle | Anterior deltoids, triceps, serratus anterior, upper core |
| Equipment | Bodyweight, floor, optional push-up bars, parallettes, or exercise mat |
| Difficulty | Beginner to Intermediate depending on body angle, control, and total reps |
Sets & Reps (By Goal)
- Technique practice: 2-3 sets × 5-8 reps with slow tempo and full control
- Muscle building: 3-5 sets × 8-15 reps, resting 60-90 seconds between sets
- Strength focus: 4-6 sets × 4-8 reps with a harder angle or added load
- Endurance / conditioning: 2-4 sets × 12-20 reps with clean mechanics
- Progression work: 2-3 sets to 1-2 reps shy of technical failure
Progression rule: First improve control, then range, then reps. After that, increase the difficulty by elevating the feet, using push-up bars for extra depth, or adding a light weighted vest.
Setup / Starting Position
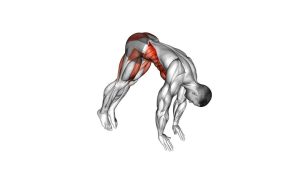
- Start in a pike position: Place your hands on the floor about shoulder-width apart and lift your hips high so your body forms an inverted V.
- Set your feet: Keep your feet planted at a comfortable distance that allows you to maintain hip height without rounding your back.
- Brace the trunk: Tighten your abs and keep the ribcage from flaring so the movement stays stable from shoulders to hips.
- Organize the shoulders: Press the floor away lightly and keep the shoulders active instead of sinking into the joints.
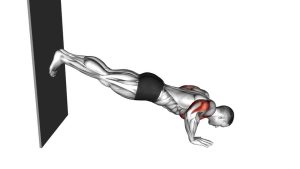
- Choose your path: For more chest emphasis, allow a slight forward lean so the chest travels forward and down rather than straight down.
- Head and neck: Keep your neck neutral and your gaze slightly back toward the floor between your hands.
Tip: If standard floor reps feel rough on the wrists, use push-up bars or low parallettes to create a more neutral grip and a cleaner pressing path.
Execution (Step-by-Step)
- Lock in the pike: Begin with your hips high, arms straight, and core tight.
- Lower with intent: Bend your elbows and bring your upper chest forward and down between your hands.
- Use a chest-biased path: Avoid dropping straight down like a strict shoulder press; instead, travel slightly forward.
- Control elbow position: Let the elbows angle naturally without flaring excessively out to the sides.
- Reach the bottom smoothly: Lower until your chest and shoulders are fully loaded while keeping tension and alignment.
- Press back up: Drive through your palms and extend your elbows to return to the starting pike position.
- Finish tall through the shoulders: Re-establish your hips high and your brace before beginning the next rep.
Pro Tips & Common Mistakes
- Think “forward and down”: This cue helps you shift the pressing pattern toward the upper chest.
- Keep the hips elevated: Don’t let the body flatten into a normal push-up.
- Use full-body tension: A braced core helps keep force directed into the press.
- Don’t rush the eccentric: The lowering phase is where most of the quality chest stimulus is built.
- Avoid elbow overflare: Too much flare can irritate the shoulders and reduce pressing efficiency.
- Don’t jam the neck forward: Let the head follow naturally, but keep the neck long and relaxed.
- Adjust hand position carefully: Slightly wider hands may feel better for some lifters, but too wide often reduces control.
- Use tools when needed: Bars, parallettes, or an incline setup can help beginners groove the pattern safely.
FAQ
What muscles does the chest-biased pike push-up work?
It primarily targets the upper chest, while also training the front delts, triceps, and shoulder stabilizers. The exact emphasis depends on your torso angle and movement path.
How is this different from a regular pike push-up?
A regular pike push-up is usually more shoulder-dominant because the pressing path is more vertical. In the chest-biased version, the torso shifts slightly forward so the upper chest contributes more.
Is this a good exercise for upper chest training at home?
Yes. It is one of the better bodyweight options for adding upper-chest emphasis when you do not have access to an incline bench or machine press setup.
Should beginners use this exercise?
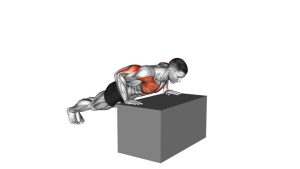
Yes, but many beginners do better starting with hands elevated on a bench, box, or sturdy bar setup. That makes the angle easier and helps maintain better control.
How can I make it harder?
Elevate your feet, increase range of motion with push-up bars or parallettes, slow down the eccentric, add pauses, or use a light weighted vest once form is consistent.
Recommended Equipment
- Push-Up Bars — neutral wrist position, better comfort, and slightly deeper pressing range
- RELIFE Parallette Bars — useful for deeper reps, wrist-friendly hand placement, and progression work
- Fit Simplify Resistance Loop Bands — great for warm-ups, shoulder prep, and pairing with upper-back corrective work
- Amazon Basics Extra Thick Exercise Mat — adds comfort for hands, feet, and head positioning during floor-based practice
- Adjustable Weighted Vest — advanced overload option once bodyweight reps become too easy
Tip: For most people, the best first upgrade is push-up bars or low parallettes. They make chest-biased pike push-ups more comfortable and often improve the quality of each rep.