Kneeling Incline Finger Press: Forearm Strength, Finger Control & Grip Training
Learn the Kneeling Incline Finger Press to build finger strength, forearm control, wrist stability, and grip endurance. Includes setup, execution, sets by goal, mistakes, FAQs, and equipment.
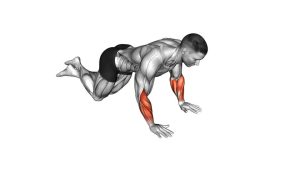
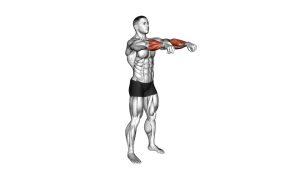
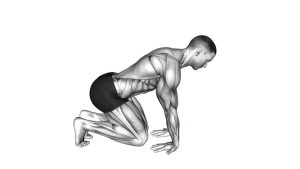
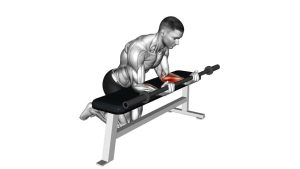
Kneeling Incline Finger Press
This exercise is excellent for athletes, climbers, calisthenics trainees, lifters, and anyone who wants stronger hands and more durable forearms. Because the hands are elevated on an incline, the bodyweight load is reduced compared with a floor-based finger push-up, making it easier to practice clean finger pressure, wrist alignment, and tendon-friendly control.
The key is not to collapse into the fingers or bounce through the reps. The fingers should press into the surface with controlled tension while the wrists stay stable and the shoulders remain relaxed. Think of this as a finger-strength and grip-control drill, not a chest push-up.
Quick Overview
| Body Part | Forearms |
|---|---|
| Primary Muscle | Finger flexors and forearm flexors |
| Secondary Muscle | Wrist stabilizers, intrinsic hand muscles, forearm extensors, triceps, anterior shoulders |
| Equipment | Incline surface, bench, box, step, or sturdy elevated platform |
| Difficulty | Beginner to Intermediate depending on incline height and bodyweight pressure |
Sets & Reps (By Goal)
- Beginner finger conditioning: 2–3 sets × 6–8 slow reps with light pressure
- Forearm strength: 3–4 sets × 8–12 reps with controlled fingertip loading
- Grip endurance: 2–3 sets × 12–20 reps using a smooth, steady tempo
- Climbing or calisthenics prep: 3–5 sets × 5–10 reps with a 2–3 second press hold
- Warm-up activation: 1–2 sets × 6–10 easy reps before grip-heavy training
Progression rule: First improve control and comfort. Then gradually lower the incline, increase hold time, or shift slightly more bodyweight into the fingers. Never progress by forcing painful pressure into the finger joints.
Setup / Starting Position
- Choose a stable incline: Use a bench, box, step, or sturdy platform that does not move. A higher surface makes the exercise easier.
- Kneel behind the incline: Place both knees on the floor with your body facing the elevated surface.
- Place your fingers on the surface: Spread the fingers naturally and press through the pads of the fingers. Avoid bunching the fingers too close together.
- Keep the palms light: The palms may hover or touch lightly, but the main emphasis should be through the fingers.
- Align the wrists: Keep the wrists extended only as much as comfortable. Do not let them collapse aggressively backward.
- Set the upper body: Keep elbows softly extended, shoulders down, chest open, and core lightly braced.
- Lean in slightly: Shift only enough bodyweight forward to feel the fingers and forearms engage.
Execution (Step-by-Step)
- Start tall and stable: Kneel with your torso controlled and your hands set on the incline.
- Apply fingertip pressure: Press the fingertips down into the surface without snapping, bouncing, or jamming the joints.
- Let the body shift slightly: Allow a small amount of pressure to move into the hands while keeping the elbows and wrists controlled.
- Press through the fingers: Use the fingers and forearms to create a small upward or stabilizing push.
- Pause briefly: Hold the strongest part of the press for 1–3 seconds while breathing calmly.
- Release slowly: Reduce pressure with control instead of dropping out of the movement.
- Repeat clean reps: Keep every repetition smooth, small, and controlled.
Pro Tips & Common Mistakes
Pro Tips
- Use a high incline first: A higher surface reduces bodyweight load and helps you learn the movement safely.
- Spread the fingers evenly: Distribute pressure across the index, middle, ring, and little fingers instead of dumping everything into one finger.
- Keep the reps quiet: The best reps look small and controlled, not explosive.
- Use slow tempo: Press for 1–2 seconds, hold briefly, then release for 2–3 seconds.
- Build tendon tolerance gradually: Finger strength improves with consistency, not aggressive loading.
- Pair it with wrist mobility: Gentle wrist circles, wrist extensions, and forearm stretches can help prepare the joints before loading.
Common Mistakes
- Using too much bodyweight: If the fingers shake hard or joints hurt, the incline is too low or the pressure is too high.
- Collapsing the wrists: Excessive wrist extension can irritate the joint and reduce control.
- Bouncing through reps: Fast bouncing turns the drill into a tendon-stress exercise instead of a strength-control drill.
- Letting the shoulders shrug: Keep the shoulders relaxed so the forearms and fingers do the work.
- Pressing only through the fingertips aggressively: Keep pressure strong but controlled; do not jam the finger joints into the surface.
- Ignoring discomfort: Finger and wrist pain is a sign to reduce load, shorten the range, or stop the set.
FAQ
What muscles does the Kneeling Incline Finger Press work?
It mainly targets the finger flexors and forearm flexors. It also trains wrist stabilizers, intrinsic hand muscles, forearm extensors, and light support from the triceps and shoulders.
Is this exercise good for grip strength?
Yes. It helps develop finger pressure, hand control, and forearm endurance, which can support grip strength for lifting, climbing, calisthenics, martial arts, and general hand strength.
Is the Kneeling Incline Finger Press beginner-friendly?
It can be beginner-friendly when performed on a high incline with light pressure. Beginners should avoid low surfaces at first because lower inclines place more bodyweight on the fingers and wrists.
Should my palms touch the surface?
They may lightly touch for support, especially when learning. However, the goal is to emphasize pressure through the fingers. Avoid fully relaxing into the palms because that reduces the finger-strength benefit.
Why do my wrists feel tight during this exercise?
The wrists are placed in extension, which can feel intense if you lack wrist mobility or control. Use a higher incline, reduce pressure, warm up the wrists first, and avoid forcing the joint into a painful angle.
Can this help with finger push-ups?
Yes. It is a useful progression toward harder finger push-up variations because it teaches controlled fingertip loading with less bodyweight than the floor version.
How often should I train this movement?
Start with 2–3 times per week. Because the fingers and tendons can be sensitive to rapid increases in load, give yourself recovery time and progress slowly.
What should I do if my fingers hurt?
Stop the set, raise the incline, reduce pressure, or switch to lighter grip drills. Sharp pain, joint pain, or lingering tendon discomfort should not be ignored.
Recommended Equipment
- Adjustable Workout Bench — provides a stable incline surface and lets you change difficulty by adjusting height
- Exercise Step Platform — useful for lower incline progressions and controlled hand-loading drills
- Finger Strengthener / Hand Grip Trainer — helps strengthen finger flexors and improve grip endurance outside bodyweight work
- Wrist Support Wraps — optional support for users who need extra wrist awareness during hand-loading drills
- Thick Exercise Mat / Knee Pad — improves comfort while kneeling and helps maintain a stable setup
Tip: Equipment should make the exercise safer and easier to control. If any tool encourages you to force the fingers, wrists, or shoulders, reduce the difficulty and return to clean technique.