Lever Seated Twist: Oblique Machine Form, Sets, Tips & FAQ
Learn the Lever Seated Twist for stronger obliques and rotational core control. Includes setup, execution, sets, mistakes, FAQs, and equipment.
Lever Seated Twist
This exercise is useful for lifters who want a safer and more guided way to train rotational strength. Because the machine supports your lower body and controls the path of motion, it can help beginners feel the obliques working without needing advanced balance or complex technique. Still, quality matters more than load. A clean rep should feel smooth, stable, and controlled from the first inch of rotation to the final return.
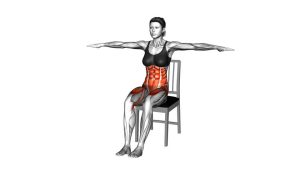
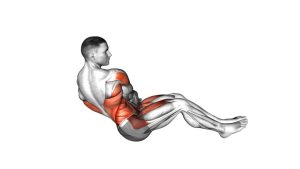
During the video demonstration, the movement starts from a tall seated posture. The lower body stays fixed while the torso rotates to one side, pauses near the end range, returns under control, and then repeats to the opposite side. The arms remain supportive, but they do not dominate the exercise. This makes the Lever Seated Twist a strong option for building the waistline, improving trunk control, and training the core through a clear rotational pattern.
Quick Overview
| Body Part | Core |
|---|---|
| Primary Muscle | Obliques |
| Secondary Muscle | Rectus abdominis, transverse abdominis, spinal stabilizers |
| Equipment | Lever seated twist machine / seated torso rotation machine |
| Difficulty | Beginner to Intermediate |
Sets & Reps (By Goal)
- Core activation: 2–3 sets × 10–12 reps per side with light resistance and slow control.
- Muscle growth: 3–4 sets × 10–15 reps per side using moderate resistance and a strong squeeze.
- Rotational strength: 3–5 sets × 6–10 reps per side with controlled heavier loading.
- Endurance and posture support: 2–4 sets × 15–20 reps per side with smooth tempo.
- Beginner learning phase: 2 sets × 8–10 reps per side while practicing stable hips and clean rotation.
Progression rule: Add resistance only when you can rotate without jerking, leaning, shrugging, or letting the hips shift. First improve control, then increase load gradually.
Setup / Starting Position
- Adjust the seat: Set the machine so your torso lines up with the rotation axis. Your chest, shoulders, and hips should feel centered before the first rep.
- Secure your lower body: Sit fully on the pad and keep your feet planted. Your knees should stay stable so the hips do not rotate with the torso.
- Choose a light starting weight: Begin with a load that allows full control. The machine should challenge your obliques, not pull you aggressively into rotation.
- Grip the handles lightly: Hold the handles or pads for support. Avoid squeezing so hard that your arms take over the movement.
- Stack your posture: Keep your chest tall, ribs controlled, shoulders relaxed, and spine long. Your head should follow the torso naturally without over-twisting the neck.
- Brace before moving: Take a calm breath, lightly tighten the core, and prepare to rotate from the trunk instead of the arms.
A good setup should feel locked-in but not stiff. The lower body provides stability while the torso performs the rotation.
Execution (Step-by-Step)
- Start from the center: Sit upright with your torso facing forward. Keep your hips pressed into the seat and your feet planted.
- Rotate to one side: Turn your torso slowly in the selected direction. Let the obliques create the motion while the arms stay relaxed and supportive.
- Keep the spine tall: Maintain an upright chest as you rotate. Do not collapse forward, lean sideways, or twist through the hips.
- Pause near the end range: Hold briefly when you reach a comfortable rotation point. Feel the obliques working without bouncing into the machine stop.
- Return with control: Rotate back toward the center slowly. Resist the weight instead of allowing the machine to pull you back.
- Repeat on the opposite side: Move through the same controlled pattern in the other direction. Match the range, speed, and posture on both sides.
- Finish cleanly: Return to the center before ending the set. Keep your torso stable and avoid relaxing suddenly under load.
Pro Tips & Common Mistakes
Pro Tips
- Think “ribcage rotates over stable hips”: This cue helps you keep the movement focused on the obliques.
- Use a controlled tempo: Rotate for 1–2 seconds, pause briefly, then return for 2–3 seconds.
- Keep your grip light: The handles should help you stay positioned, not become the main driver of the rep.
- Train both sides evenly: Match your reps and range on the left and right side to support balanced core development.
- Exhale during rotation: A controlled exhale can help you brace and feel the obliques more clearly.
- Use moderate range: Rotate far enough to challenge the core, but avoid forcing the spine beyond a comfortable position.
Common Mistakes
- Using too much weight: Heavy loading often turns the movement into a jerky arm pull instead of a clean core exercise.
- Letting the hips move: If the hips rotate with the torso, the obliques receive less focused tension.
- Rushing the return: The eccentric phase is important. Control the machine back to the center on every rep.
- Leaning instead of rotating: Side bending changes the exercise and can place unnecessary stress on the spine.
- Over-twisting the neck: Allow the head to follow naturally, but avoid cranking the neck past the torso.
- Bouncing at end range: A small pause is helpful. A bounce can irritate the spine and reduce muscular control.
FAQ
What muscles does the Lever Seated Twist work?
The Lever Seated Twist mainly works the obliques. It also involves the rectus abdominis, transverse abdominis, and spinal stabilizers because these muscles help control rotation and keep the torso steady during the movement.
Is the Lever Seated Twist good for building obliques?
Yes. It is a strong machine option for targeting the obliques because the seated position helps lock the lower body in place. For best results, use a controlled tempo, avoid momentum, and focus on rotating from the torso rather than pulling with the arms.
Should I go heavy on the seated twist machine?
Heavy weight is not always better. A moderate load with clean control usually works better for oblique tension. If your hips shift, your shoulders jerk, or your arms dominate the rep, reduce the weight.
How far should I rotate during the Lever Seated Twist?
Rotate through a comfortable range that you can control. You do not need to force maximum rotation. A smooth, moderate range with a brief pause is safer and more effective than twisting aggressively.
Can beginners do the Lever Seated Twist?
Beginners can use this exercise when the machine is adjusted correctly and the resistance is light. Start with slow reps, stable hips, and a small range. As control improves, increase range or resistance gradually.
Is this exercise safe for the lower back?
It can be safe when performed with proper setup, moderate resistance, and controlled rotation. However, people with back pain, disc issues, or rotation-sensitive symptoms should be cautious and seek professional guidance before using loaded twisting exercises.
Recommended Equipment
- Torso Rotation Machine — the closest equipment match for performing lever-style seated twists in a gym or home training setup
- Ab Machine for Home Gym — useful for machine-based core training when a full commercial torso rotation unit is not available
- Adjustable Weight Bench — helpful for seated core variations, supported twists, and general abdominal training
- Resistance Bands with Handles — good alternative for standing or seated cable-style rotational core exercises
- Thick Exercise Mat — useful for warm-ups, mobility drills, and floor-based oblique exercises that support machine work
Tip: If you do not have access to a seated twist machine, cable rotations, banded trunk rotations, and controlled Russian twist variations can train a similar rotational pattern.