Reverse Crunch: Proper Form, Lower Abs Benefits, Sets, Tips & FAQ
Learn how to do the Reverse Crunch with safe form, lower-ab control, sets by goal, step-by-step cues, common mistakes, FAQs, and equipment tips.
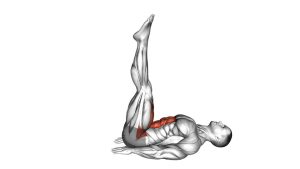
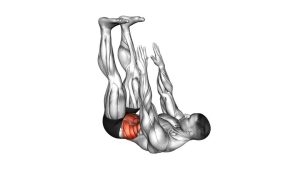
Reverse Crunch
The Reverse Crunch is most effective when the movement is small, slow, and precise. Your abs should create the lift, while your arms and upper back provide light stability. A good repetition looks like a gentle curl of the pelvis rather than a large leg swing. Keep the lower back controlled, avoid kicking the knees, and focus on pulling the pelvis upward as if you are rolling your hips off the floor one small segment at a time.
Quick Overview
| Body Part | Core |
|---|---|
| Primary Muscle | Rectus abdominis, especially lower abdominal fibers |
| Secondary Muscle | Hip flexors, obliques, transverse abdominis, deep core stabilizers |
| Equipment | No equipment required; optional exercise mat |
| Difficulty | Beginner to intermediate |
Sets & Reps (By Goal)
- Beginner control: 2–3 sets × 8–10 reps with a slow, clean tempo.
- Core strength: 3–4 sets × 10–15 reps with a 1-second pause at the top.
- Lower-ab endurance: 2–4 sets × 15–20 reps while keeping the hips controlled.
- Hypertrophy focus: 3–4 sets × 10–15 reps using a 3-second lowering phase.
- Finisher: 1–2 sets × controlled reps near fatigue without losing form.
Progression rule: First improve control, then increase reps, then increase pause time. Do not progress by swinging harder or rushing the lowering phase.
Setup / Starting Position
- Lie on your back: Use a mat if the floor feels uncomfortable. Keep your head, upper back, and hips supported.
- Place your arms beside you: Keep palms down or slightly out to the sides for balance. Do not push aggressively into the floor.
- Lift your legs: Bring your knees above your hips and bend them around 90 degrees.
- Brace your core: Pull your ribs slightly down and keep your lower back close to the floor.
- Relax your neck: Keep your head down and your gaze neutral. Your neck should not help the movement.
- Start compact: Keep the knees close enough that you can control the pelvis without swinging.
A strong starting position makes the exercise safer and more effective. If your lower back arches before the first rep, bring your knees slightly closer or reduce the range.
Execution (Step-by-Step)
- Set your brace: Exhale slightly, tighten your abs, and keep your ribs from flaring upward.
- Pull the knees in: Move the knees toward your chest without kicking or using momentum.
- Curl the pelvis: Lift your tailbone and hips slightly off the floor by contracting your abs.
- Pause at the top: Hold briefly when your lower abs are fully engaged. Keep the motion compact.
- Lower slowly: Return the hips to the floor with control. Do not let the legs drop quickly.
- Reset the pelvis: Stop before your lower back arches. Begin the next rep from a stable position.
Pro Tips & Common Mistakes
- Think “hips to ribs”: The main action is pelvic curling, not simply moving the knees.
- Avoid leg swinging: Momentum reduces abdominal tension and makes the exercise less effective.
- Keep the range small: You only need to lift the hips slightly to create a strong ab contraction.
- Control the lowering phase: Lowering too fast often causes the lower back to arch.
- Do not pull with the neck: Keep your head relaxed on the floor.
- Use your arms lightly: Your hands can stabilize, but they should not launch your hips upward.
- Exhale as you curl: Breathing out helps the ribs stay down and improves core tension.
- Stop before compensation: If your back arches, reduce reps or shorten the movement.
FAQ
What muscles does the Reverse Crunch work?
The Reverse Crunch mainly works the rectus abdominis, with strong emphasis on the lower-ab region. It also uses the hip flexors and obliques for support, especially when you control the legs and pelvis carefully.
Is the Reverse Crunch good for lower abs?
Yes. It is one of the best bodyweight exercises for training lower-ab control because the pelvis curls toward the ribs. To feel it properly, avoid swinging your legs and focus on lifting your hips with your abs.
Why do I feel Reverse Crunches in my hip flexors?
Some hip flexor involvement is normal because your legs are lifted. However, if the hip flexors dominate, slow down, keep the knees bent, and focus more on curling the pelvis instead of pulling the thighs.
Should my hips lift off the floor?
Yes, but only slightly. The lift should come from your abs curling the pelvis upward. A big throw or fast hip lift usually means you are using momentum instead of controlled core strength.
Can beginners do Reverse Crunches?
Yes. Beginners can start with a smaller range of motion and fewer reps. If the movement feels too hard, keep the knees closer to the chest and perform slow pelvic tilts first.
How do I make the Reverse Crunch harder?
You can make it harder by adding a longer pause at the top, slowing the lowering phase, extending the legs slightly, or holding a stable object behind your head for support. Progress only when your lower back stays controlled.
Recommended Equipment
- Exercise Mat — adds comfort for your back, hips, and spine during floor core training.
- Non-Slip Yoga Mat — helps keep your body stable while performing controlled ab exercises.
- Adjustable Ankle Weights — optional progression for advanced users who already control the basic version.
- Ab Mat — useful for comfort and additional support during floor-based abdominal work.
- Resistance Bands Set — helpful for pairing Reverse Crunches with anti-rotation and full-core exercises.
Start with bodyweight first. Add equipment only when your reps stay smooth, your hips lift without swinging, and your lower back remains controlled.