Roll Hip Lat Stretch: Proper Form, Benefits, Tips & FAQ
Learn how to perform the Roll Hip Lat Stretch with proper form to release tension in the outer hip, upper thigh, and lateral torso. Includes setup, execution, tips, FAQs, and recommended equipment.
Roll Hip Lat Stretch
This exercise is best performed slowly, using your arms and top leg to control how much bodyweight rests on the foam roller. Instead of aggressively rolling over a long distance, focus on a small zone along the outside of the hip and upper thigh. You should feel pressure and tissue release, but not sharp pain, numbness, or joint irritation. Smooth breathing and relaxed shoulders make the drill much more effective.
Quick Overview
| Body Part | Legs |
|---|---|
| Primary Muscle | Tensor fasciae latae (TFL), gluteus medius, upper outer thigh tissues |
| Secondary Muscle | Gluteus minimus, vastus lateralis, lateral obliques, lat-adjacent fascial line |
| Equipment | Foam roller, exercise mat (optional) |
| Difficulty | Beginner (pressure tolerance and body control determine intensity) |
Sets & Reps (By Goal)
- Warm-up mobility: 1–2 rounds per side for 20–40 seconds of slow rolling
- Recovery / cool-down: 2–3 rounds per side for 30–60 seconds with easy pressure
- Targeted tight spots: 2–3 rounds per side with 3–5 slow passes plus 5–10 second pauses on tender areas
- Pre-leg day prep: 1–2 rounds per side before squats, lunges, deadlifts, or running drills
Progression rule: Increase time under control before increasing pressure. The goal is better tissue quality and mobility, not pain tolerance.
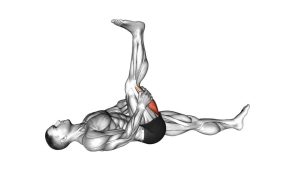
Setup / Starting Position
- Place the foam roller: Position it under the outer hip or upper outer thigh on one side of the body.
- Lie on your side: Support yourself on your bottom forearm with your chest slightly lifted.
- Use the top leg for balance: Place the top foot in front of the body to help manage pressure.
- Keep the bottom leg long: Extend it comfortably along the floor unless a bent position feels better.
- Brace lightly through the core: Stay stable without twisting the torso excessively.
Tip: Small adjustments in roller placement can shift the emphasis between the upper outer thigh, TFL, and outer glute area.
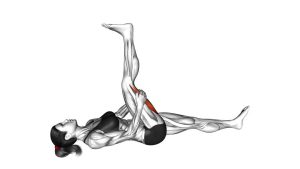
Execution (Step-by-Step)
- Set your pressure: Ease bodyweight onto the roller until you feel moderate pressure in the outer hip or thigh.
- Roll slowly: Use the forearm and top leg to move your body a few inches forward and backward over the roller.
- Stay in a short range: Focus on the tight section instead of covering the entire thigh in one pass.
- Pause when needed: If you find a particularly tender spot, stop there for 5–10 seconds and breathe.
- Keep the upper body relaxed: Avoid shrugging the shoulder or collapsing into the neck while rolling.
- Finish and switch sides: Complete the desired number of passes, then repeat on the opposite side.
Pro Tips & Common Mistakes
- Use manageable pressure: More pain does not mean more benefit. Stay at a tolerable intensity.
- Roll in short passes: Small movements help you target the right tissue more precisely.
- Breathe through tight areas: Slow exhalations help the muscles relax instead of guarding.
- Do not rush: Fast rolling usually turns the drill into a rough massage instead of a useful mobility exercise.
- Avoid direct pressure on bones: Keep the roller on soft tissue, not the point of the hip.
- Support your neck and shoulder: Stay long through the torso instead of collapsing into the bottom arm.
- Pair it with movement: Follow this stretch with hip mobility drills, glute activation, or lower-body warm-up work.
FAQ
Where should I feel the Roll Hip Lat Stretch?
You should mainly feel pressure along the outer hip, upper outer thigh, and sometimes the outer glute. Some people also notice release through the lateral torso, depending on the setup and body angle.
Is this exercise supposed to hurt?
It can feel uncomfortable on tight tissue, but it should not feel sharp, electric, or unbearable. Use moderate pressure and back off if the discomfort becomes too intense.
How long should I foam roll each side?
Most people do well with 20 to 60 seconds per side. Longer is not always better. Quality, breathing, and controlled pressure matter more than spending excessive time on one area.
Should I do this before or after training?
It works well both ways. Before training, it can help improve movement comfort and mobility. After training, it can be used as part of a recovery routine to reduce stiffness.
Who should be cautious with this stretch?
Anyone with acute hip injury, severe inflammation, nerve symptoms, or unexplained leg pain should avoid aggressive foam rolling and get professional guidance before using this drill.
Recommended Equipment (Optional)
- High-Density Foam Roller — the main tool for applying controlled pressure to the outer hip and thigh
- Soft-Density Foam Roller — a better option for beginners or anyone sensitive to firm pressure
- Exercise or Yoga Mat — adds comfort for the forearm, knee, and side-lying setup on hard floors
- Massage Therapy Ball — useful for targeting smaller tight spots around the glutes and hip stabilizers
- Mini Resistance Bands — great for pairing with glute activation work after foam rolling
Tip: Start with a softer roller if the outer hip area feels too tender. Controlled pressure and regular practice usually produce better results than using the firmest tool available.