Seated Single-Leg Hamstring Stretch: Form, Benefits, Tips & FAQ
Learn the Seated Single-Leg Hamstring Stretch to improve hamstring flexibility, hip mobility, and posture with safe form, tips, FAQs, and gear.
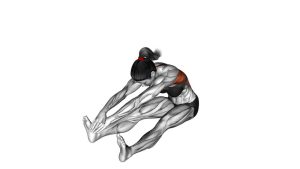
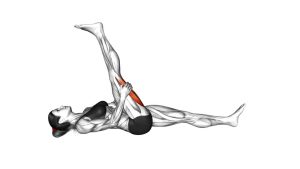
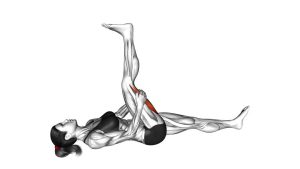
Seated Single-Leg Hamstring Stretch
This stretch works best when performed with a calm tempo, relaxed breathing, and a controlled forward hinge. Keep the extended knee mostly straight, keep the toes gently pulled upward, and avoid bouncing into the range. You should feel a steady stretch through the back of the thigh, not sharp pain behind the knee or pulling in the lower back.
Quick Overview
| Body Part | Hamstrings |
|---|---|
| Primary Muscle | Hamstrings — biceps femoris, semitendinosus, semimembranosus |
| Secondary Muscle | Calves, glutes, lower back, adductors, hip stabilizers |
| Equipment | No equipment required; optional exercise mat, yoga strap, towel, or yoga block |
| Difficulty | Beginner-friendly; suitable for warm-ups, cooldowns, mobility work, and recovery routines |
Sets & Reps (By Goal)
- General flexibility: 2–3 sets × 20–30 seconds per side, using relaxed breathing.
- Post-workout cooldown: 1–2 sets × 30–45 seconds per side, performed after lower-body training.
- Mobility improvement: 3–4 sets × 30–60 seconds per side, keeping the stretch controlled and repeatable.
- Beginner range practice: 2 sets × 15–20 seconds per side, with the knee slightly bent if needed.
- Recovery or desk-break routine: 1–2 easy holds per side, focusing on comfort instead of maximum depth.
Progression rule: Increase hold time before increasing depth. A deeper stretch is only useful when you can keep the knee controlled, the hips square, and the breathing steady.
Setup / Starting Position
- Sit on the floor: Begin seated with your torso upright and both hips grounded evenly.
- Extend one leg forward: Straighten the target leg in front of you with the heel resting on the floor.
- Bend the opposite leg: Bring the non-working foot toward the inner thigh of the extended leg, keeping the bent leg relaxed.
- Set your posture: Lengthen the spine, relax the shoulders, and face the extended leg.
- Prepare the foot position: Gently pull the toes of the extended leg toward you to increase hamstring and calf involvement.
- Use support if needed: Sit on a folded towel or yoga block if your lower back rounds too early.
Tip: If you cannot sit upright comfortably, elevate your hips slightly. This helps the pelvis tilt forward and makes the stretch cleaner.
Execution (Step-by-Step)
- Inhale and lengthen: Sit tall first before moving forward. Think about creating space through the spine.
- Hinge from the hips: Begin folding forward by tipping the pelvis toward the extended leg, not by collapsing the chest.
- Reach toward the leg: Slide your hands toward the shin, ankle, or foot depending on your flexibility.
- Keep the extended leg controlled: Maintain a mostly straight knee, but allow a slight bend if the stretch feels too intense.
- Hold the stretch: Stay in a comfortable range and breathe slowly for the target hold time.
- Avoid bouncing: Keep the position steady. Do not pulse or jerk deeper into the stretch.
- Return slowly: Lift the torso back up with control, then repeat or switch sides.
Pro Tips & Common Mistakes
- Hinge before you round: Start the stretch from the hips to keep tension on the hamstrings instead of dumping into the lower back.
- Do not force the foot grab: Reaching the toes is not required. Holding the shin or ankle is completely effective.
- Keep the knee soft if needed: A slight knee bend can make the stretch safer and more comfortable for beginners.
- Avoid bouncing: Ballistic movement can irritate the hamstrings, especially when the tissue is cold or tight.
- Keep both hips grounded: Do not twist the pelvis away from the extended leg.
- Relax the shoulders: Pulling with the upper body creates tension and reduces stretch quality.
- Breathe into the hold: Slow breathing helps reduce guarding and allows the stretch to settle naturally.
- Use a strap if necessary: A towel or yoga strap around the foot can help you maintain posture without straining forward.
FAQ
What muscles does the Seated Single-Leg Hamstring Stretch target?
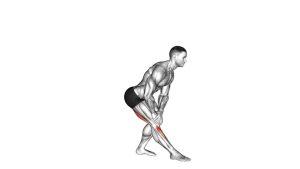
It primarily targets the hamstrings of the extended leg. You may also feel secondary tension in the calves, glutes, lower back, and inner thigh depending on your foot position and flexibility level.
Should my knee stay completely straight?
A mostly straight knee is ideal, but it does not need to be locked. If the stretch feels too intense behind the knee, bend the knee slightly and focus on a smoother hip hinge.
Do I need to touch my toes?
No. Touching the toes is not the goal. The goal is to feel a controlled hamstring stretch while keeping good posture. Holding the shin, ankle, or using a strap is perfectly acceptable.
Is this stretch good for tight hamstrings?
Yes. This is one of the most accessible stretches for tight hamstrings because it trains one side at a time and allows you to control the amount of forward fold.
When should I perform this stretch?
It works well after leg workouts, after running, during mobility sessions, or as part of a light recovery routine. If performed before training, keep the hold shorter and avoid pushing into maximum range.
Why do I feel this in my lower back?
You may be rounding too much or reaching too aggressively. Sit taller, bend the knee slightly, elevate the hips, and focus on moving from the pelvis instead of collapsing the spine.
Recommended Equipment (Optional)
- Exercise Mat — provides floor comfort and helps support longer stretching sessions
- Yoga Strap for Stretching — helps reach the foot without rounding the spine or pulling aggressively
- Stretching Towel — useful as a simple alternative to a yoga strap for assisted hamstring stretching
- Yoga Blocks — can elevate the hips or support the hands during limited-range stretching
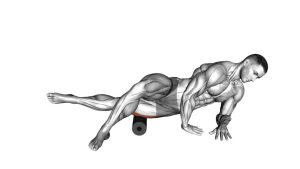
- Foam Roller for Legs — helpful for pairing soft-tissue work with hamstring mobility routines
Tip: Equipment should make the stretch easier to control, not more aggressive. Use support to improve posture and comfort.