Seated Side Crunch Wall: Oblique Form, Sets, Tips & FAQ
Learn the Seated Side Crunch Wall exercise to target your obliques with strict form, wall support, setup cues, sets, mistakes, FAQs, and equipment.
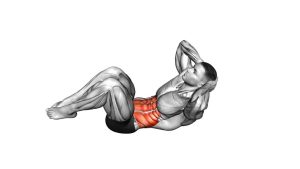
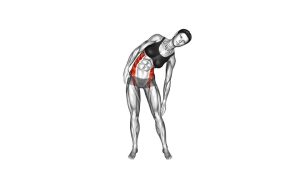
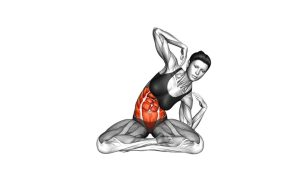
Seated Side Crunch (Wall)
This exercise is useful for beginners, home workouts, low-impact core training, and anyone who wants to improve oblique awareness without lying on the floor. The wall gives you feedback, so your torso stays more upright and your reps stay cleaner. As a result, the working side of the waist can shorten with better control while the opposite side lengthens slightly.
However, the goal is not to pull the head down or collapse the shoulder. Instead, keep the chest open, brace the core lightly, and side crunch with the torso. When performed correctly, the movement should feel focused through the side abdominal muscles, not through the neck, jaw, or lower back.
Quick Overview
| Body Part | Obliques |
|---|---|
| Primary Muscle | Internal obliques and external obliques |
| Secondary Muscle | Rectus abdominis, transverse abdominis, deep core stabilizers |
| Equipment | Wall only; optional exercise mat for seated comfort |
| Difficulty | Beginner-friendly and low impact |
Sets & Reps (By Goal)
- Beginner control: 2–3 sets of 8–12 reps per side with a slow tempo.
- Core endurance: 3–4 sets of 12–18 reps per side with steady breathing.
- Oblique activation: 2–3 sets of 10–15 reps per side with a 1-second squeeze.
- Warm-up or desk break: 1–2 sets of 8–10 reps per side using easy effort.
- Finisher: 2 rounds of 20–30 seconds per side while maintaining clean form.
Progression rule: First, improve control and range quality. Then, add reps or a longer squeeze. Finally, progress to a more challenging oblique variation only when you can avoid neck pulling, shoulder shrugging, and lower-back shifting.
Setup / Starting Position
- Sit with your back against a wall: Place your hips close enough to the wall so your torso can stay upright and supported.
- Bend your knees: Keep your feet planted on the floor. This position improves balance and reduces unnecessary hip movement.
- Stack your posture: Keep your ribs over your pelvis, lift the chest gently, and avoid slouching into the wall.
- Place your hands lightly near your head: Your fingertips can touch the sides of your head, but they should not pull your neck.
- Relax your shoulders: Let the elbows stay open and natural. Do not shrug before you begin.
- Brace lightly: Tighten your midsection as if preparing for a small cough, while still breathing normally.
Execution (Step-by-Step)
- Start tall against the wall: Keep your spine long, your feet grounded, and your hands light near your head.
- Choose one side: Begin by moving your ribcage toward the same-side hip. Keep the movement small and controlled.
- Crunch sideways: Shorten the working side of your waist without twisting your torso forward or pulling on your neck.
- Pause briefly: Hold the side crunch for about one second and feel the obliques contract.
- Return to center: Slowly lift your torso back to the upright starting position.
- Repeat with control: Complete all reps on one side, or alternate sides depending on your workout goal.
- Keep breathing: Exhale as you crunch to the side, then inhale as you return to center.
Pro Tips & Common Mistakes
Pro Tips
- Use the wall as feedback: Keep your back lightly connected to the wall so the movement stays strict.
- Move slowly: A controlled side crunch creates better oblique tension than a fast side bend.
- Shorten the waist: Focus on closing the space between your ribs and hip on the working side.
- Keep the neck neutral: Your head should follow the torso naturally without being pulled.
- Control both directions: The return phase matters because it trains stability and prevents momentum.
Common Mistakes
- Pulling on the head: This shifts tension into the neck and reduces oblique focus.
- Twisting instead of side bending: Rotation changes the exercise and may reduce the target contraction.
- Dropping the shoulder: A lazy lean is not the same as an active side crunch.
- Using momentum: Fast reps often turn the movement into rocking instead of controlled core training.
- Holding the breath: Breath-holding can increase tension and make the movement feel stiff.
- Arching the lower back: Keep your ribs controlled so the abs stay active throughout the set.
FAQ
What muscles does the Seated Side Crunch (Wall) work?
The main muscles are the internal and external obliques. In addition, the rectus abdominis and deep core stabilizers help control your posture while you move side to side.
Is the Seated Side Crunch (Wall) good for beginners?
Yes. The wall support makes this variation easier to control than many floor-based or standing oblique exercises. Therefore, it is a good choice for beginners who need a simple way to learn lateral trunk flexion.
Should I alternate sides or finish one side first?
Both methods can work. If your goal is learning control, finish one side first so you can focus on the same movement pattern. However, if your goal is light core conditioning, alternating sides can feel more natural.
Why do I feel this exercise in my neck?
You may be pulling on your head, shrugging your shoulders, or leading with your elbow. To fix this, relax your hands, keep your neck long, and move from the ribcage instead of the arms.
Can this exercise help build visible side abs?
It can strengthen and improve control in the obliques. However, visible definition also depends on overall body fat, nutrition, progressive training, and consistency.
How can I make the Seated Side Crunch (Wall) harder?
First, slow the tempo and add a longer squeeze at the bottom. Then, increase reps or sets. Later, you can use a light resistance band or progress to more challenging side-crunch variations.
Recommended Equipment
- Exercise Mat — useful for seated comfort and floor-based core variations.
- Foam Exercise Pad — adds cushioning under the hips during seated wall exercises.
- Resistance Bands Set — helpful for progressing oblique and anti-rotation core work.
- Small Pilates Ball — can support posture drills and controlled abdominal exercises.
- Ab Wheel — a useful advanced tool for stronger core stability once basic control improves.
Choose equipment that improves comfort and control. However, do not add resistance until your reps stay smooth, pain-free, and free from neck pulling.