Band Bicycle Crunch: Form, Core Benefits, Sets, Tips & FAQ
Learn the Band Bicycle Crunch for stronger abs and obliques. Step-by-step form, sets by goal, mistakes, FAQs, and equipment tips.
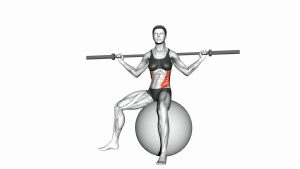
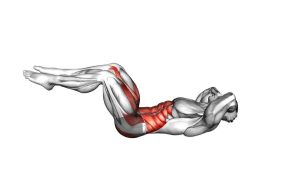
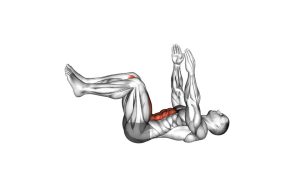
Band Bicycle Crunch
This exercise works best when the band creates steady resistance without pulling the neck out of position. Each repetition should combine three actions: a small crunch, a controlled torso rotation, and an opposite-side knee drive. The goal is not to swing the elbows or pump the legs quickly. Instead, focus on bringing the rib cage toward the opposite hip while keeping your pelvis controlled and your lower back close to the floor.
Because the band adds tension during the crunch, the Band Bicycle Crunch is more demanding than a regular bicycle crunch. It is useful for home workouts, resistance-band core sessions, athletic conditioning, and ab-focused training plans. However, clean form matters more than speed. If your neck takes over, your lower back arches, or your legs drop too low, reduce the range of motion and slow the tempo.
Quick Overview
| Body Part | Core |
|---|---|
| Primary Muscle | Rectus abdominis and obliques |
| Secondary Muscle | Hip flexors, transverse abdominis, deep core stabilizers |
| Equipment | Resistance band and floor mat |
| Difficulty | Intermediate |
Sets & Reps (By Goal)
- Core endurance: 2–3 sets × 12–20 alternating reps per side with a steady rhythm.
- Oblique strength: 3–4 sets × 8–12 reps per side with a 1-second squeeze at each rotation.
- Controlled ab training: 2–4 sets × 10–16 total slow reps using a 2–1–2 tempo.
- Home workout finisher: 2–3 rounds × 30–45 seconds with clean form and short rest.
- Beginner progression: 2 sets × 6–10 reps per side using a light band and higher leg position.
Progression rule: Increase control before increasing band resistance. Add reps first, then slow the tempo, then use a slightly stronger band only when your lower back stays stable.
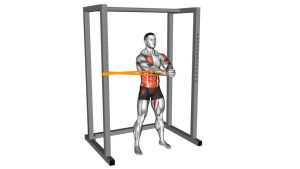
Setup / Starting Position
- Anchor the band securely: Attach the resistance band behind your head to a stable anchor point, or use a safe setup that keeps the band tension controlled.
- Lie on your back: Position your body on a mat with your head facing away from the band anchor. Keep enough distance to create light-to-moderate tension.
- Place your hands near the head: Hold the band or position your hands lightly beside your head. Do not pull the neck forward with your arms.
- Lift the legs: Bring both knees above the hips, then slightly extend one leg while keeping the other knee ready to drive inward.
- Set the core: Gently press your lower back toward the floor. Keep the ribs down and brace as if you are preparing for a controlled crunch.
- Start with control: Keep your chin slightly tucked, shoulders relaxed, and eyes directed upward or slightly forward.
Tip: If the band feels too aggressive at the neck or shoulders, move closer to the anchor or use a lighter band.
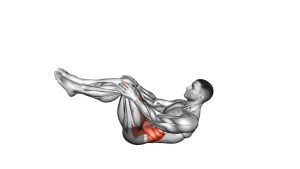
Execution (Step-by-Step)
- Begin with a small crunch: Lift your head, shoulders, and upper back slightly from the floor while keeping your lower back controlled.
- Rotate across the body: Turn your rib cage toward the opposite knee. The elbow should travel diagonally, but the rotation should come mainly from your torso.
- Drive one knee inward: Bring one knee toward your chest as the opposite side of your upper body rotates toward it.
- Extend the other leg: Reach the opposite leg away from your body without letting it drop too low. Keep tension through the abs.
- Squeeze briefly: Pause for a moment at the top of the rotation. Feel the abs and obliques contract.
- Switch sides smoothly: Return through the center without relaxing completely. Bend the extended leg in as the other leg reaches out.
- Repeat the alternating pattern: Continue moving side to side with a controlled bicycle rhythm. Avoid bouncing, yanking, or rushing the transition.
Pro Tips & Common Mistakes
- Rotate from the ribs: Do not simply swing your elbows across your body. Let the rib cage turn toward the opposite hip.
- Keep the band controlled: The band should add resistance, not pull your head, neck, or shoulders into an uncomfortable position.
- Avoid neck pulling: Keep your hands light. Your abs should lift your upper body, not your arms.
- Control the leg extension: A lower leg position is harder. If your back arches, extend the leg higher instead.
- Do not rush the bicycle motion: Fast reps often reduce oblique engagement and increase hip-flexor dominance.
- Exhale on the crunch: Breathe out as you rotate and bring the knee in. Inhale during the switch.
- Keep the shoulders off the floor: Maintain light upper-body elevation so the abs stay active between sides.
- Use moderate tension: Too much band resistance can turn the exercise into a neck and shoulder strain instead of a core drill.
FAQ
What muscles does the Band Bicycle Crunch work?
The Band Bicycle Crunch mainly works the rectus abdominis and obliques. It also involves the hip flexors and deep core stabilizers because your legs move while your trunk resists unwanted extension.
Is the Band Bicycle Crunch harder than a regular bicycle crunch?
Yes. The resistance band increases tension during the crunch and makes your abs work harder to lift and rotate the torso. It also demands more control because the band can pull you out of position if you move too fast.
Should my elbow touch my knee?
It does not have to touch. The goal is controlled torso rotation, not forcing contact. Focus on bringing your ribs toward the opposite hip while keeping your neck relaxed and your lower back stable.
Why do I feel this exercise in my neck?
Neck tension usually happens when the band is too strong, the hands pull the head, or the abs are not doing enough of the work. Use a lighter band, reduce range, and think about lifting from the rib cage instead of the neck.
Can beginners do the Band Bicycle Crunch?
Beginners can use it, but only with a light band and a shorter range of motion. A standard bicycle crunch or dead bug may be a better starting point if you cannot keep your lower back controlled.
How do I make the Band Bicycle Crunch harder?
You can slow the tempo, pause at the top of each rotation, extend the legs lower, or use a slightly stronger band. Only progress one variable at a time so your form stays clean.
Recommended Equipment
- Resistance Bands Set — useful for adding progressive resistance to bicycle crunches and other core drills.
- Door Anchor for Resistance Bands — helps create a stable band anchor for home core exercises.
- Thick Exercise Mat — supports your spine and hips during floor-based ab exercises.
- Mini Resistance Bands — helpful for extra lower-body activation and banded core variations.
- Ab Workout Floor Mat — adds comfort for crunches, sit-ups, bicycle crunches, and floor core training.
Tip: Choose a light-to-medium band first. The best resistance level lets you rotate smoothly without neck strain or lower-back arching.