Front Plank: Proper Form, Benefits, Sets, Tips & FAQ
Learn how to do the Front Plank with proper form. Build core stability, improve posture, avoid common mistakes, and follow sets and reps by goal.
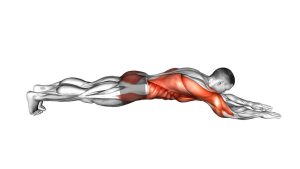
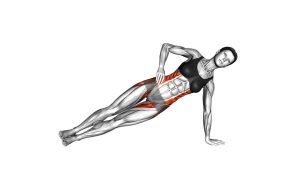
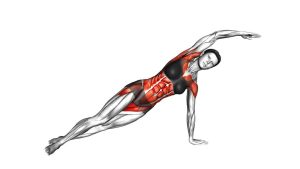
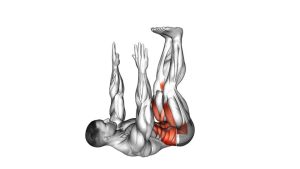
Front Plank
The Front Plank looks simple, but it becomes highly effective when your alignment is precise. During the hold, your elbows stay under your shoulders, your forearms press into the floor, and your body forms a straight line from head to heels. Meanwhile, your abs brace, your glutes stay lightly active, and your lower back remains neutral instead of sagging.
Because this movement uses no equipment, it fits well into home workouts, warm-ups, core finishers, and beginner strength routines. However, quality matters more than time. Therefore, a clean 20-second plank is more useful than a long hold with dropped hips, shrugged shoulders, or lower-back pressure.
Quick Overview
| Body Part | Core |
|---|---|
| Primary Muscle | Transverse abdominis, rectus abdominis, and deep core stabilizers |
| Secondary Muscle | Obliques, shoulders, glutes, quads, serratus anterior, and upper back stabilizers |
| Equipment | Bodyweight only; exercise mat optional |
| Difficulty | Beginner to intermediate, depending on hold time and form control |
Sets & Reps (By Goal)
- Beginner core control: 2–3 sets of 15–25 seconds with 45–60 seconds rest.
- General core strength: 3–4 sets of 25–45 seconds with 45–75 seconds rest.
- Core endurance: 3–5 sets of 45–75 seconds with 60–90 seconds rest.
- Warm-up activation: 1–2 sets of 15–30 seconds before squats, deadlifts, push-ups, or athletic work.
- Posture and stability practice: 2–3 short sets, performed several times per week with perfect alignment.
Progression rule: Add time only when your hips, ribs, neck, and shoulders stay controlled. Once your form breaks, end the set and rest.
Setup / Starting Position
- Place your forearms on the floor: Set your elbows directly under your shoulders. Keep your forearms parallel or slightly angled inward.
- Extend your legs back: Step both feet behind you and balance on your toes. Keep your feet about hip-width apart for better stability.
- Set your spine: Create a straight line from your head to your heels. Keep your neck neutral and look slightly down.
- Brace your core: Gently pull your ribs down and tighten your abs as if preparing for a light punch to the stomach.
- Engage your glutes: Squeeze lightly to keep your pelvis from tipping forward.
- Press through the floor: Push your forearms down so your shoulders stay active instead of collapsing.
A good setup should feel strong, balanced, and controlled before the timer starts. If your lower back already feels compressed, shorten the set or adjust your pelvis before continuing.
Execution (Step-by-Step)
- Start in the forearm plank position: Keep your elbows under your shoulders and your toes anchored to the floor.
- Create full-body tension: Brace your abs, lightly squeeze your glutes, and keep your thighs active.
- Hold a straight line: Avoid letting your hips drop toward the floor. At the same time, avoid lifting them too high.
- Keep your shoulders stable: Press the floor away with your forearms so your chest does not sink between your shoulders.
- Maintain a neutral neck: Look slightly ahead of your hands, not forward at the wall. This keeps your neck aligned with your spine.
- Breathe with control: Take slow breaths through your nose or mouth while keeping your core tight.
- Finish before form breaks: Lower your knees to the floor when your hips start to sag, your back arches, or your shoulders lose position.
Pro Tips & Common Mistakes
Pro Tips
- Think “ribs down, hips level”: This cue helps prevent lower-back arching.
- Push the floor away: Active shoulders protect the joints and improve upper-body stability.
- Squeeze the glutes lightly: This supports pelvic control and keeps the body aligned.
- Use short, high-quality holds: Several clean sets usually work better than one sloppy long set.
- Keep breathing: Controlled breathing makes the plank safer and more useful for real core endurance.
Common Mistakes
- Letting the hips sag: This shifts stress into the lower back and reduces abdominal engagement.
- Lifting the hips too high: This makes the exercise easier and removes tension from the target muscles.
- Shrugging the shoulders: Keep your neck long and your shoulders away from your ears.
- Looking forward: This can strain the neck. Instead, keep your gaze down and slightly ahead.
- Holding your breath: Breath-holding increases tension unnecessarily and can make the exercise harder to control.
FAQ
What muscles does the Front Plank work?
The Front Plank mainly works the deep core muscles, including the transverse abdominis and rectus abdominis. In addition, it trains the obliques, shoulders, glutes, quads, and upper-back stabilizers.
How long should I hold a Front Plank?
Beginners can start with 15–25 seconds per set. After that, increase gradually as long as your body stays straight, your hips remain level, and your lower back feels comfortable.
Is the Front Plank good for beginners?
Yes. The Front Plank is beginner-friendly when the hold is short and controlled. However, beginners should stop each set before the hips sag or the shoulders collapse.
Why does my lower back hurt during planks?
Lower-back discomfort often happens when the hips drop, the ribs flare, or the abs lose tension. Therefore, shorten the hold, squeeze the glutes lightly, and focus on keeping your ribs down.
Should I do planks every day?
You can practice light plank holds often, but hard sets do not need to be done every day. For most people, 3–5 sessions per week is enough for steady improvement.
Is a longer plank always better?
No. A longer plank is only useful when your form stays clean. Once your hips drop, your back arches, or your shoulders collapse, the set becomes less effective.
Recommended Equipment
- Exercise Mat — adds comfort for the forearms and helps protect the elbows during longer plank holds.
- Thick Yoga Mat — useful for home workouts, core training, stretching, and floor-based exercises.
- Core Sliders — helpful for progressing from basic planks into plank body saws, mountain climbers, and stability drills.
- Resistance Bands Set — useful for pairing planks with upper-back activation, shoulder stability, and posture work.
- Ab Wheel Roller — a more advanced core tool that can be added after you master strong plank alignment.
Tip: Start with a mat first. Then, add sliders, bands, or an ab wheel only after your plank form stays stable and pain-free.