Straight-Leg Wipers: Core Form, Benefits, Sets, Tips & FAQ
Learn Straight-Leg Wipers to strengthen abs, obliques, and core control with safe form, sets, mistakes, FAQs, and equipment tips.
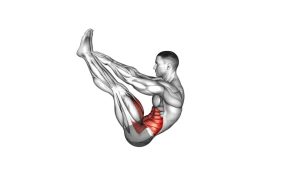
Straight-Leg Wipers
This exercise is best used when you already have a solid foundation in basic core training. Unlike a simple lying leg raise, Straight-Leg Wipers challenge the body through rotation, anti-rotation, and controlled hip movement at the same time. Therefore, the goal is not to touch the floor quickly. Instead, focus on keeping the shoulders grounded, the legs straight, and the lower back controlled from side to side.
Quick Overview
| Body Part | Core |
|---|---|
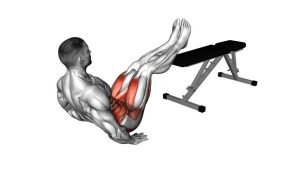
| Primary Muscle | Rectus abdominis and obliques |
| Secondary Muscle | Transverse abdominis, hip flexors, lower back stabilizers |
| Equipment | No equipment required; exercise mat optional |
| Difficulty | Intermediate to advanced |
Sets & Reps (By Goal)
- Core control: 2–3 sets × 6–8 reps per side with slow tempo
- Strength development: 3–4 sets × 8–10 reps per side with full control
- Advanced endurance: 3 sets × 10–14 reps per side, only if form stays clean
- Skill practice: 2 sets × 4–6 reps per side using a shorter range of motion
Progression rule: Increase range of motion before adding speed. If control breaks, return to bent-knee wipers or use a smaller side-to-side arc.
Setup / Starting Position
- Lie on your back: Position your body flat on the floor with your head, upper back, and hips supported.
- Open the arms wide: Extend both arms out to the sides in a T-shape, then press the hands and arms gently into the floor.
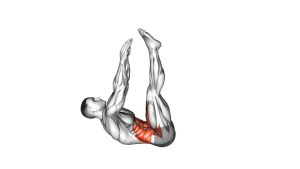
- Raise both legs: Lift the legs straight up until they are close to vertical above the hips.
- Keep the legs together: Maintain straight knees and keep the feet close together throughout the movement.
- Brace before moving: Tighten the core lightly and keep the shoulders anchored before lowering the legs to either side.
Tip: If your hamstrings limit the starting position, keep a very small knee bend while still focusing on the same controlled side-to-side pattern.
Execution (Step-by-Step)
- Start tall through the legs: Hold both legs together above the hips while keeping the arms wide and the shoulders grounded.
- Lower to one side: Slowly rotate the legs toward one side while keeping them straight and controlled.
- Control the bottom: Stop before the legs touch the floor or before your opposite shoulder lifts.
- Pull back to center: Use the abs and obliques to bring the legs back to the vertical starting position.
- Switch sides: Lower the legs toward the opposite side with the same slow tempo and range.
- Repeat evenly: Continue alternating sides while keeping the movement smooth, controlled, and symmetrical.
Pro Tips & Common Mistakes
- Press the arms into the floor: This creates a stable base and helps prevent the upper body from twisting too much.
- Keep the shoulders down: If one shoulder lifts, the range is too large or the movement is too fast.
- Move slowly: A controlled descent makes the obliques work harder and protects the lower back.
- Avoid dropping the legs: Letting gravity take over reduces tension and increases strain.
- Do not force the floor touch: Stop where your core can still control the legs.
- Keep breathing: Exhale gently as the legs return to center, then inhale as you lower with control.
- Use a bent-knee regression: If the straight-leg version feels too heavy, bend the knees and master the pattern first.
FAQ
What muscles do Straight-Leg Wipers work?
Straight-Leg Wipers mainly train the abs and obliques. In addition, the transverse abdominis, hip flexors, and lower back stabilizers help control the legs and pelvis during the side-to-side rotation.
Are Straight-Leg Wipers good for obliques?
Yes. Because the legs rotate from side to side, the obliques work strongly to control the descent and bring the legs back to center. However, the exercise should be performed slowly for the best effect.
Why does my lower back arch during Straight-Leg Wipers?
Your lower back may arch because the straight-leg lever is too challenging. Reduce the range of motion, bend the knees slightly, or practice bent-knee wipers until your core can control the movement.
Should my legs touch the floor?
Not necessarily. Touching the floor is not required. Instead, lower only as far as you can while keeping both shoulders grounded and the movement controlled.
Are Straight-Leg Wipers beginner-friendly?
They are usually better for intermediate or advanced trainees. Beginners should first build control with dead bugs, lying knee drops, reverse crunches, or bent-knee wipers.
Recommended Equipment (Optional)
- Exercise Mat — adds floor comfort and helps protect the spine during supine core exercises
- Non-Slip Fitness Mat — improves grip so the arms and upper body stay stable during rotation
- Adjustable Ankle Weights — advanced option for increasing difficulty after bodyweight control is mastered
- Core Sliders — useful for related core stability drills and controlled abdominal progressions
- Foam Roller — helpful for warm-ups, mobility work, and post-workout recovery
Tip: Master the bodyweight version first. After that, small progressions are safer than adding heavy resistance too early.