Reverse Push-Up: Proper Form, Sets, Muscles Worked & FAQ
Learn the Reverse Push-Up with proper form, setup, execution tips, sets and reps by goal, common mistakes, FAQs, and recommended equipment to improve triceps strength safely.
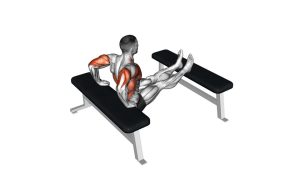
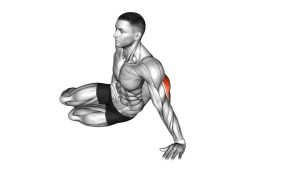
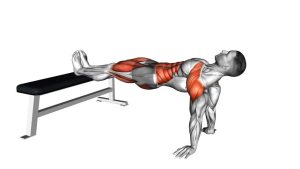
Reverse Push-Up
This exercise is effective for building triceps strength, improving upper-arm endurance, and adding extra pressing volume using only bodyweight. The movement should feel controlled and stable, with most of the effort coming from the back of the upper arms. Keep your hips close to the bench, your chest open, and your elbows tracking backward rather than flaring too wide.
Quick Overview
| Body Part | Triceps |
|---|---|
| Primary Muscle | Triceps brachii |
| Secondary Muscle | Anterior deltoids, lower chest, forearms, core stabilizers |
| Equipment | Bench, step, box, or other stable elevated surface |
| Difficulty | Beginner to Intermediate, depending on leg position and range of motion |
Sets & Reps (By Goal)
- General strength: 3–4 sets × 6–10 reps, 60–90 seconds rest
- Muscle growth: 3–4 sets × 10–15 reps, 45–75 seconds rest
- Muscular endurance: 2–3 sets × 15–20 reps, 30–45 seconds rest
- Beginner practice: 2–3 sets × 6–8 controlled reps with knees bent
Progression rule: First improve control, then increase reps, then make the movement harder by straightening the legs or elevating the feet. Do not add difficulty if shoulder position becomes unstable.
Setup / Starting Position
- Choose a stable surface: Sit on the edge of a bench or sturdy platform that will not shift during the set.
- Place your hands behind you: Set your palms on the edge next to your hips with fingers pointing forward.
- Move your hips off the bench: Slide forward so your body is supported by your arms.
- Position your legs: Keep knees bent for an easier version or extend your legs for more difficulty.
- Set posture: Lift your chest, brace your core lightly, and keep your shoulders down and back.
Tip: Keep your body close to the bench from the start. Letting the hips drift too far forward usually increases shoulder stress and reduces triceps focus.
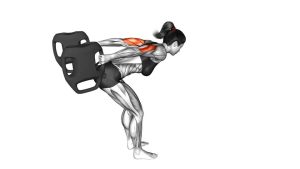
Execution (Step-by-Step)
- Start at lockout: Begin with your arms straight but not aggressively jammed into the joints.
- Lower under control: Bend your elbows and descend slowly, keeping them pointed mostly backward.
- Stay close to the bench: Keep the torso near the platform rather than letting the body drift out in front.
- Reach a comfortable bottom position: Lower until your elbows are around 90 degrees or until your shoulders remain pain-free and stable.
- Push back up: Press through your palms and extend the elbows to return to the starting position.
- Repeat smoothly: Perform each rep with the same controlled path and avoid bouncing out of the bottom.
Pro Tips & Common Mistakes
- Keep elbows tracking backward: Excessive flaring can shift tension away from the triceps and irritate the shoulders.
- Do not drop too deep: Going lower than your mobility allows can overload the front of the shoulder joint.
- Control the lowering phase: A slow descent improves tension and makes the movement safer.
- Keep the chest open: Avoid collapsing through the shoulders or rounding the upper back.
- Stay close to the bench: Hips drifting forward usually makes the exercise less efficient.
- Use bent knees if needed: This is a smart regression, not a weakness, especially for beginners.
- Avoid bouncing: Momentum reduces muscle tension and can irritate the shoulders and wrists.
FAQ
What muscles does the reverse push-up work?
The reverse push-up mainly targets the triceps. It also involves the front shoulders, lower chest, and stabilizers in the forearms and core.
Is the reverse push-up the same as a bench dip?
In most gym contexts, yes. The reverse push-up is commonly performed as a bench dip-style bodyweight triceps exercise with the hands placed behind the body.
Should beginners bend their knees?
Yes. Bending the knees reduces the load and makes it easier to control the movement, which is helpful for learning proper form and protecting the shoulders.
How low should I go?
Lower only as far as you can while keeping the shoulders comfortable and the elbows under control. For many people, stopping around a 90-degree elbow bend is a practical starting point.
Why do I feel this more in my shoulders than my triceps?
That usually happens when the body drifts too far away from the bench, the shoulders roll forward, or the range of motion is too deep. Stay close to the bench and reduce depth until the triceps take over.
Recommended Equipment
- Adjustable Weight Bench — a stable bench gives you the safest and most consistent setup for reverse push-ups
- Dip Station — useful if you want to progress into harder bodyweight triceps and dip variations
- Resistance Bands Set — helpful for warm-ups, triceps pump work, and shoulder activation before training
- Workout Gloves — can improve grip comfort if your hands slip on the bench surface
- Exercise Mat — useful for heel comfort, floor traction, and home workout setups around the bench
Tip: Prioritize a stable bench or platform first. Better setup quality usually improves both safety and exercise execution.