Weighted Three-Bench Dip: Proper Form, Sets, Muscles Worked & FAQ
Learn how to do the Weighted Three-Bench Dip with proper form to build stronger triceps, shoulders, and pressing strength. Includes setup, step-by-step execution, sets by goal, common mistakes, FAQs, and recommended Amazon equipment.
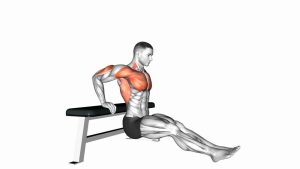
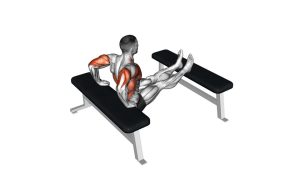
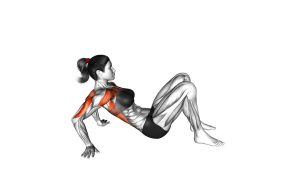
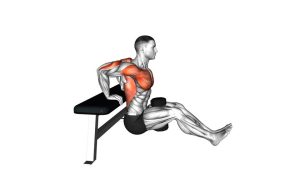
Weighted Three-Bench Dip
This exercise is best used as a higher-intensity accessory for lifters who already have good control in standard bench dips or parallel-bar dips. The elevated feet increase leverage, and the weight plate raises the loading demand even more. You should feel strong work through the back of the upper arms, with the shoulders staying stable and the chest lifted throughout the rep.
Quick Overview
| Body Part | Triceps |
|---|---|
| Primary Muscle | Triceps brachii |
| Secondary Muscle | Anterior deltoids and lower chest |
| Equipment | Two sturdy benches and one weight plate |
| Difficulty | Intermediate to Advanced |
Sets & Reps (By Goal)
- Muscle growth: 3–4 sets × 8–12 reps, 60–90 sec rest
- Strength emphasis: 4–5 sets × 5–8 reps, 90–120 sec rest
- Accessory pressing work: 2–4 sets × 10–15 reps, controlled tempo
- Bodyweight progression work: 2–3 sets × 6–10 reps before adding plates
Progression rule: First master full control with bodyweight and elevated feet, then add small amounts of external load. Increase load only when every rep stays smooth and shoulder-friendly.
Setup / Starting Position
- Position the benches: Place one bench behind you for your hands and one in front for your heels. Both surfaces should be stable and non-slip.
- Set your hands: Place your palms on the rear bench just outside hip-width, fingers pointing forward.
- Elevate the feet: Put your heels on the front bench with the legs extended.
- Add the load: Place a weight plate securely across the thighs close to the hips.
- Start tall: Lift the hips off the floor, extend the elbows, keep the chest open, and let the shoulders stay down and back.
Tip: Keep the hips close to the rear bench. If they drift too far forward, the shoulders usually take more stress.
Execution (Step-by-Step)
- Brace and stabilize: Tighten the core, keep the neck neutral, and lock the plate in place with steady leg tension.
- Lower under control: Bend the elbows straight behind you and descend slowly while keeping your torso upright and your hips close to the bench.
- Reach a safe bottom: Lower until your elbows reach about 90 degrees or a little deeper only if your shoulders stay comfortable.
- Pause briefly: Control the bottom without bouncing or collapsing into the shoulders.
- Press back up: Drive through the palms, extend the elbows, and return to the top until the arms are straight without aggressively locking out.
Pro Tips & Common Mistakes
- Keep the elbows driving back: This improves triceps emphasis and helps reduce sloppy shoulder positioning.
- Do not drop too deep: Excessive bottom depth often turns the movement into a shoulder stress test instead of a good triceps exercise.
- Stay close to the bench: Letting the hips drift forward increases joint stress and usually makes the rep feel less stable.
- Control the eccentric: A slow lowering phase improves muscle tension and helps keep the plate steady.
- Do not bounce out of the bottom: Use muscular control, not rebound.
- Progress the load gradually: Small plate increases are better than jumping up too fast and losing clean mechanics.
FAQ
What muscles does the Weighted Three-Bench Dip work?
It mainly targets the triceps, with additional help from the anterior deltoids and chest. The elevated-feet setup and added load make it much more demanding than a standard bench dip.
Is this better than regular bench dips?
It is not automatically better, just harder. This variation is useful when normal bench dips become too easy and you want more overload for triceps growth or pressing assistance.
How deep should I go?
Lower until your elbows are around 90 degrees, or slightly deeper only if you can do so without front-shoulder discomfort. More depth is not always better on bench dip variations.
Can beginners do Weighted Three-Bench Dips?
Most beginners should start with bodyweight bench dips, bent-knee bench dips, or assisted dip progressions first. This weighted elevated-feet version is better suited to trainees with solid pressing control already built.
What should I do if the plate moves on my thighs?
Use a manageable plate size, place it close to the hips, and set it carefully before starting. If it still shifts, reduce the load or use a different resistance method such as a dip belt or weighted vest.
Recommended Equipment
- Dip Belt — a cleaner way to add resistance once plate-on-thigh loading becomes awkward
- Weighted Vest — adds load without having to balance a plate across the lap
- Adjustable Workout Bench — useful for setting up a stable rear support and elevated foot position
- Push-Up Bars / Parallettes — good for related bodyweight pressing and arm-strength accessories
- Rubber-Coated Weight Plates — practical for progressive overload and more comfortable lap loading
Use sturdy, non-slip equipment only. Since this exercise loads the shoulders in extension, stability matters as much as resistance.