Diamond Push-Up Against Wall: Form, Benefits, Sets, Tips & FAQ
Learn how to do the Diamond Push-Up Against Wall with proper form. Beginner-friendly triceps exercise with setup, step-by-step execution, mistakes, FAQs, and equipment tips.
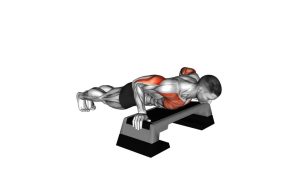
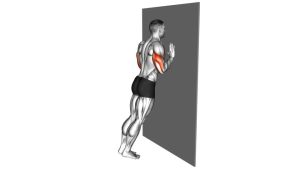
Diamond Push-Up Against Wall
This exercise is especially useful for beginners who want to build strength for regular diamond push-ups but are not ready for the full floor version yet. Because the wall reduces bodyweight load, you can focus on elbow tracking, hand position, posture, and smooth control without collapsing through the shoulders or lower back.
The key detail is keeping the elbows close to the body as you lower. A wide elbow flare turns the movement into a less effective push-up and can place unnecessary stress on the shoulders. Keep the movement clean, controlled, and small enough that you can maintain a straight body line from head to heels.
Quick Overview
| Body Part | Triceps |
|---|---|
| Primary Muscle | Triceps brachii |
| Secondary Muscle | Chest, front shoulders, serratus anterior, core stabilizers |
| Equipment | Wall only; optional exercise mat or wrist support |
| Difficulty | Beginner |
Sets & Reps (By Goal)
- Beginner technique: 2–3 sets × 8–12 reps with slow control.
- Triceps endurance: 3–4 sets × 12–20 reps with short rest periods.
- Strength progression: 3–5 sets × 6–10 reps while gradually stepping farther from the wall.
- Warm-up activation: 1–2 sets × 10–15 reps before push-ups, dips, or upper-body pressing.
- Rehab-friendly pressing practice: 2–3 sets × 6–10 reps using a pain-free range of motion.
Progression rule: First improve control and range of motion. Then step your feet farther back from the wall to increase difficulty. After that, progress to an incline diamond push-up on a bench before moving to the floor version.
Setup / Starting Position
- Stand facing a wall: Position yourself about one arm’s length away from the wall. The farther your feet move back, the harder the exercise becomes.
- Create the diamond hand shape: Place your hands on the wall at about chest height. Bring the thumbs and index fingers close together to form a diamond or triangle shape.
- Set your body line: Keep your head, ribs, hips, knees, and ankles aligned. Avoid bending at the hips or letting the lower back arch.
- Brace lightly: Tighten your core just enough to stop your body from sagging as you move.
- Relax the neck: Keep your gaze slightly forward toward the wall. Do not crane the neck or drop the head between the shoulders.
- Prepare the elbows: Before lowering, point your elbows slightly down and back rather than out to the sides.
Execution (Step-by-Step)
- Start tall and stable: Press both palms into the wall and keep your body in one straight line.
- Bend the elbows: Slowly lower your chest toward your hands. Keep your elbows close to your sides instead of letting them flare outward.
- Control the descent: Move in a smooth 2–3 second lowering phase. Do not drop quickly into the wall.
- Reach the bottom position: Stop when your chest is close to the diamond hand position or when your elbows reach a comfortable bend.
- Pause briefly: Hold the bottom position for a moment while keeping your shoulders down and your core engaged.
- Press away: Push through your palms and straighten your elbows to move your body away from the wall.
- Finish with control: Return to the starting position without locking the elbows aggressively.
- Repeat: Perform each repetition with the same clean elbow path and steady body alignment.
Pro Tips & Common Mistakes
Pro Tips
- Keep the elbows tucked: The closer elbow path increases triceps involvement and makes the movement more specific to the diamond push-up pattern.
- Use a slow tempo: A controlled lowering phase helps build strength and teaches better shoulder stability.
- Step farther back to progress: Increasing your body angle adds more resistance without changing the exercise.
- Keep the diamond centered: Your hands should stay in line with the middle of your chest.
- Press evenly through both hands: Avoid shifting weight into one arm or twisting your torso.
Common Mistakes
- Flaring the elbows wide: This reduces triceps emphasis and can irritate the shoulders.
- Standing too close to the wall: This makes the exercise too easy and limits the training effect.
- Letting the hips sag: Keep the body straight instead of arching the lower back.
- Dropping the head forward: Maintain a neutral neck and move the chest toward the wall.
- Rushing reps: Fast bouncing reps reduce muscle tension and make technique harder to control.
- Forcing the diamond too narrow: If your wrists hurt, widen the hands slightly while keeping them close.
FAQ
Is the Diamond Push-Up Against Wall good for beginners?
Yes. It is one of the easiest diamond push-up variations because the wall reduces the amount of bodyweight you have to press. This allows beginners to learn close-grip pushing mechanics before moving to harder incline or floor versions.
What muscles does the Diamond Push-Up Against Wall work?
The main target is the triceps brachii. The chest, front shoulders, serratus anterior, and core also assist by stabilizing the body and supporting the pushing motion.
Where should my hands be placed?
Place your hands at about chest height on the wall. Bring your thumbs and index fingers close together to form a diamond shape. If that position bothers your wrists, make the diamond slightly wider.
Should my elbows stay close or wide?
Keep your elbows close to your body. They should travel backward and slightly downward, not flare out to the sides. This keeps the exercise focused on the triceps and improves pressing control.
How can I make this exercise harder?
Step your feet farther away from the wall to increase the angle. Once that becomes easy, progress to a diamond push-up on a high bench, then a lower bench, and eventually the floor.
Is this exercise safe for wrists?
It is usually easier on the wrists than floor diamond push-ups because less bodyweight is loaded through the hands. However, if the narrow hand position causes discomfort, widen your hands slightly or use push-up handles on an elevated surface instead.
Recommended Equipment
- Push-Up Handles — useful when progressing from wall push-ups to incline or floor push-ups with less wrist strain.
- Exercise Mat — helpful for warm-ups, mobility work, and future floor push-up progressions.
- Resistance Bands Set — great for triceps pressdowns, assisted push-up drills, and upper-body activation.
- Wrist Wraps — optional support for people who feel wrist pressure during push-up variations.
- Adjustable Workout Bench — ideal for progressing from wall diamond push-ups to incline diamond push-ups.
Choose equipment based on your current level. For this wall version, you do not need anything besides a stable wall, but these tools can help with progression, wrist comfort, and long-term triceps training.