Incline Close-Grip Push-Up with Chair: Form, Sets, Tips & FAQ
Learn how to do the Incline Close-Grip Push-Up with Chair to strengthen triceps, chest, and shoulders with proper form, sets by goal, common mistakes, FAQs, and equipment tips.
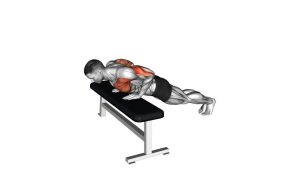
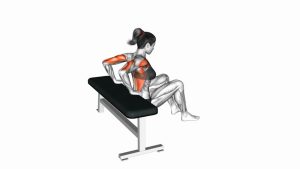
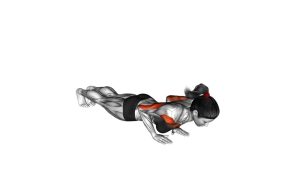
Incline Close-Grip Push-Up with Chair
This exercise is best performed with a stable chair, controlled tempo, and clean elbow tracking. The close-grip position shifts more work toward the triceps brachii, while the incline angle reduces total bodyweight resistance. As a result, it gives you an effective triceps-focused push-up variation without needing dumbbells, cables, or machines.
Unlike a regular incline push-up, the hands stay closer together and the elbows travel backward near the ribs. This creates more elbow extension demand, which is the main job of the triceps. To make the movement effective, avoid rushing the descent, dropping the hips, or letting the elbows flare wide. Think of the exercise as a controlled upper-arm strength drill, not just a fast push-up variation.
Quick Overview
| Body Part | Arms |
|---|---|
| Primary Muscle | Triceps brachii |
| Secondary Muscle | Chest, anterior deltoids, serratus anterior, core stabilizers |
| Equipment | Chair, bench, box, or stable elevated surface |
| Difficulty | Beginner to intermediate |
Sets & Reps (By Goal)
- Beginner strength: 2–3 sets × 6–10 reps with slow control and full-body tension.
- Triceps hypertrophy: 3–4 sets × 8–15 reps, keeping elbows tucked and tempo controlled.
- Muscular endurance: 2–4 sets × 15–25 reps using a moderate incline and smooth breathing.
- Warm-up activation: 1–2 sets × 8–12 reps before upper-body pushing workouts.
- Home workout finisher: 2–3 sets close to technical failure, stopping before form breaks.
Progression rule: First increase reps, then slow the tempo, then lower the incline height. A lower surface makes the exercise harder because more bodyweight shifts onto the arms.
Setup / Starting Position
- Choose a stable chair: Place a sturdy chair on a non-slip floor. The chair should not rock, slide, or tilt when pressure is applied.
- Set your hands close: Place both hands on the chair surface inside shoulder width. Your hands should be narrow enough to emphasize the triceps but not so close that your wrists feel painful.
- Step your feet back: Walk your feet backward until your body forms a straight diagonal line from head to heels.
- Brace your core: Tighten your abs lightly, squeeze your glutes, and keep your ribs from flaring.
- Stack the upper body: Keep shoulders down, neck neutral, and elbows pointing mostly backward.
- Set your gaze: Look slightly down toward the chair, not forward or under your body.
Execution (Step-by-Step)
- Start tall through the arms: Begin with arms extended, hands pressing firmly into the chair, and elbows softly locked.
- Lower under control: Bend your elbows and bring your chest toward the chair. Move slowly, especially during the lowering phase.
- Keep elbows tucked: Let the elbows travel backward close to your sides instead of flaring out wide like a regular push-up.
- Maintain a straight body line: Do not let your hips sag toward the floor or rise into a pike. Your chest, hips, and legs should descend together.
- Reach the bottom position: Lower until your chest is close to the chair or until your elbows reach a comfortable bend without shoulder discomfort.
- Press back up: Push through your palms and extend your elbows to return to the starting position.
- Finish with control: At the top, fully engage the triceps without aggressively locking or snapping the elbows.
Pro Tips & Common Mistakes
Pro Tips
- Use a close but comfortable grip: Your hands do not need to touch. A slightly narrow grip is enough to increase triceps demand.
- Control the eccentric: Take about 2–3 seconds to lower. This keeps tension on the triceps and improves technique.
- Keep the chair height appropriate: Higher incline is easier; lower incline is harder. Choose a height that allows clean reps.
- Push through the whole palm: Avoid collapsing into the wrists. Spread pressure through the base of the palm and fingers.
- Stop before form breaks: If your hips sag, shoulders shrug, or elbows flare, end the set.
Common Mistakes
- Elbows flaring wide: This reduces triceps emphasis and may increase shoulder stress.
- Using an unstable chair: A moving chair makes the exercise unsafe and reduces control.
- Sagging hips: This usually means the core is not braced or the set has gone too far.
- Only doing half reps: Partial range limits strength development. Lower with control as far as your shoulders and wrists allow.
- Rushing the movement: Fast bouncing removes tension from the triceps and increases joint stress.
- Placing hands too narrow: If the wrists hurt or the elbows feel jammed, widen the hands slightly.
FAQ
What muscles does the Incline Close-Grip Push-Up with Chair work?
It primarily works the triceps brachii. The chest, front shoulders, serratus anterior, and core also assist to stabilize and control the movement.
Is this exercise good for beginners?
Yes. The chair incline reduces the amount of bodyweight you have to press, making it easier than a close-grip push-up on the floor. Beginners should start with a higher surface and focus on slow, clean reps.
How close should my hands be?
Your hands should be inside shoulder width, but they do not need to touch. If your wrists or elbows feel uncomfortable, separate your hands slightly while still keeping the elbows tucked.
Why do I feel this more in my chest than my triceps?
You may be flaring your elbows or using a grip that is too wide. Keep your elbows closer to your ribs and focus on pressing by extending the elbows instead of just pushing the chest away.
How can I make the exercise harder?
Use a lower surface, slow the lowering phase, pause at the bottom, increase reps, or eventually progress to a floor close-grip push-up. Do not progress until you can maintain a straight body line and tucked elbows.
Can I use this in a home triceps workout?
Absolutely. It is one of the best home-friendly triceps exercises because it requires only a chair or stable elevated surface. Pair it with dips, overhead extensions, or band pressdowns for a complete triceps session.
Recommended Equipment
- Adjustable Workout Bench — a more stable and gym-style surface than a chair for incline push-up variations.
- Push-Up Handles — useful for keeping wrists more neutral during close-grip push-up work.
- Non-Slip Exercise Mat — helps keep your feet secure and protects the floor during home workouts.
- Resistance Bands Set — great for pairing with triceps pressdowns, band pushdowns, and upper-body warm-ups.
- Workout Wrist Wraps — optional support for lifters who need extra wrist stability during pressing exercises.
Choose equipment that improves stability and control. The most important requirement is a safe elevated surface that does not slide while you press.