Groin Crunch Exercise: Form, Benefits, Sets, Tips & FAQ
Learn how to do the Groin Crunch with proper form. Build waist control, abs strength, hip flexor coordination, and groin stability with step-by-step cues, sets, mistakes, FAQs, and equipment.
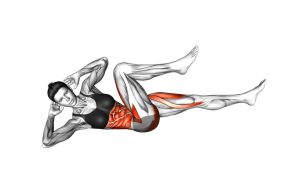
Groin Crunch
The Groin Crunch is useful when you want a compact core movement that also involves the lower body. Because the knee moves toward the torso, the exercise challenges the connection between the abdominal wall, the hip flexors, and the groin area. As a result, it can improve coordination during twisting, sprinting, kicking, grappling, and many athletic movements that require the trunk and hips to work together.
However, this movement should stay smooth and controlled. The goal is not to yank the head forward, swing the leg, or force the hip into an uncomfortable range. Instead, keep the crunch small, breathe out during the upward phase, and let the abs guide the movement.
Quick Overview
| Body Part | Abs |
|---|---|
| Primary Muscle | Rectus abdominis and hip flexors |
| Secondary Muscle | Obliques, adductors, deep core stabilizers, and lower abs region |
| Equipment | Bodyweight only; exercise mat recommended |
| Difficulty | Beginner to intermediate, depending on range, tempo, and control |
Sets & Reps (By Goal)
- Core activation: 2 sets of 8–10 reps per side with a slow, clean tempo.
- Muscle endurance: 3 sets of 12–15 reps per side with short rest periods.
- Waist control: 3 sets of 10–12 reps per side with a 1-second squeeze at the top.
- Beginner practice: 2 sets of 6–8 reps per side using a small range of motion.
- Bodyweight core circuit: 30–40 seconds per side, then rest for 30–45 seconds.
Progression rule: First improve control and breathing. After that, add reps, slow the lowering phase, or increase the top squeeze. Do not progress by pulling harder on the neck or swinging the leg faster.
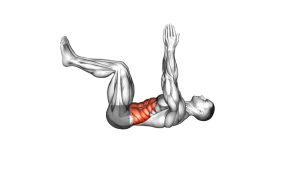
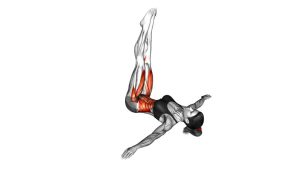
Setup / Starting Position
- Lie on your back: Use a mat if the floor feels hard. Keep your body centered and relaxed before starting.
- Bend your knees: Keep the legs comfortable. The working knee should be able to move toward the torso without hip pinching.
- Place your hands lightly: Keep the hands beside the head or across the chest. If the hands support the head, avoid pulling.
- Brace the core: Draw the ribs slightly down and keep the lower back controlled against the floor.
- Set the neck position: Keep the chin slightly tucked, as if holding a small space between the chin and chest.
- Prepare the knee drive: Before lifting, know which knee will move inward toward the torso during the crunch.
The starting position should feel stable. If your lower back arches strongly before the first rep, reduce the leg movement and focus on abdominal control.
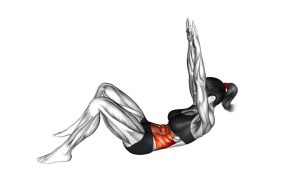
Execution (Step-by-Step)
- Brace before moving: Tighten your abs gently and keep your ribs from flaring upward.
- Begin the crunch: Lift your head, shoulders, and upper back slightly off the floor.
- Drive the knee inward: Bring the working knee toward the torso or groin line while keeping the motion controlled.
- Compress through the waist: Exhale as your torso and knee move closer together.
- Pause briefly: Hold the top position for a short moment and feel the abs working.
- Lower with control: Return your shoulders and leg slowly to the starting position.
- Reset your breathing: Inhale at the bottom, then repeat without rushing.
Pro Tips & Common Mistakes
Pro Tips
- Exhale at the top: Breathing out helps the abs shorten and improves the crunch position.
- Use a small lift: You only need the shoulder blades to leave the floor slightly.
- Keep the knee path controlled: Move the knee inward with purpose instead of swinging it upward.
- Slow down the lowering phase: A controlled descent increases core tension and protects the lower back.
- Alternate sides evenly: Match the same number of reps on each side to avoid imbalance.
Common Mistakes
- Pulling the neck: This shifts stress away from the abs and may cause discomfort.
- Using momentum: Fast swinging reduces the quality of the movement.
- Over-crunching: A huge sit-up is not necessary. Keep the movement compact.
- Letting the lower back arch: Maintain core tension so the pelvis stays controlled.
- Forcing the groin: The knee should move naturally. Never push into sharp inner-thigh pain.
FAQ
What muscles does the Groin Crunch work?
The Groin Crunch mainly works the abs and hip flexors. In addition, it activates the obliques, inner thighs, and deep core stabilizers because the knee moves inward while the torso crunches.
Is the Groin Crunch good for lower abs?
Yes, it can help target the lower abs region because the movement combines trunk flexion with a knee-drive pattern. Even so, the lower abs work best when the pelvis stays controlled and the reps stay slow.
Should I feel this exercise in my groin?
A light inner-thigh or hip-flexor feeling is normal. However, sharp groin pain is not normal. If discomfort appears, reduce the range, slow the knee drive, or switch to a basic crunch.
Can beginners do the Groin Crunch?
Beginners can do this exercise if they use a small range of motion and avoid pulling on the neck. Start with fewer reps, focus on control, and increase volume only when the movement feels smooth.
Is the Groin Crunch better than a regular crunch?
It is not automatically better, but it is more dynamic. A regular crunch focuses mainly on spinal flexion, while the Groin Crunch adds hip and inner-thigh coordination. Therefore, both exercises can be useful.
How many times per week should I do this exercise?
Most people can include it 2–4 times per week as part of a core routine. For best results, pair it with planks, dead bugs, side planks, and anti-rotation exercises.
Recommended Equipment
- Exercise Mat — provides comfort and support during floor-based crunch variations.
- Ab Mat — helps support the spine and improve crunch range for some users.
- Mini Resistance Bands — useful for adding light hip and inner-thigh activation drills.
- Foam Roller — helpful for recovery work around the hips, quads, and adductors.
- Core Sliders — useful for progressing into more advanced core and hip-flexor exercises.
Choose equipment that supports better control, not more strain. The Groin Crunch works well with bodyweight alone, so optional tools should improve comfort, feedback, or progression.