Stability Ball Sit-Up: How to Do It, Benefits, Form Tips & FAQ
Learn how to perform the Stability Ball Sit-Up with proper form. Improve core strength, abdominal control, and stability with step-by-step instructions, sets, tips, FAQs, and equipment recommendations.
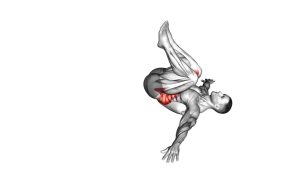
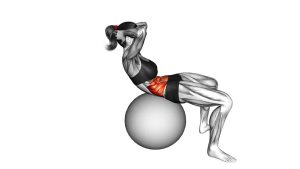
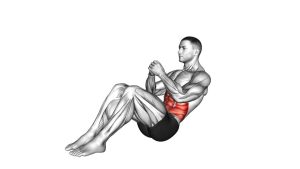
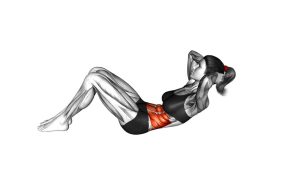
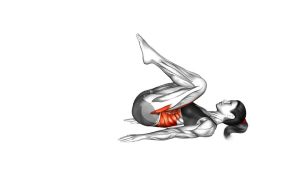
Stability Ball Sit-Up
This exercise is excellent for building stronger abs while also improving core stability. Because the body rests on an unstable surface, the obliques, deep core muscles, hip stabilizers, and spinal stabilizers all help maintain balance throughout the movement. The stability ball also increases the available range of motion, allowing the abdominal muscles to lengthen more at the bottom before contracting into the sit-up.
The movement should feel smooth and controlled. Start with your lower back supported by the ball, feet planted firmly, knees bent, and hands placed lightly behind the head or across the chest. As you rise, think about curling your ribs toward your pelvis instead of yanking your head forward. At the top, pause briefly and squeeze the abs before lowering with control.
Quick Overview
| Body Part | Abs |
|---|---|
| Primary Muscle | Rectus Abdominis |
| Secondary Muscle | Obliques, transverse abdominis, hip flexors, spinal stabilizers |
| Equipment | Stability ball / Swiss ball / exercise ball |
| Difficulty | Beginner to Intermediate |
Sets & Reps (By Goal)
- Beginner core control: 2–3 sets × 8–10 reps with slow tempo and full balance control.
- Muscle endurance: 3–4 sets × 12–20 reps using a steady rhythm and short rest periods.
- Ab strength: 3–4 sets × 8–12 reps with a 1–2 second squeeze at the top.
- Warm-up activation: 1–2 sets × 10–12 reps before a core or full-body workout.
- Core finisher: 2–3 sets × 15–25 reps, only if form stays clean and controlled.
Progression rule: First improve stability, range of motion, and control. Then increase reps, slow the lowering phase, add a longer top squeeze, or hold a light weight only after your body position remains stable.
Setup / Starting Position
- Choose the correct ball size: Use a stability ball that lets your knees bend comfortably around 90 degrees when your feet are flat on the floor.
- Sit on the ball first: Start seated, then slowly walk your feet forward until your lower back and mid-back are supported by the ball.
- Plant your feet firmly: Keep your feet about shoulder-width apart. A wider stance makes the exercise easier and more stable.
- Set your hips: Keep the hips slightly lifted and stable so you do not slide forward or collapse over the ball.
- Position your hands: Place hands lightly behind the head, across the chest, or reaching forward depending on your control level.
- Brace gently: Before moving, tighten the abs lightly and keep the ribs controlled.
- Start from a stretched position: Let the upper body extend slightly over the curve of the ball without forcing the lower back into pain.
Tip: If you are new to this exercise, cross your arms over your chest instead of placing your hands behind your head. This helps prevent pulling on the neck.
Execution (Step-by-Step)
- Start in the extended position: Lie back over the stability ball with your feet planted and your abs lightly engaged.
- Keep your neck neutral: Look slightly upward or forward. Do not aggressively tuck the chin or pull the head with your hands.
- Curl the torso upward: Contract your abs and bring your ribs toward your pelvis. Think about rolling the upper spine off the ball one segment at a time.
- Avoid hip thrusting: Keep the hips steady. The movement should come from abdominal flexion, not from pushing the hips forward.
- Reach the top position: Stop when your abs are fully contracted and your torso is raised enough to feel a strong squeeze.
- Pause briefly: Hold the top for 1 second while keeping balance and steady breathing.
- Lower slowly: Control the descent as your spine extends back over the ball.
- Return to the stretch: Let the abs lengthen at the bottom, but do not bounce or overextend the lower back.
- Repeat with rhythm: Perform each rep smoothly, keeping the ball stable and your feet connected to the floor.
Pro Tips & Common Mistakes
Pro Tips
- Use the ball’s curve: Let the ball support your lower back so your abs can stretch safely before contracting.
- Move with control: A slower lowering phase makes the exercise more effective and reduces bouncing.
- Keep your feet heavy: Press evenly through both feet to stay balanced.
- Exhale as you rise: Breathing out during the sit-up helps the abs contract harder.
- Pause at the top: A short squeeze improves mind-muscle connection and prevents momentum reps.
- Adjust foot width: Place feet wider for more stability or closer together for a greater balance challenge.
Common Mistakes
- Pulling the neck: Hands should support the head lightly, not yank it forward.
- Using momentum: Bouncing off the ball reduces ab tension and increases injury risk.
- Sliding on the ball: Keep the hips and feet stable so the ball does not roll under you uncontrollably.
- Turning it into a hip hinge: Curl through the spine instead of simply sitting up from the hips.
- Overextending the lower back: Use a comfortable stretch, not a painful arch.
- Holding your breath: Keep breathing steady to maintain control and reduce unnecessary tension.
FAQ
What muscles does the Stability Ball Sit-Up work?
The main muscle worked is the rectus abdominis, which flexes the spine and creates the visible “six-pack” area. The obliques, transverse abdominis, hip flexors, and spinal stabilizers also assist with balance and trunk control.
Is the Stability Ball Sit-Up better than a floor sit-up?
It depends on your goal. The stability ball version allows a greater abdominal stretch and challenges balance more than the floor version. However, it also requires more control, so beginners should move slowly and avoid bouncing.
Should I feel this exercise in my lower back?
You may feel light support pressure from the ball, but you should not feel sharp pain or pinching in the lower back. If you do, reduce the range of motion, brace more gently, or use a smaller movement.
Can beginners do Stability Ball Sit-Ups?
Yes, but beginners should start with a slow tempo, feet wider apart, and arms crossed over the chest. The priority is balance and clean abdominal contraction, not high reps.
How do I make the Stability Ball Sit-Up harder?
You can slow the lowering phase, pause longer at the top, bring your feet closer together, extend your arms overhead, or hold a light weight plate. Only progress when you can control the ball without sliding or pulling your neck.
How do I make this exercise easier?
Use a wider foot stance, cross your arms over your chest, reduce the range of motion, and perform fewer reps. You can also position the ball slightly higher on the back for more support.
Recommended Equipment
- Stability Ball / Swiss Ball — the main tool needed for this exercise and other core stability movements.
- Anti-Burst Exercise Ball — a safer, durable option for repeated sit-ups, crunches, and balance drills.
- Exercise Mat — improves foot grip and comfort when training at home.
- Light Weight Plate — useful for advanced progression once bodyweight reps are controlled.
- Resistance Bands — helpful for adding variety to core workouts and pairing with stability ball training.
Tip: Choose a stability ball size that matches your height and allows your feet to stay flat with your knees bent comfortably.