Spinal Stretch on Stability Ball: Form, Benefits, Sets & Tips
Learn the Spinal Stretch on Stability Ball to improve core control, spinal mobility, posture, and abdominal engagement with safe form.
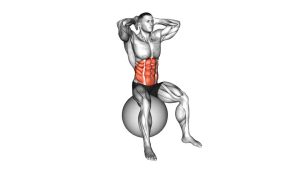
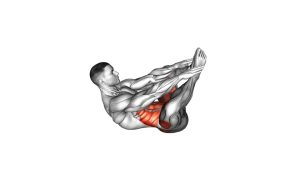
Spinal Stretch on Stability Ball
This exercise looks simple, but it works best when every repetition is slow, clean, and intentional. The goal is not to collapse forward or bounce on the ball. Instead, you should sit tall, brace lightly, curl the ribs toward the pelvis, and return to the starting position with control. Because the ball creates an unstable base, your hips, abs, and posture muscles must work together to keep the movement smooth.
The Spinal Stretch on Stability Ball can be used as a warm-up drill, a gentle core exercise, or a mobility-focused movement inside a home workout. It is especially useful for people who want to improve abdominal control while keeping the exercise lower impact than floor crunches. However, the hands should stay relaxed behind the head. They are there for light support only, not to pull the neck forward.
Quick Overview
| Body Part | Core |
|---|---|
| Primary Muscle | Rectus abdominis |
| Secondary Muscle | Obliques, deep core stabilizers, hip stabilizers, spinal erectors during controlled return |
| Equipment | Stability ball / exercise ball |
| Difficulty | Beginner to Intermediate |
Sets & Reps (By Goal)
- Mobility warm-up: 1–2 sets × 8–12 slow reps with a small range of motion.
- Core control: 2–3 sets × 10–15 reps with a 2-second squeeze at the curled position.
- Beginner strength: 2–3 sets × 8–10 reps, resting 45–60 seconds between sets.
- Posture and movement practice: 1–3 sets × 6–12 reps using a smooth tempo and relaxed breathing.
- Oblique emphasis: 2 sets × 8–10 reps per side with a small controlled rotation.
Progression rule: First improve control, then increase reps. After that, you may add a longer pause or a slightly larger range. Do not progress by pulling harder with the arms or bouncing the ball.
Setup / Starting Position
- Choose the right ball size: Sit on a stability ball that lets your knees bend comfortably with your feet flat on the floor.
- Plant your feet: Place your feet about hip-width to shoulder-width apart. Keep your weight evenly distributed through both feet.
- Sit tall on the ball: Stack your ribs over your pelvis. Keep the chest open without arching aggressively through the lower back.
- Place your hands lightly behind your head: Keep the fingers relaxed. Do not interlock and pull hard on the neck.
- Open the elbows: Let the elbows point outward naturally. They may move slightly as you curl, but they should not drive the exercise.
- Brace gently: Create light abdominal tension before you move. Think about controlling the spine rather than dropping forward.
- Set your eyes and neck: Keep the neck long. Your chin may tuck slightly as the spine curls, but the head should not be yanked down.
Setup quality matters because the ball can roll if your feet are too narrow or your torso moves too fast. A wider foot stance gives more balance, while a narrower stance makes the drill more challenging.
Execution (Step-by-Step)
- Start tall: Sit upright on the ball with your feet grounded, shoulders relaxed, and hands lightly behind your head.
- Begin with the ribs: Exhale gently and start curling your upper spine forward. Think about bringing your ribs toward your pelvis.
- Let the spine round gradually: Move one segment at a time instead of folding from the hips. The ball should stay steady under you.
- Keep the neck supported, not pulled: Your hands may support your head, but your abs should create the movement.
- Reach the bottom position with control: Stop when you feel a strong but comfortable abdominal contraction. Avoid forcing a deep curl.
- Pause briefly: Hold the curled position for 1–2 seconds while keeping the feet planted and the shoulders relaxed.
- Return slowly: Inhale and uncurl back to the tall starting position. Do not snap the spine back or let the ball roll away.
- Reset before the next rep: Rebuild posture, breathe, and repeat with the same controlled tempo.
Pro Tips & Common Mistakes
Pro Tips
- Use a slow tempo: Take about 2 seconds to curl forward, pause briefly, then take 2–3 seconds to return.
- Exhale into the curl: Breathing out helps the ribs move down and makes the abdominal contraction cleaner.
- Keep the ball quiet: A stable ball shows that you are controlling the movement instead of using momentum.
- Think “curl,” not “fold”: The movement should come from spinal flexion, not a big hip hinge.
- Use a small range first: A short, clean crunch is better than a deep rep with neck pulling or bouncing.
- Add rotation carefully: For an oblique version, rotate slightly as you curl. Keep the movement small and controlled.
Common Mistakes
- Pulling the head: This can strain the neck and reduce abdominal focus. Keep the hands light.
- Bouncing on the ball: Momentum makes the exercise easier but less effective. Pause and control each rep.
- Overarching at the top: Return to neutral, not an excessive backbend.
- Letting the feet slide: Keep the feet planted so the hips remain stable.
- Rushing the return: The upward phase trains control too. Move slowly back to upright.
- Twisting too far: If using rotation, avoid aggressive spinal twisting. Small rotation is enough.
FAQ
What muscles does the Spinal Stretch on Stability Ball work?
It mainly works the rectus abdominis, especially during the forward curl. The obliques assist when rotation is added, while the deep core, hips, and spinal stabilizers help control balance on the ball.
Is this exercise the same as a stability ball crunch?
It is similar, but the focus is slightly different. A stability ball crunch often emphasizes abdominal strengthening, while the Spinal Stretch on Stability Ball can also emphasize slow spinal mobility and controlled flexion.
Should I feel this in my lower back?
You may feel light support work around the trunk, but the main effort should come from the front of the core. If the lower back feels pinched, reduce your range, slow down, and avoid leaning too far backward at the top.
Can beginners do this exercise?
Yes. Beginners can use a wider foot stance, a smaller range of motion, and fewer reps. The key is to keep the ball stable and avoid pulling the neck forward.
How do I make the Spinal Stretch on Stability Ball harder?
Increase the pause at the curled position, slow the tempo, narrow your foot stance slightly, or add a small rotation for oblique engagement. Progress only when your balance and form stay clean.
Can I use this exercise for posture?
Yes, it can support posture training by improving core awareness and spinal control. For best results, combine it with upper-back strengthening, hip mobility, and controlled breathing drills.
Recommended Equipment
- Stability Ball / Exercise Ball — the main tool for performing the Spinal Stretch on Stability Ball with support and balance challenge.
- Anti-Burst Stability Ball — a safer option for regular home training, especially when using the ball for seated core drills.
- Non-Slip Exercise Mat — helps keep the feet stable and prevents the ball from sliding on smooth floors.
- Resistance Bands Set — useful for pairing this exercise with upper-back posture work such as rows, pull-aparts, and face pulls.
- Foam Roller — helpful for additional thoracic mobility, warm-ups, and recovery work around the spine and upper back.
Choose equipment that matches your body size and floor surface. If the ball feels unstable, start with a wider stance and place the ball on a mat before increasing difficulty.