Janda Sit-Up: Proper Form, Core Benefits, Sets, Tips & FAQ
Learn how to perform the Janda Sit-Up with proper form to strengthen the abs while reducing hip flexor dominance. Includes setup, execution, sets, tips, mistakes, FAQs, and equipment.
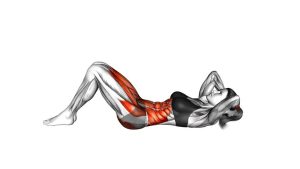
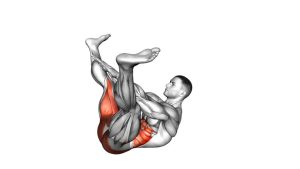
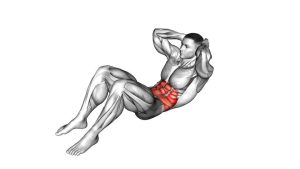
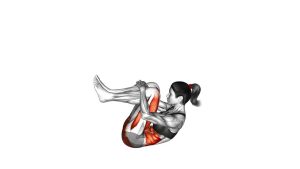
Janda Sit-Up
The Janda Sit-Up works best when every repetition is slow, deliberate, and tension-based. Your heels should feel as if they are trying to drag backward against the floor, even though the feet do not actually move. That action helps activate the hamstrings and glutes, which can reduce the tendency to pull the body up mainly with the hip flexors.
In the video demonstration, the athlete begins lying on the back with the knees bent and feet planted. Before the torso rises, there is a clear pre-tension phase. The core tightens, the legs stay grounded, and the upper body lifts in a smooth curl rather than a fast hinge. During the lowering phase, the body returns under control instead of dropping back to the floor.
Quick Overview
| Body Part | Abs |
|---|---|
| Primary Muscle | Rectus abdominis |
| Secondary Muscle | Obliques, transverse abdominis, hamstrings, glutes, deep core stabilizers |
| Equipment | Bodyweight only; optional mat, partner assistance, resistance band, or foot anchor |
| Difficulty | Intermediate to advanced because it requires strict control, strong bracing, and minimal momentum |
Sets & Reps (By Goal)
- Core strength: 3–4 sets of 4–8 controlled reps with 60–90 seconds of rest.
- Abdominal control: 2–3 sets of 6–10 reps using a slow 3-second lowering phase.
- Hypertrophy focus: 3–5 sets of 6–12 reps if form stays strict and the lower back remains comfortable.
- Skill practice: 2–3 sets of 3–5 slow reps before your main core workout.
- Regression work: 2–4 sets of 6–10 partial-range reps, stopping before momentum appears.
Progression rule: Add reps only when you can keep the heels pulling backward, the ribs controlled, and the descent smooth. If your feet lift, your back arches, or your torso swings, reduce the range first.
Setup / Starting Position
- Lie on your back: Start on a flat surface with your knees bent and your feet planted about hip-width apart.
- Set your heel pressure: Lightly dig the heels into the floor as if you are trying to pull them toward your hips.
- Create posterior-chain tension: Engage the hamstrings and glutes without lifting the hips off the floor.
- Brace the core: Exhale slightly, draw the ribs down, and keep the pelvis controlled before the first rep begins.
- Choose your arm position: Place the arms across the chest for a moderate version or extend them forward for better balance.
- Relax the neck: Keep the chin gently tucked, but do not pull the head forward or jam the chin into the chest.
- Prepare to curl: Think about peeling the spine off the floor one section at a time instead of throwing the torso upward.
For beginners, a partner can lightly hold the ankles or provide backward resistance at the calves. The goal is not to lock the feet down. The goal is to help the hamstrings stay active while the abs perform the lift.
Execution (Step-by-Step)
- Build tension before moving: Press the heels down and gently pull them backward against the floor. Keep the feet planted.
- Exhale and brace: Let the ribs move down as the abdominal wall tightens. Avoid pushing the stomach outward.
- Lift the head and shoulders: Begin with a controlled curl. The upper back leaves the floor before the lower back follows.
- Continue curling upward: Move slowly through the mid-range while keeping the hamstrings active and the feet quiet.
- Avoid hip-flexor takeover: Do not kick the feet down, jerk the torso, or straighten the spine to force the sit-up.
- Reach the top with control: Stop when you reach a strong seated position or the highest position you can control cleanly.
- Pause briefly: Hold the top for a moment while keeping the abs contracted and the shoulders relaxed.
- Lower slowly: Roll the spine back down with control. Resist gravity instead of collapsing.
- Reset without relaxing fully: Once your back touches the floor, maintain light tension before starting the next rep.
Pro Tips & Common Mistakes
Pro Tips
- Pull the heels without sliding them: This cue helps activate the hamstrings while keeping the feet stable.
- Use a slow tempo: Take about 2–3 seconds to rise and 3–4 seconds to lower for better abdominal tension.
- Think curl, not hinge: The spine should round gradually as the abs shorten. A stiff, straight-body rise usually becomes hip-flexor dominant.
- Keep the ribs down: Rib flare makes the movement less controlled and can increase lower-back stress.
- Stop before form breaks: Partial reps are better than ugly full reps when learning this exercise.
- Use assistance wisely: A partner, band, or anchor should support the Janda pattern, not turn the drill into a locked-feet sit-up.
Common Mistakes
- Using momentum: Swinging the arms or jerking the torso reduces abdominal control and increases compensation.
- Relaxing the hamstrings: Without heel-drag tension, the exercise often becomes a standard sit-up.
- Pulling on the neck: The hands should not yank the head forward. Keep the neck long and relaxed.
- Arching the lower back: Losing rib and pelvic control can shift stress away from the abs.
- Dropping on the descent: The lowering phase builds strength. Do not waste it by falling back to the floor.
- Chasing too many reps: The Janda Sit-Up is demanding. Quality matters more than high repetition numbers.
FAQ
What is the Janda Sit-Up?
The Janda Sit-Up is a strict sit-up variation that uses hamstring and glute tension to reduce hip flexor involvement. This makes the abs work harder during the curl-up phase compared with many regular sit-up styles.
What muscles does the Janda Sit-Up work?
The main target is the rectus abdominis. The obliques and transverse abdominis assist with trunk control, while the hamstrings and glutes create the tension that helps limit hip flexor dominance.
Is the Janda Sit-Up better than a regular sit-up?
It can be better for strict abdominal focus because it discourages excessive hip flexor pulling. However, it is also harder. A regular crunch, reverse crunch, or dead bug may be a better starting point for beginners.
Should my feet be anchored during the Janda Sit-Up?
Your feet can receive light assistance, but they should not be aggressively locked down. Heavy anchoring often encourages hip flexor dominance, which reduces the purpose of the Janda method.
Why do I feel my hip flexors during this exercise?
Hip flexor sensation usually means you lost hamstring tension, moved too fast, or tried to sit up with a hip hinge instead of a spinal curl. Reduce the range, slow the tempo, and focus on pulling the heels backward.
Can beginners do the Janda Sit-Up?
Beginners can practice partial-range Janda Sit-Ups, but many people need simpler core exercises first. Start with crunches, dead bugs, hollow holds, or assisted curl-ups if you cannot control the full movement.
How many Janda Sit-Ups should I do?
Start with 2–3 sets of 4–8 clean reps. Because the exercise is strict and demanding, low to moderate reps usually work best. Add volume only when every repetition stays smooth.
Is the Janda Sit-Up safe for the lower back?
It can be safe for many trained people when performed with control. Still, it is not ideal for everyone. If sit-ups irritate your back, choose a lower-spine-friendly core exercise and consult a qualified professional if pain continues.
Recommended Equipment
- Exercise Mat — adds comfort for the spine, hips, and shoulders during floor-based core training.
- Resistance Bands With Door Anchor — useful for assisted Janda Sit-Up variations and controlled core progressions.
- Ab Mat — supports spinal extension setup for some sit-up and crunch variations.
- Adjustable Sit-Up Foot Anchor — can provide light foot support when used carefully without excessive hip-flexor pulling.
- Core Sliders — helpful for complementary core drills such as body saws, mountain climbers, and knee tucks.
Tip: For the Janda Sit-Up, equipment should support better form rather than make the movement easier through momentum. Keep every tool secondary to strict bracing, heel tension, and slow control.