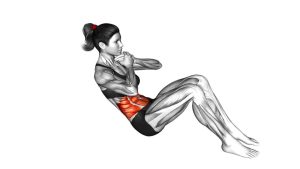
Oblique Crunches Floor: Form, Benefits, Sets, Tips & FAQ
Learn how to do Oblique Crunches on the floor with proper form. Build stronger side abs, improve core control, avoid common mistakes, and follow sets by goal.
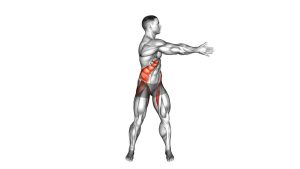
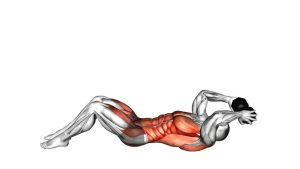
Oblique Crunches Floor
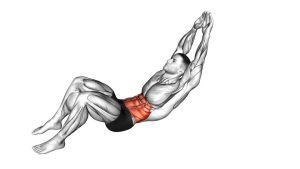
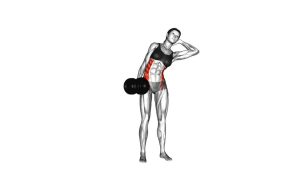
This exercise is most effective when you avoid momentum and focus on a clean side-bending motion. Your top elbow should travel toward your hip, while your legs remain stacked and stable. In addition, your neck should stay relaxed so the hand behind your head supports position rather than pulling the head forward. Because the range of motion is naturally short, quality matters more than height.
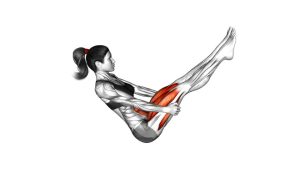
During the video demonstration, the athlete starts in a side-lying position with the body extended. Then, the torso lifts sideways as the obliques contract. At the top, the ribs and hip move closer together. After a brief squeeze, the torso lowers under control. This pattern creates a strong oblique contraction without needing equipment.
Quick Overview
| Body Part | Obliques |
|---|---|
| Primary Muscle | Internal obliques and external obliques |
| Secondary Muscle | Rectus abdominis, transverse abdominis, hip stabilizers, and spinal stabilizers |
| Equipment | No equipment required; optional exercise mat for comfort |
| Difficulty | Beginner to intermediate, depending on tempo, pause length, and rep control |
Sets & Reps (By Goal)
- Beginner technique practice: 2 sets of 8–10 reps per side with a slow tempo and full control.
- Core endurance: 3 sets of 12–20 reps per side with short rest periods of 30–45 seconds.
- Oblique hypertrophy focus: 3–4 sets of 10–15 reps per side with a 1–2 second squeeze at the top.
- Bodyweight core circuit: 2–4 rounds of 12–18 reps per side paired with planks, dead bugs, or leg raises.
- Warm-up activation: 1–2 sets of 8–12 reps per side before rotational or anti-rotation core training.
Progression rule: First, improve control and pause quality. Then, add reps or sets. Finally, increase difficulty by slowing the lowering phase or holding the top contraction longer.
Setup / Starting Position
- Lie on one side: Start on the floor with your legs stacked and your body extended in a straight or slightly angled line.
- Stabilize your lower body: Keep both legs together. However, you may bend the knees slightly if straight legs feel unstable.
- Place your bottom arm: Rest the bottom arm on the floor for balance. This helps prevent rolling backward or forward.
- Position your top hand: Place your top hand lightly behind your head. Do not lock your fingers or pull on your neck.
- Open the top elbow: Keep the elbow comfortably flared. Meanwhile, keep the chest facing mostly sideways.
- Brace gently: Draw the ribs down slightly and create light abdominal tension before the first rep.
- Set your head position: Keep your neck long and neutral. Your chin should stay slightly tucked without forcing it down.
Execution (Step-by-Step)
- Prepare your brace: Before moving, exhale slightly and tighten your side abs. This creates a stable base for the crunch.
- Lift your torso sideways: Crunch your upper body toward your hip. The movement should happen through the side of your waist, not by pulling your head.
- Bring elbow and hip closer: Allow the top elbow to travel toward the top hip. However, keep the motion controlled and compact.
- Squeeze at the top: Pause briefly when your obliques feel fully shortened. In this position, avoid bouncing or forcing extra range.
- Lower slowly: Return your torso toward the floor with control. Because the lowering phase builds strength, do not collapse down.
- Reset without relaxing completely: Touch down lightly or stop just before full relaxation. Then begin the next repetition smoothly.
- Complete both sides evenly: Finish all reps on one side. After that, switch sides and match the same rep count and tempo.
Pro Tips & Common Mistakes
Pro Tips
- Think ribs to hip: This cue keeps the effort focused on lateral flexion instead of a regular forward crunch.
- Use a small range: Since the obliques do not need a huge movement to work hard, a short squeeze is usually enough.
- Exhale as you lift: Breathing out during the crunch helps your ribs move down and improves abdominal contraction.
- Pause at the top: A brief hold makes the rep harder and reduces the chance of using momentum.
- Control both directions: The lift trains contraction, while the lowering phase builds control and endurance.
- Keep hips stacked: Stable hips help the obliques do the work instead of letting the body roll backward.
Common Mistakes
- Pulling the head: This can strain the neck and reduce oblique focus. Keep the hand light behind your head.
- Twisting instead of side bending: A small amount of natural rotation may happen, but the main action should be side crunching.
- Using momentum: Fast reps often turn the movement into a swing. Slow down and squeeze the side abs.
- Letting the legs move: Moving legs reduce stability and make the rep less precise.
- Overarching the lower back: Keep your ribs controlled so the lower back does not take over.
- Skipping the weaker side: Train both sides evenly. If one side feels weaker, start with that side first.
FAQ
What muscles do Oblique Crunches Floor work?
Oblique Crunches Floor mainly work the internal and external obliques. In addition, the rectus abdominis, transverse abdominis, and hip stabilizers help control the body position.
Are floor oblique crunches good for beginners?
Yes. This exercise is beginner-friendly because it uses bodyweight only and has a short range of motion. However, beginners should move slowly and avoid pulling the neck.
Should I feel this exercise in my neck?
No. You may feel light support from the neck muscles, but the main contraction should come from the side of your waist. If your neck works too much, loosen your hand position and reduce the height of the crunch.
Can Oblique Crunches Floor reduce love handles?
They can strengthen and shape the oblique muscles, but they do not directly burn fat from one specific area. For visible waist definition, combine oblique training with full-body strength training, nutrition control, and consistent activity.
How many reps should I do per side?
Most people do well with 10–20 controlled reps per side. If your form breaks before that range, stop earlier and build up gradually.
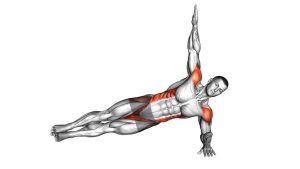
Is this exercise better than side planks?
They train the obliques differently. Oblique crunches use dynamic side flexion, while side planks train anti-lateral-flexion stability. For a complete core routine, include both movements.
Can I make this exercise harder?
Yes. You can slow the lowering phase, pause longer at the top, perform more reps, or hold a light weight carefully near the upper chest. Even so, control should always come before added resistance.
Recommended Equipment
- Exercise Mat — adds comfort for side-lying crunches and protects the hip, ribs, and shoulder from hard flooring.
- Thick Yoga Mat — useful if you need extra cushioning during floor-based core exercises.
- Ankle Weights — optional tool for advanced users who want more lower-body stabilization demand.
- Small Pilates Ball — can be used for support, positioning, or core activation variations.
- Ab Workout Mat — provides extra lumbar and floor support for ab-focused training sessions.
Tip: Equipment is optional for this exercise. For best results, start with bodyweight and use a mat for comfort before adding any external load.