Side Bridge Exercise: Form, Benefits, Sets, Tips & Core Stability Guide
Learn the Side Bridge exercise for stronger obliques, better core stability, and safer side plank form with setup, steps, tips, FAQs, and equipment.
Side Bridge
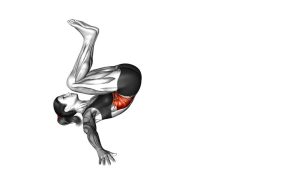
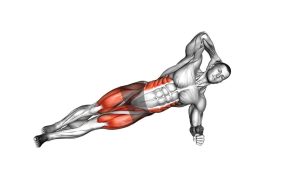
The Side Bridge works best when the body forms one long, stable line from head to heels. Although the exercise looks simple, it requires strong coordination between the shoulder, rib cage, pelvis, obliques, glutes, and legs. Therefore, the focus should stay on clean alignment rather than holding for the longest possible time. A short, well-controlled hold is more valuable than a long hold with sagging hips or twisted shoulders.
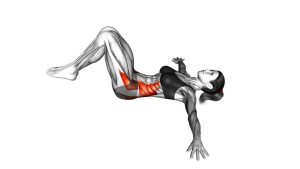
During the movement, the lower forearm supports the upper body while the feet or knees anchor the lower body. Then, the hips lift away from the floor until the torso becomes straight. Once you reach the top position, the obliques work hard to prevent the waist from collapsing toward the ground. At the same time, the glutes help keep the pelvis stable, while the shoulder muscles maintain a safe support position.
Quick Overview
| Body Part | Core |
|---|---|
| Primary Muscle | Obliques |
| Secondary Muscle | Transverse abdominis, rectus abdominis, quadratus lumborum, glute medius, glute maximus, shoulder stabilizers |
| Equipment | Bodyweight only; optional exercise mat for elbow comfort |
| Difficulty | Beginner to Intermediate, depending on hold time and leg position |
Sets & Reps (By Goal)
- Beginner core control: 2–3 sets of 10–20 seconds per side, resting 30–60 seconds between sides.
- Core endurance: 3–4 sets of 20–40 seconds per side, keeping the hips lifted and the ribs stacked.
- Strength and stability: 3–5 sets of 30–45 seconds per side, using a harder variation only if alignment stays clean.
- Warm-up activation: 1–2 sets of 10–20 seconds per side before squats, deadlifts, running, or athletic training.
- Posture and desk-work reset: 2 easy sets of 10–25 seconds per side, focusing on breathing and trunk control.
Progression rule: First increase hold quality, then increase time. After that, progress from knee-supported side bridges to full straight-leg holds. Finally, add advanced variations such as top-leg raises, weighted side planks, or side plank hip dips.
Setup / Starting Position
- Lie on your side: Position your body on one side with your lower forearm on the floor and your elbow directly under your shoulder.
- Stack the legs: Extend both legs and stack the top foot over the bottom foot. For an easier version, bend the knees and keep them stacked.
- Set the shoulder: Press the forearm gently into the floor while keeping the shoulder away from the ear. This helps prevent collapsing into the supporting joint.
- Align the torso: Keep the ribs, hips, knees, and ankles in one line. Avoid letting the hips roll forward or backward before you lift.
- Place the top hand: Rest the top hand on the hip, across the chest, or straight upward if you want an extra balance challenge.
- Brace lightly: Before lifting, exhale gently and tighten the core as if preparing to resist a push from the front and side.
A good setup should feel stable before you lift. If your elbow feels uncomfortable, use a thicker mat or folded towel under the forearm.
Execution (Step-by-Step)
- Start from the side-lying position: Keep your elbow under your shoulder, legs stacked, and body long from head to feet.
- Engage the core: Brace the abs gently and keep the ribs pulled down so the lower back does not arch.
- Lift the hips: Press through the forearm and the side of the bottom foot, then raise the hips until your body forms a straight line.
- Hold the bridge: Keep the hips high, shoulders stacked, neck neutral, and eyes looking forward. Breathe slowly while maintaining tension.
- Resist rotation: Do not let the chest turn toward the floor or open too far toward the ceiling. Stay square and controlled.
- Lower with control: After the target hold time, lower the hips slowly to the floor instead of dropping suddenly.
- Switch sides: Repeat the same hold on the opposite side, matching the same time and quality.
Pro Tips & Common Mistakes
Pro Tips
- Think “long body”: Reach through the crown of the head and heels so the spine stays neutral.
- Push the floor away: Lightly press the forearm into the floor to keep the shoulder stable and active.
- Lift from the waist: Imagine pulling the bottom side of your waist away from the floor to activate the obliques.
- Stack the ribs and pelvis: Keep the chest and hips facing the same direction to avoid twisting out of the exercise.
- Breathe under tension: Use slow breaths instead of holding your breath for the entire set.
- Train both sides evenly: Start with your weaker side first, then match that same time on the stronger side.
Common Mistakes
- Letting the hips sag: This reduces oblique tension and can shift stress into the lower back.
- Placing the elbow too far away: If the elbow is not under the shoulder, the shoulder joint may feel overloaded.
- Rotating the torso: Rolling forward or backward turns the exercise into a compensation instead of a stable side hold.
- Shrugging the shoulder: Keep the neck long and the shoulder away from the ear to protect the upper body.
- Holding too long: Long sets with poor form are less effective than shorter sets with strong alignment.
- Forgetting the glutes: Squeeze the glutes lightly to keep the pelvis from tipping or drifting backward.
FAQ
What muscles does the Side Bridge work?
The Side Bridge mainly targets the obliques. In addition, it trains the transverse abdominis, quadratus lumborum, glutes, hip stabilizers, and shoulder stabilizers. Because the movement is isometric, these muscles work together to hold your body in a strong side position.
Is the Side Bridge the same as the Side Plank?
Yes, many people use the names interchangeably. The Side Bridge often describes the hip-lift and hold position, while the Side Plank usually refers to the same side-supported isometric hold.
How long should I hold a Side Bridge?
Beginners can start with 10–20 seconds per side. As control improves, 20–45 seconds is a useful range for most training goals. However, form matters more than time, so stop the set when your hips drop or your shoulder collapses.
Why do I feel the Side Bridge in my shoulder?
Some shoulder work is normal because the supporting arm stabilizes your body. However, pain or heavy pressure may mean your elbow is too far from your shoulder, your shoulder is shrugged, or the variation is too difficult. Use a knee-supported version and push the floor away gently.
Is the Side Bridge good for beginners?
Yes, but beginners should start with the bent-knee version if the full straight-leg hold feels too hard. This allows you to learn the correct alignment while reducing load on the shoulder, hips, and side core.
Can Side Bridges help with lower back stability?
Yes, Side Bridges can help strengthen the muscles that resist side bending and trunk rotation. As a result, they are often used in core stability programs. Still, if you have back pain, use a pain-free range and seek guidance from a qualified professional when needed.
Recommended Equipment
- Thick Exercise Mat — helps protect the elbow, forearm, hip, and knee during side bridge holds.
- Non-Slip Yoga Mat — improves floor grip so your elbow and feet stay stable during the hold.
- Foam Exercise Pad — useful for beginners who need extra cushioning under the elbow or knee.
- Mini Resistance Bands — helpful for progressing into side plank variations with extra hip and glute activation.
- Weighted Vest — an advanced option for increasing difficulty once bodyweight holds become easy.
Choose comfort and stability first. For most people, a quality mat is the most useful tool because it keeps the support arm comfortable and helps maintain better position.