Twisting Crunch Arms Straight: Oblique Exercise Guide
Learn the Twisting Crunch Arms Straight for stronger obliques, better core rotation, and controlled ab training with form steps, tips, FAQs, and gear.
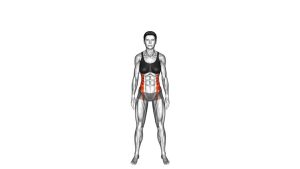
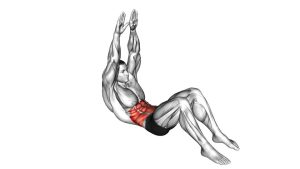
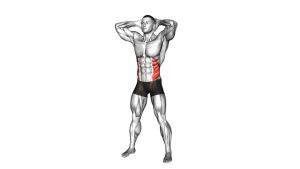
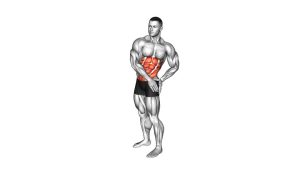
Twisting Crunch (Arms Straight)
This exercise is useful for building rotational core strength, improving abdominal control, and adding variety to bodyweight ab training. Because the arms stay straight, the movement encourages a longer reach and a stronger oblique contraction. However, the exercise should still feel smooth and controlled. Your lower back should stay stable, your neck should remain relaxed, and your ribs should move toward the opposite side without pulling aggressively on the head.
Quick Overview
| Body Part | Core |
|---|---|
| Primary Muscle | Obliques |
| Secondary Muscle | Rectus abdominis, deep core stabilizers, hip flexors |
| Equipment | No equipment required; optional exercise mat |
| Difficulty | Beginner to Intermediate |
Sets & Reps (By Goal)
- Beginner control: 2–3 sets × 8–10 reps per side with slow tempo.
- Core endurance: 3–4 sets × 12–16 reps per side with steady breathing.
- Oblique strength: 3–4 sets × 10–12 reps per side with a 1–2 second squeeze at the top.
- Home ab circuit: 2–3 rounds × 30–45 seconds, alternating sides with clean form.
Progression rule: First improve control, then add reps. After that, increase the pause at the top. Do not progress by swinging faster, because speed usually reduces oblique tension.
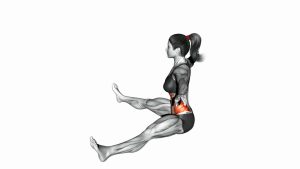
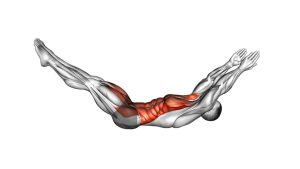
Setup / Starting Position
- Lie on your back: Use a comfortable floor space or an exercise mat. Bend your knees and keep your feet planted.
- Extend your arms: Keep both arms straight above your chest or slightly forward in line with your torso.
- Set your spine: Keep the lower back controlled and avoid excessive arching before you start.
- Relax your neck: Keep the chin slightly tucked, but do not press the chin hard into the chest.
- Brace lightly: Tighten your core as if preparing for a small crunch. Keep your breathing calm.
Your arms should guide the direction of the reach, but your abs and obliques should create the movement. Do not throw the arms forward to pull the torso up.
Execution (Step-by-Step)
- Start from the floor: Keep your knees bent, feet stable, arms straight, and eyes looking slightly upward.
- Crunch upward: Lift your head and shoulders off the floor using your abs, not your neck.
- Rotate the torso: Turn your ribs toward one side as your arms reach diagonally across your body.
- Reach with control: Keep the elbows straight and move the arms as one unit with your torso.
- Squeeze the obliques: Pause briefly at the top and feel the side of your core contract.
- Lower slowly: Return your shoulders toward the floor while untwisting back to center.
- Repeat to the other side: Alternate sides or complete all reps on one side before switching.
Pro Tips & Common Mistakes
- Keep your arms straight: Bent elbows reduce the challenge and change the feel of the exercise.
- Rotate from the ribs: Avoid simply moving the arms side to side without turning the torso.
- Do not pull the neck: Your hands are not behind your head, but neck tension can still happen if you rush.
- Control the lowering phase: The return matters as much as the lift. Lower slowly and avoid dropping onto the floor.
- Keep feet stable: If your feet lift, reduce your range or slow the tempo.
- Do not over-twist: Rotate enough to feel the obliques, but avoid forcing the spine into an uncomfortable range.
- Exhale during the crunch: Breathe out as you rotate upward. This helps the ribs come down and improves abdominal tension.
FAQ
What muscles does the Twisting Crunch Arms Straight work?
It mainly works the obliques, which help rotate and side-bend the trunk. The rectus abdominis also assists during the crunching motion, while deeper core muscles help stabilize the pelvis and lower back.
Is the arms-straight version harder than a normal twisting crunch?
Yes. Keeping the arms straight creates a longer lever, which increases the demand on the core. It also makes the reach more deliberate, so the obliques must work harder to control the rotation.
Should I alternate sides or finish one side first?
Both methods work. Alternating sides is useful for rhythm and balanced control. Finishing one side first can create more local oblique fatigue. Choose the method that matches your workout goal.
Why do I feel this in my neck?
Neck tension usually happens when you lift the head too aggressively or hold your breath. Keep the chin gently tucked, look upward, and think about lifting the shoulder blades with your abs instead of pulling through the neck.
Can beginners do this exercise?
Yes, but beginners should use a small range of motion and slow tempo. If the straight-arm version feels too hard, perform a regular twisting crunch first, then return to this variation when your control improves.
Recommended Equipment
- Exercise Mat — provides comfort and grip during floor-based ab exercises.
- Thick Yoga Mat — useful if your spine or tailbone feels uncomfortable on hard floors.
- Core Sliders — helpful for progressing into more advanced rotational core drills.
- Resistance Bands Set — useful for pairing this exercise with anti-rotation and core stability work.
- Ab Wheel — a strong progression tool for advanced anterior core strength.
Tip: You do not need equipment to perform this movement. A comfortable mat is the most useful option because it supports better setup, smoother reps, and more consistent floor contact.