Side Plank Exercise: Proper Form, Benefits, Sets, Tips & FAQ
Learn the Side Plank to strengthen obliques, core stability, hips, and shoulders. Includes form cues, sets, mistakes, FAQs, and gear.
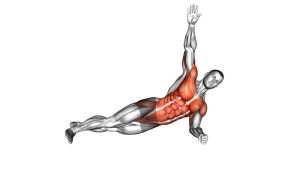
Side Plank
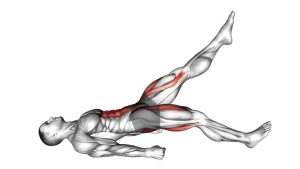
The Side Plank may look simple, but it requires strong coordination between the shoulder, ribs, pelvis, hips, and ankles. During the movement, the body stays lifted on one forearm and the outside edge of the lower foot. The supporting elbow should stay directly under the shoulder, while the hips remain high and stacked. A good rep feels steady, controlled, and balanced rather than rushed or forced.
This exercise is especially useful for people who want stronger obliques without heavy spinal flexion. It also helps athletes, lifters, and beginners develop better anti-lateral-flexion strength. That means the core learns to resist bending sideways under tension. Because the movement is held instead of repeated quickly, form quality matters more than long hold times.
Quick Overview
| Body Part | Core |
|---|---|
| Primary Muscle | Obliques |
| Secondary Muscle | Transverse abdominis, glute medius, glute maximus, quadratus lumborum, shoulder stabilizers |
| Equipment | Bodyweight only; optional exercise mat |
| Difficulty | Beginner to intermediate, depending on hold length and leg position |
Sets & Reps (By Goal)
- Beginner core control: 2–3 sets × 10–20 seconds per side, resting 45–60 seconds.
- Core endurance: 3–4 sets × 25–45 seconds per side, resting 45–75 seconds.
- Strength and stability: 3–5 sets × 20–40 seconds per side with strict alignment.
- Warm-up activation: 1–2 sets × 10–20 seconds per side before lifting or athletic work.
- Advanced progression: 3–4 sets × 30–60 seconds, or use harder variations such as top-leg raise side plank.
Progression rule: Add time only while your hips stay lifted, ribs stay stacked, and breathing remains controlled. If the hips drop or the shoulder collapses, end the set and rebuild quality first.
Setup / Starting Position
- Lie on one side: Place your body in a straight line with your legs extended and feet stacked.
- Set the elbow: Position your lower elbow directly under your shoulder. The forearm should point forward or slightly across the body.
- Stack the shoulders: Keep the top shoulder directly above the bottom shoulder. Avoid rolling the chest toward the floor.
- Stack the hips: Place the top hip directly over the lower hip before lifting. This helps prevent twisting.
- Brace gently: Tighten your core as if preparing for a light push into the ribs.
- Set the neck: Keep the head aligned with the spine. Look forward instead of looking down at the floor.
- Place the top arm: Rest the top hand on the hip, keep it along the body, or extend it upward for balance.
Execution (Step-by-Step)
- Brace before lifting: Lightly tighten your abs and glutes while keeping your breathing calm.
- Lift the hips: Press through the forearm and the side of the lower foot to raise your hips off the floor.
- Create one straight line: Align your head, shoulders, hips, knees, and ankles without letting the waist sag.
- Keep the chest open: Do not rotate your torso toward the floor. Keep the ribs stacked and the top shoulder pulled slightly back.
- Hold with control: Maintain steady tension through the obliques, glutes, and shoulder. Breathe slowly through the hold.
- Avoid over-arching: Keep the ribs down and pelvis neutral. Do not push the hips too far forward.
- Lower slowly: Bring the hips back to the floor with control instead of dropping at the end of the set.
- Switch sides: Repeat the same hold on the opposite side for balanced core development.
Pro Tips & Common Mistakes
Pro Tips
- Push the floor away: Actively press through your forearm to keep the shoulder stable and strong.
- Squeeze the glutes lightly: This helps keep the pelvis stacked and prevents the hips from drifting backward.
- Keep the hold quiet: A clean Side Plank should have minimal shaking, twisting, or shifting.
- Use shorter perfect sets: A 20-second clean hold is better than a 60-second hold with sagging hips.
- Breathe behind the brace: Keep your core tight, but do not hold your breath for the entire set.
Common Mistakes
- Letting the hips sag: This reduces oblique tension and may shift stress into the lower back.
- Placing the elbow too far away: A wide elbow position can irritate the shoulder and weaken your base.
- Rotating the chest downward: This turns the exercise into a twisted plank instead of a clean lateral hold.
- Shrugging the shoulder: Keep space between the shoulder and ear by pressing the forearm into the floor.
- Holding too long: End the set before form breaks. Quality should control the duration.
- Neck dropping: Keep your head in line with your spine to avoid unnecessary neck tension.
FAQ
What muscles does the Side Plank work?
The Side Plank mainly works the obliques. It also trains the transverse abdominis, quadratus lumborum, glute medius, glute maximus, and shoulder stabilizers. Because the entire body must stay aligned, it also improves full-body tension and balance.
Is the Side Plank good for beginners?
Yes. Beginners can start with a shorter hold or perform the Side Plank from the knees. This version reduces the load while still teaching core bracing, hip stacking, and shoulder stability.
How long should I hold a Side Plank?
Most people should start with 10–20 seconds per side. As control improves, progress toward 30–45 seconds. Longer holds are useful only if your hips stay high and your alignment stays clean.
Why do I feel the Side Plank in my shoulder?
Some shoulder work is normal because the supporting arm stabilizes your body. However, sharp pain or heavy pressure usually means your elbow is not under your shoulder, your shoulder is shrugging, or you are not pressing the floor away.
Why does my hip drop during the Side Plank?
Hip dropping usually happens when the obliques and glutes fatigue. Shorten the hold, switch to the knee-supported version, or perform fewer sets until you can maintain a straight body line.
Can Side Planks help with love handles?
Side Planks strengthen the muscles around the waist, especially the obliques. They do not directly burn fat from one specific area. For visible changes, combine core training with full-body strength work, daily movement, and nutrition control.
Should I do Side Planks every day?
You can practice light Side Planks often, especially if the volume is low. For harder sets, 2–4 times per week is usually enough. Recovery matters because the obliques, hips, and shoulder stabilizers still need time to adapt.
Recommended Equipment
- Exercise Mat — adds comfort for the elbow, forearm, hip, and ankle during floor-based core training.
- Thick Yoga Mat — useful if your elbow feels uncomfortable on hard floors.
- Foam Exercise Pad — provides extra cushioning under the elbow or knee for beginner side plank variations.
- Resistance Loop Bands — helpful for advanced side plank variations that include hip abduction or glute activation.
- Core Sliders — useful for progressing into dynamic plank and anti-rotation core drills.
Tip: Equipment is optional for the Side Plank. Start with bodyweight and a comfortable mat first. Add tools only when your basic hold is stable on both sides.