Band-Assisted Wheel Rollout: Form, Core Benefits, Sets, Tips & FAQ
Learn the Band-Assisted Wheel Rollout for stronger abs, better core control, and safer ab wheel progression with step-by-step form, tips, and equipment.
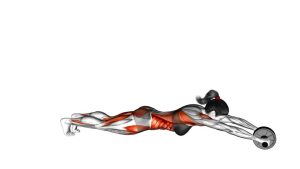
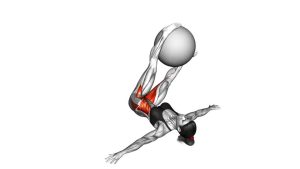
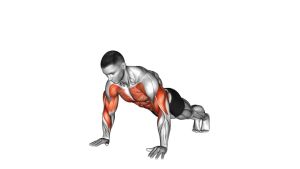
Band-Assisted Wheel Rollout
This movement is not just an abdominal exercise. Instead, it is a full-body stability drill that teaches the abs, obliques, lats, shoulders, glutes, and hip flexors to work together. During the forward phase, the body must resist arching. Then, during the return phase, the core and lats help pull the wheel back while the hips stay controlled. As a result, the Band-Assisted Wheel Rollout builds strength, body awareness, and safer ab wheel mechanics.
The band makes the exercise more forgiving because it reduces the load as the wheel travels away from the knees. Therefore, beginners can practice a longer range of motion without losing posture. However, the movement still requires patience. Move slowly, breathe with control, and stop each rep before the lower back starts to sag.
Quick Overview
| Body Part | Core |
|---|---|
| Primary Muscle | Rectus abdominis |
| Secondary Muscle | Obliques, transverse abdominis, lats, anterior deltoids, serratus anterior, hip flexors, glutes |
| Equipment | Ab wheel, resistance band, stable anchor point, exercise mat |
| Difficulty | Beginner to Intermediate, depending on band tension and rollout range |
Sets & Reps (By Goal)
- Technique practice: 2–3 sets × 5–8 controlled reps with a short rollout range.
- Core strength: 3–4 sets × 6–10 reps with a moderate rollout distance.
- Core endurance: 2–4 sets × 10–15 reps using smooth, repeatable form.
- Progression toward unassisted rollouts: 3–5 sets × 4–8 reps while gradually reducing band assistance.
- Warm-up activation: 1–2 sets × 6–8 easy reps before heavier core or compound training.
Progression rule: First increase control, then increase range, and only after that reduce band assistance. If your hips drop or your lower back arches, the variation is too hard for your current control level.
Setup / Starting Position
- Anchor the band securely: Attach a resistance band behind you to a low, stable anchor point. The band should assist the wheel as you roll forward.
- Loop the band correctly: Place the band around the ab wheel handles or axle area, depending on your wheel design. Make sure it does not slip during movement.
- Kneel on a mat: Set your knees hip-width apart. Use a soft mat to protect the knees and help you stay stable.
- Grip the wheel firmly: Hold both handles with straight wrists. Keep the wheel directly under or slightly in front of the shoulders.
- Brace your core: Pull the ribs down, tighten the abs, and lightly squeeze the glutes before the wheel moves.
- Set your spine: Maintain a neutral back position. Avoid starting with the hips too high or the lower back already arched.
- Look slightly forward and down: Keep the neck long and relaxed. Do not crane the head upward.
Setup matters because the band can change the feel of the exercise. A stronger band gives more assistance, while a lighter band makes the rollout closer to the standard kneeling ab wheel rollout.
Execution (Step-by-Step)
- Start with tension: Brace your abs before moving. Then press the wheel gently into the floor so your shoulders feel stable.
- Roll forward slowly: Let the wheel travel away from your knees while your arms extend in front of you. Keep the elbows mostly straight.
- Control the hips: Allow the hips to move forward with the torso, but do not let them sag toward the floor.
- Keep the ribs down: As the rollout gets longer, resist the urge to arch your lower back. Instead, keep the front of your body tight.
- Reach your safe end range: Stop when you can still hold a strong brace. Your body should feel long, controlled, and stable.
- Pause briefly: Hold the extended position for a moment without losing posture. This teaches anti-extension strength.
- Pull back with control: Use your abs and lats to bring the wheel back toward your knees. At the same time, keep your hips from shooting backward too early.
- Finish stacked: Return to the starting position with the wheel under the shoulders, ribs down, and core still active.
Pro Tips & Common Mistakes
Pro Tips
- Think “long body, tight core”: The best reps look calm and controlled, not rushed or shaky.
- Use the band as assistance, not a shortcut: Let it support the hardest range, but still make your abs do the work.
- Start with partial reps: A shorter clean rollout is better than a long rollout with poor posture.
- Exhale slightly during the rollout: This helps keep the ribs down and prevents excessive lower-back arching.
- Keep the shoulders active: Push through the handles and avoid collapsing into the shoulder joints.
- Progress slowly: Reduce band tension only when every rep stays smooth and pain-free.
Common Mistakes
- Arching the lower back: This usually means the rollout is too long or the band is too light.
- Dropping the hips first: The hips should move with the torso, not collapse ahead of the brace.
- Bending the elbows too much: This shifts work away from the core and turns the movement into an arm pull.
- Rushing the return: A fast return often hides weak control. Instead, pull back slowly and stay braced.
- Using an unstable anchor: A loose anchor can snap or shift, so always secure the band before starting.
- Going too far too soon: Range should be earned through control, not forced through momentum.
FAQ
What muscles does the Band-Assisted Wheel Rollout work?
The main target is the rectus abdominis. However, the obliques, transverse abdominis, lats, shoulders, serratus anterior, glutes, and hip flexors also help stabilize the body during the rollout.
Is the Band-Assisted Wheel Rollout good for beginners?
Yes, it can be a great beginner-friendly ab wheel progression. Because the band assists the hardest part of the movement, it allows you to practice proper form with less load. Even so, beginners should start with short reps and a strong band.
Where should I feel this exercise?
You should feel strong tension through the front of your core, especially the abs. You may also feel your lats and shoulders working. However, you should not feel sharp pressure in the lower back.
How far should I roll out?
Roll only as far as you can while keeping your ribs down, hips controlled, and lower back neutral. Over time, you can increase the distance as your core strength improves.
How do I make the exercise harder?
You can use a lighter band, roll farther forward, slow the tempo, add a longer pause at the end range, or eventually perform the rollout without band assistance.
How do I make it easier?
Use a stronger resistance band, shorten the rollout distance, move slower, or perform the movement against a wall stop so the wheel cannot travel too far.
Can this replace regular ab wheel rollouts?
It can replace them while you are building strength and technique. Later, it can also work as a warm-up, regression, or high-quality volume option before unassisted rollouts.
Recommended Equipment
- Ab Wheel Roller — the main tool for performing controlled kneeling and assisted rollouts.
- Resistance Bands Set — provides adjustable assistance for safer rollout progression.
- Resistance Band Door Anchor — helps create a secure anchor point when training at home.
- Thick Exercise Mat — protects the knees and improves comfort during kneeling rollouts.
- Foam Knee Pad — useful if you want extra knee support without using a full mat.
Tip: Choose a band that gives enough help to keep your lower back safe, but not so much assistance that the exercise feels effortless.