Standing Wheel Rollout: Form, Benefits, Sets, Tips & FAQ
Learn the Standing Wheel Rollout for advanced core strength, anti-extension control, shoulder stability, proper form, sets, mistakes, FAQs, and equipment.
Standing Wheel Rollout
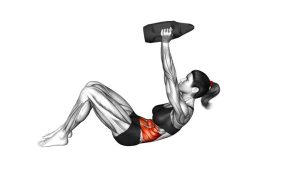
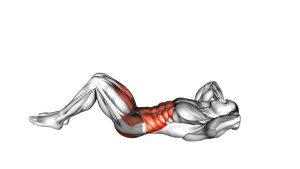
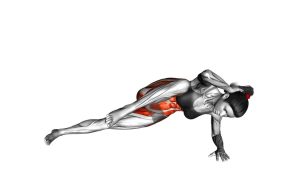
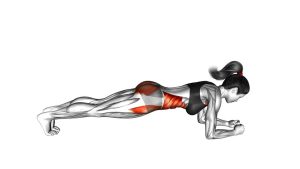
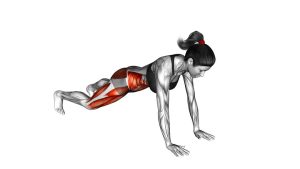
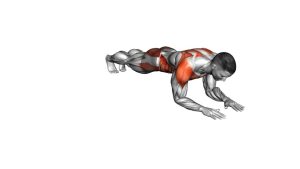
The Standing Wheel Rollout is much harder than the kneeling ab wheel rollout because the leverage is longer, the body starts higher, and the core must control a greater amount of load. During the rollout, your abs, obliques, lats, glutes, hip flexors, and shoulders work together to prevent the lower back from sagging. A clean repetition should look smooth and controlled from start to finish. The wheel rolls forward, the body lengthens, the torso lowers, and the athlete pulls back without collapsing, bouncing, or using momentum.
This exercise is best for advanced trainees who already have strong planks, hollow body holds, kneeling wheel rollouts, and shoulder stability. The movement is not about reaching the farthest distance at any cost. Instead, it is about keeping the trunk stiff while moving through the largest range that you can control safely. If your lower back arches, your hips drop too low, or you cannot return without jerking, reduce the range and build strength gradually.
Quick Overview
| Body Part | Abs |
|---|---|
| Primary Muscle | Rectus abdominis |
| Secondary Muscle | Obliques, transverse abdominis, lats, shoulders, hip flexors, glutes, lower-back stabilizers |
| Equipment | Ab wheel / ab roller and a stable non-slip floor surface |
| Difficulty | Advanced to elite-level core exercise |
Sets & Reps (By Goal)
- Strength skill practice: 3–5 sets × 1–5 controlled reps, resting 90–180 seconds between sets.
- Core strength development: 3–4 sets × 3–6 reps using a range you can control without lumbar sagging.
- Advanced ab training: 4–6 sets × 2–5 reps with slow eccentrics and a strict return phase.
- Progression from kneeling rollouts: 3–5 sets × 3–8 partial standing rollouts against a wall or range limiter.
- Maintenance work: 2–3 sets × 2–4 clean reps after your main strength work.
Progression rule: Increase range before increasing reps. Add only a small distance each week, and keep every repetition smooth. A shorter controlled rollout is better than a longer rep with a sagging back.
Setup / Starting Position
- Place the wheel on the floor: Set the ab wheel slightly in front of your feet on a stable, non-slip surface. Avoid slick floors that may cause the wheel to shoot forward.
- Stand with control: Keep your feet about hip-width apart. A slightly wider stance can make the exercise more stable while you are learning.
- Hinge down to grip the handles: Bend at the hips and reach for the ab wheel while keeping your arms straight and shoulders active.
- Brace before moving: Pull the ribs down, tighten the abs, lightly squeeze the glutes, and create a strong line from your feet through your torso.
- Set the shoulders: Push gently into the handles and keep the upper back active. Your shoulders should feel stable, not loose or shrugged.
- Choose your range: Beginners to this variation should roll toward a wall or stop before full extension. Only go as far as you can return with control.
Execution (Step-by-Step)
- Start in a strong standing hinge: Hold the wheel with both hands, arms straight, feet planted, and core braced. Keep your eyes slightly ahead of the wheel instead of looking straight down.
- Roll forward slowly: Let the wheel travel away from your feet while your shoulders move forward and your body begins to lengthen.
- Keep the ribs and pelvis connected: Do not let the belly drop toward the floor. Think about pulling the front of your ribs toward your pelvis as the wheel moves away.
- Reach your controlled end range: Stop when your body is long, your abs are highly engaged, and your lower back still feels neutral. Full extension is optional, not required.
- Pause briefly: Hold the end position for a moment without collapsing. This teaches control at the hardest part of the movement.
- Pull the wheel back: Drive the handles back toward your feet by contracting your abs and lats. Avoid yanking with the arms only.
- Finish tall and controlled: Return to the starting hinge or standing position without rushing. Reset your brace before the next repetition.
Pro Tips & Common Mistakes
Pro Tips
- Use the wall as a range limiter: Roll toward a wall so the wheel stops before your form breaks. Move farther away over time as you get stronger.
- Brace like a hollow body hold: Keep the ribs down, glutes tight, and pelvis slightly tucked to reduce lumbar extension.
- Control the eccentric phase: The forward rollout builds strength when it is slow and deliberate. Do not let gravity pull you down.
- Use your lats on the return: Think about pulling the handles back with your armpits while the abs keep the spine stable.
- Keep the arms long: A small elbow bend is acceptable, but excessive arm bending turns the exercise into an unstable push-pull motion.
- Train it early: Perform this exercise near the start of your core work, when your trunk and shoulders are fresh enough to maintain strict form.
Common Mistakes
- Letting the lower back sag: This is the biggest mistake. Reduce range immediately if the lumbar spine drops into extension.
- Rolling too far too soon: Full standing rollouts require serious strength. Partial reps are the correct progression, not a failure.
- Pulling back with only the arms: The return should come from the core and lats working together, not from bending the elbows aggressively.
- Using momentum: Fast reps hide weak positions. Slow reps reveal whether you truly control the movement.
- Relaxing the glutes: Loose hips make it harder to keep the pelvis stable and protect the lower back.
- Training to failure: Once form breaks, the set is finished. This is a high-tension skill, not a burnout exercise.
FAQ
Is the Standing Wheel Rollout better than the kneeling rollout?
It is harder, but not automatically better for every person. The kneeling rollout is better for building technique and controlled strength. The standing version is best once you can already perform strict kneeling rollouts with a neutral spine and smooth return.
What muscles does the Standing Wheel Rollout work?
The main target is the rectus abdominis. The obliques, transverse abdominis, lats, shoulders, hip flexors, glutes, and spinal stabilizers also work hard to keep the body aligned during the rollout.
Why does my lower back hurt during standing rollouts?
Lower-back discomfort usually happens when the abs lose tension and the spine extends too much. Shorten the range, brace harder, squeeze the glutes, and master kneeling rollouts before returning to the standing version.
How far should I roll out?
Roll only as far as you can control. Your best range is the distance where your body stays strong, your hips do not collapse, and you can pull the wheel back smoothly without jerking.
Can beginners do the Standing Wheel Rollout?
Most beginners should not start with the standing version. Better progressions include planks, body saws, stability ball rollouts, kneeling ab wheel rollouts, and partial standing rollouts against a wall.
How often should I train Standing Wheel Rollouts?
One to three times per week is enough for most advanced trainees. Because the exercise is demanding, quality matters more than frequency. Leave enough recovery time for your abs, shoulders, and lower back.
Recommended Equipment
- Ab Wheel Roller — the essential tool for standing and kneeling rollout variations.
- Wide Ab Wheel Roller — offers more side-to-side stability for controlled rollout practice.
- Non-Slip Exercise Mat — improves floor grip and gives extra comfort during kneeling progressions.
- Ab Wheel With Elbow Support — useful for some beginners who need extra stability before progressing.
- Resistance Bands Set — helpful for assisted rollout progressions and controlled core training.
Tip: Choose an ab wheel with firm handles, smooth rolling action, and reliable floor traction. A stable wheel makes it easier to control the movement and reduces the risk of slipping during advanced reps.