Suspender Twist Side: Form, Core Benefits, Sets & Tips
Learn the Suspender Twist Side for stronger obliques, core control, and shoulder stability. Includes setup, steps, tips, FAQs, and gear.
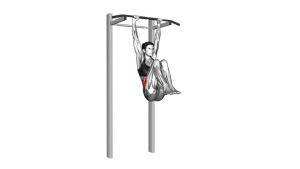
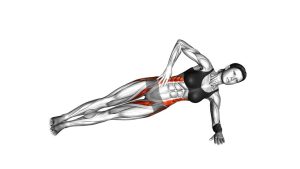
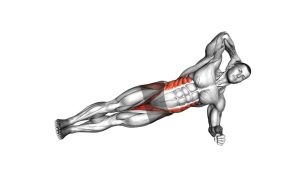
Suspender Twist Side
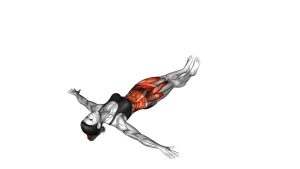
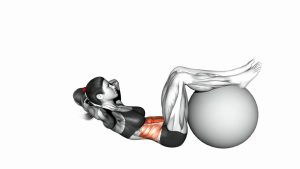
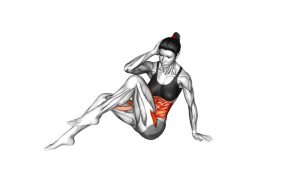
This exercise works best when every repetition is controlled. First, the body begins in a suspended plank position with the hands under the shoulders and the feet secured in the straps. Then, the legs rotate toward one side while the upper body stays steady. After that, the legs return to center before rotating to the opposite side. Since the straps create constant instability, the abs and obliques must control both the twist and the return.
Although the movement looks simple, it is demanding. Therefore, beginners should master regular planks, suspension planks, and slow knee-tuck variations before adding the side twist. When performed correctly, the Suspender Twist Side builds rotational control without relying on speed or momentum. In addition, it teaches the shoulders, hips, and trunk to work together as one strong unit.
Quick Overview
| Body Part | Obliques |
|---|---|
| Primary Muscle | Obliques |
| Secondary Muscle | Rectus abdominis, transverse abdominis, hip flexors, shoulders, serratus anterior, and deep spinal stabilizers |
| Equipment | Suspension trainer, anchor point, and exercise mat |
| Difficulty | Intermediate to advanced |
Sets & Reps (By Goal)
- Core control: 2–3 sets × 6–8 reps per side with a slow tempo.
- Oblique strength: 3–4 sets × 8–12 reps per side with strict control.
- Advanced conditioning: 3–5 sets × 10–16 total reps with short rest periods.
- Stability training: 2–4 sets × 5–8 reps per side with a 1–2 second pause in the center.
- Workout finisher: 2–3 rounds × 20–30 seconds, only if form stays clean.
Progression rule: Begin with a short range of motion. Then, increase reps before increasing speed or rotation depth. If the hips swing or the shoulders collapse, reduce the range immediately.
Setup / Starting Position
- Set the straps low: Adjust the suspension trainer so the foot cradles hang close to the floor. This creates a stable but challenging plank setup.
- Place your feet in the straps: Kneel on the floor, secure both feet in the foot cradles, and make sure the straps are even.
- Walk your hands forward: Move into a straight-arm plank with your hands under your shoulders and your legs extended behind you.
- Brace your core: Pull your ribs down, tighten your abs, and squeeze your glutes lightly. This helps prevent your lower back from sagging.
- Set your shoulders: Push the floor away gently so your shoulder blades stay stable. Avoid sinking between the shoulders.
- Align your body: Keep your head, ribs, hips, knees, and feet in one long line before you begin the twist.
Tip: If the starting plank feels unstable, practice holding a suspension plank for 20–30 seconds before adding rotation.
Execution (Step-by-Step)
- Start in a strong suspended plank: Keep your arms straight, shoulders stacked over your wrists, and feet secured in the straps.
- Brace before moving: Exhale slightly, tighten your abs, and keep your hips from dropping.
- Rotate your legs to one side: Slowly move both feet together toward one side. Let your hips rotate slightly, but keep your shoulders mostly square to the floor.
- Control the end range: Pause briefly when your obliques are working hard. However, do not force the twist or arch your lower back.
- Return to center: Pull your legs back under your body with control. Avoid letting the straps swing you back.
- Twist to the opposite side: Repeat the same motion in the other direction while keeping your arms strong and your core tight.
- Continue alternating sides: Move smoothly from side to side until all reps are complete.
- Finish safely: Return to center, lower your knees to the floor, and remove your feet from the straps with control.
Pro Tips & Common Mistakes
Pro Tips
- Move from the core: Lead the twist with your obliques instead of throwing your legs side to side.
- Keep your shoulders steady: Press firmly through your hands so the upper body stays controlled while the lower body rotates.
- Use a slow tempo: A slower twist increases tension and reduces the risk of swinging.
- Control the return: The center position matters. Therefore, avoid rushing through it.
- Keep your ribs down: This prevents the lower back from overextending during the twist.
- Start with small rotation: A smaller clean twist is better than a large sloppy twist.
Common Mistakes
- Swinging the legs: Momentum reduces core tension and makes the exercise less effective.
- Dropping the hips: This shifts stress into the lower back. Instead, keep the glutes and abs engaged.
- Over-rotating: Twisting too far can cause the lumbar spine to compensate.
- Letting the shoulders collapse: Keep pushing the floor away to protect the shoulders and wrists.
- Holding the breath: Breathe steadily so your core stays braced without creating unnecessary tension.
- Using uneven straps: Uneven strap length can create poor alignment and make the movement harder to control.
FAQ
What muscles does the Suspender Twist Side work?
The Suspender Twist Side mainly targets the obliques. However, it also trains the rectus abdominis, transverse abdominis, hip flexors, shoulders, serratus anterior, and deep spinal stabilizers. Because the feet are suspended, the entire core must work harder to control rotation and instability.
Is the Suspender Twist Side beginner-friendly?
This exercise is usually better for intermediate and advanced users. Beginners should first build strength with standard planks, side planks, mountain climbers, and suspension plank holds. After those feel stable, the twisting version becomes safer and more effective.
Should my hips rotate during the exercise?
Yes, your hips can rotate slightly as your legs move from side to side. However, the rotation should stay controlled. If your hips whip around or your lower back twists aggressively, reduce the range and slow the movement.
Why do I feel this exercise in my shoulders?
Your shoulders work hard because they support your body in a straight-arm plank while your lower body rotates. This is normal. Still, you should not feel sharp pain or pinching. If your shoulders feel overloaded, shorten the set or practice regular suspension planks first.
How can I make the Suspender Twist Side easier?
You can make it easier by reducing the twist range, moving slower, performing fewer reps, or practicing from a more stable plank position. In addition, you can use a wider hand position for better balance.
How can I make the exercise harder?
To make it harder, increase the range slightly, pause at each side, slow down the return to center, or perform longer sets. However, only progress when you can keep your shoulders stable and your lower back pain-free.
Recommended Equipment
- Suspension Trainer System — the main tool needed for Suspender Twist Side variations.
- Door Anchor for Suspension Trainer — useful for home workouts when a fixed anchor point is not available.
- Non-Slip Exercise Mat — supports the hands, knees, and wrists during setup and transitions.
- Workout Wrist Wraps — optional support for users who feel wrist strain in straight-arm plank positions.
- Core Sliders — helpful for practicing floor-based twisting and plank-control drills before using straps.
Tip: Choose equipment that feels secure and stable. Since this exercise depends on suspension control, avoid weak anchors, slippery mats, or straps that shift unevenly.