Lever Seated Crunch: Proper Form, Muscles Worked, Sets & Tips
Learn the Lever Seated Crunch for stronger abs with proper machine setup, controlled form, sets by goal, common mistakes, FAQs, and equipment tips.
Lever Seated Crunch
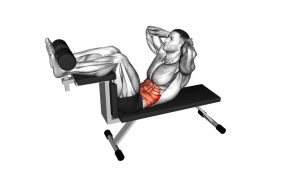
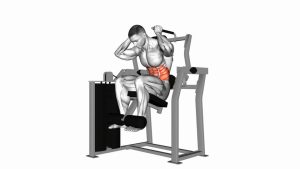
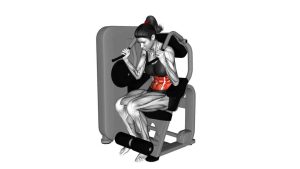
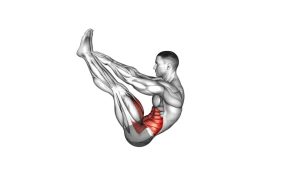
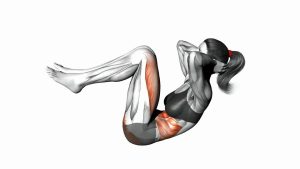
This exercise works best when the movement is slow, clean, and intentional. The video shows the lifter seated against the back pad, holding the machine handles, and securing the legs under the pads. From that stable base, the torso curls forward as the abdominal muscles shorten. Then the body returns under control until the abs are lengthened again.
The main action is spinal flexion, not hip flexion. That detail matters because many people turn the movement into a forward fold. A correct Lever Seated Crunch should feel like the front of the torso is closing down, while the pelvis remains steady and the abs perform most of the work.
Quick Overview
| Body Part | Core |
|---|---|
| Primary Muscle | Rectus abdominis |
| Secondary Muscle | Obliques, deep core stabilizers, hip flexors lightly as stabilizers |
| Equipment | Lever seated crunch machine / abdominal crunch machine |
| Difficulty | Beginner to Intermediate |
Sets & Reps (By Goal)
- Core activation: 2–3 sets × 10–12 reps with light resistance and a slow squeeze.
- Muscle growth: 3–4 sets × 10–15 reps with moderate resistance and a 1-second peak contraction.
- Strength focus: 3–5 sets × 6–10 reps with heavier resistance, while keeping strict form.
- Beginner practice: 2 sets × 12–15 reps using a smooth tempo and no momentum.
- Finisher work: 2–3 sets × 15–20 reps with light-to-moderate resistance near the end of a workout.
Progression rule: Add resistance only when every rep stays controlled. A heavier load is useful only if you can still curl through the abs without yanking the handles or throwing the torso forward.
Setup / Starting Position
- Adjust the seat: Sit so the machine handles line up comfortably near the upper chest or shoulder area.
- Secure your legs: Place your feet firmly and lock the thighs or shins under the pads, depending on the machine design.
- Set your back: Keep your back against the pad at the start, with the torso tall and the abs lightly braced.
- Grip the handles: Hold the handles firmly, but do not pull with the arms before the abs initiate the crunch.
- Choose the load: Select a resistance that lets you move smoothly through the full range without jerking.
- Prepare your breath: Inhale lightly before the rep, then brace as you begin to curl forward.
The starting position should feel stable, not compressed. If the handles force your shoulders too high or your lower back feels jammed, adjust the seat before starting the set.
Execution (Step-by-Step)
- Start tall: Sit upright against the pad with your abs lightly engaged. Keep your feet and legs locked into position.
- Brace the core: Tighten the midsection before the machine moves. This helps the abs lead the rep instead of the arms.
- Curl forward: Bring your ribs toward your pelvis by rounding through the spine. Avoid turning the movement into a hip fold.
- Keep the handle grip steady: Let the hands guide the machine path, but do not yank the handles downward.
- Squeeze the abs: Pause briefly in the bottom position, where the torso is curled forward and the abs are fully shortened.
- Return slowly: Control the weight as your torso rises back to the starting position. Do not let the stack slam or pull you backward.
- Reset each rep: Return to a tall position, keep tension in the core, and repeat with the same smooth path.
Pro Tips & Common Mistakes
Pro Tips
- Think “ribs to pelvis”: This cue helps you target the abs instead of folding from the hips.
- Use a controlled tempo: Try 2 seconds down, 1 second squeeze, and 2–3 seconds back up.
- Keep tension continuous: Avoid fully relaxing at the top between reps.
- Exhale during the crunch: Breathing out can help the abs contract harder at the bottom.
- Start lighter than expected: The machine can make it easy to overload before your technique is ready.
Common Mistakes
- Pulling with the arms: The handles should not become the main driver of the exercise.
- Using momentum: Fast reps reduce abdominal tension and increase the chance of poor spinal control.
- Folding from the hips: Leaning forward without curling the spine shifts work away from the rectus abdominis.
- Going too heavy: Excessive weight often causes jerking, short range, or neck and shoulder tension.
- Releasing the eccentric: Letting the machine pull you back removes one of the most valuable parts of the rep.
- Over-tucking the neck: Keep the head comfortable. The neck should follow the torso without aggressive pulling.
FAQ
What muscles does the Lever Seated Crunch work?
The Lever Seated Crunch mainly works the rectus abdominis, which is the front abdominal muscle responsible for trunk flexion. The obliques and deep core muscles also assist by stabilizing the torso during the movement.
Is the Lever Seated Crunch good for building abs?
Yes. It is useful for building the abs because the machine allows controlled resistance and progressive overload. For best results, use strict form, controlled reps, and a full abdominal squeeze instead of chasing heavy weight only.
Should I go heavy on the seated crunch machine?
You can train heavier once your technique is consistent. However, the load should never force you to yank the handles, swing forward, or lose control on the return. Clean tension is more important than the number on the weight stack.
Why do I feel this exercise in my hips?
Hip tension usually means you are folding forward from the hips instead of curling through the spine. Reduce the weight, brace first, and focus on bringing the ribs toward the pelvis.
Is this exercise beginner-friendly?
Yes, it can be beginner-friendly because the machine guides the path. Beginners should start light, learn the correct crunch pattern, and avoid rushing the movement.
How is this different from a regular floor crunch?
A regular floor crunch uses bodyweight resistance, while the Lever Seated Crunch uses a machine for adjustable load. This makes the machine version easier to progress and more suitable for structured strength or hypertrophy training.
Recommended Equipment
- Ab Crunch Machine — useful for practicing seated crunch mechanics at home when a gym machine is not available.
- Ab Exercise Mat — helpful for floor-based crunch variations and core accessory work.
- Weight Plates — useful if your machine or home gym setup supports plate-loaded resistance.
- Fitness Gloves — improve grip comfort when holding machine handles during higher-volume sets.
- Adjustable Home Gym Bench — supports extra core training variations such as decline crunches, sit-ups, and weighted ab work.
Equipment note: Product availability and exact models can change. Choose gear that matches your space, budget, body size, and training level.