Wheel Pose Guide: Form, Benefits, Tips & Safe Progressions
Learn Wheel Pose with safe step-by-step form, setup cues, muscles worked, sets by goal, common mistakes, FAQs, and useful equipment.
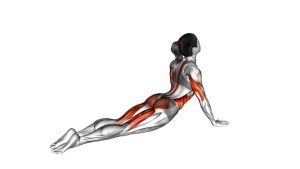
Wheel Pose (Urdhva Dhanurasana)
Wheel Pose is best treated as both a strength exercise and a mobility posture. Although it looks like a simple backbend, it requires coordinated effort from the shoulders, triceps, glutes, spinal erectors, hip flexors, wrists, and core. Because of that demand, beginners should first build confidence with glute bridges, bridge pose, cobra variations, shoulder-opening drills, and supported backbends. Once the foundation is ready, this exercise can become an excellent way to improve total-body extension and posture awareness.
Quick Overview
| Body Part | Back |
|---|---|
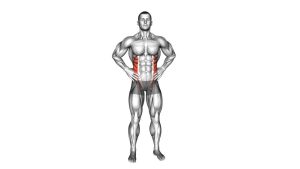
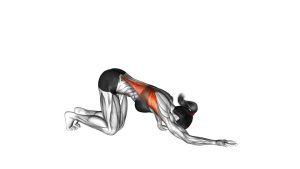
| Primary Muscle | Spinal erectors, glutes, shoulders, and chest |
| Secondary Muscle | Triceps, hamstrings, hip flexors, wrists, core stabilizers, and upper back |
| Equipment | Yoga mat; optional yoga blocks, yoga wheel, stretching strap, and wrist support |
| Difficulty | Advanced; requires shoulder mobility, wrist tolerance, spinal extension, and controlled hip drive |
Sets & Reps (By Goal)
- Mobility practice: 2–4 sets × 10–20 second holds with slow breathing and full control.
- Yoga flow practice: 1–3 controlled holds, performed after a complete warm-up and easier backbend progressions.
- Strength and stability: 3–5 sets × 5–10 second holds, focusing on strong hand pressure, active legs, and steady hips.
- Skill development: 3–6 short attempts with long rest, using blocks or a wall if needed.
- Beginner progression: Start with bridge pose, then elevated bridge, then partial wheel before attempting the full posture.
Progression rule: Increase hold time before increasing range. Moreover, progress only when the shoulders, wrists, and lower back feel comfortable after practice.
Setup / Starting Position
- Lie on your back: Start supine on a yoga mat with your knees bent and your feet flat on the floor.
- Set the feet: Place your feet about hip-width apart. Keep them close enough that your knees can stay stacked over your ankles.
- Place the hands: Bend your elbows and place your palms beside your ears. Your fingers should point toward your shoulders.
- Anchor the base: Press evenly through the four corners of both feet and the full surface of both palms.
- Prepare the shoulders: Keep your elbows pointing upward rather than flaring wide. This helps the arms push more efficiently.
- Engage lightly: Draw the ribs in, activate the glutes, and prepare to lift without throwing the head or forcing the spine.
A clean setup makes the lift safer. Therefore, take a moment to organize the feet, hands, elbows, and breath before pushing up.
Execution (Step-by-Step)
- Press through the feet: Begin by driving the feet into the floor and lifting the hips, similar to a strong bridge.
- Push through the hands: Next, press the palms firmly down as the elbows begin to straighten.
- Lift the chest: As the arms extend, guide the chest upward and slightly toward the wall behind you.
- Create the arch: Allow the spine to extend smoothly, but avoid dumping all the bend into the lower back.
- Keep the legs active: Press the knees forward in line with the toes while keeping the feet grounded.
- Open the shoulders: Continue pushing the floor away so the shoulders support the backbend instead of collapsing.
- Hold with control: Breathe slowly for the chosen hold time. Keep the face relaxed and the neck comfortable.
- Lower carefully: Bend the elbows and knees slightly, tuck the chin gently, and lower the upper back, mid-back, and hips to the floor with control.
Pro Tips & Common Mistakes
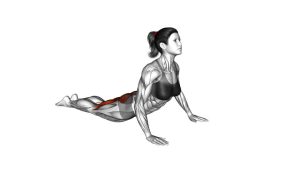
- Warm up first: Use cat-cow, cobra, bridge pose, shoulder circles, wrist mobility, and hip flexor stretches before attempting the full pose.
- Do not rush the lift: A fast push can overload the wrists, shoulders, or lumbar spine. Instead, rise with steady pressure.
- Keep the knees tracking forward: If the knees flare wide, the hips may lose power and the lower back may take more stress.
- Press through the palms: Weak hand pressure often causes the shoulders to collapse and the elbows to stay bent.
- Avoid gripping the lower back: Use the glutes and legs to support the arch. In addition, lift the chest to distribute the curve.
- Do not force straight arms: If the shoulders are not ready, use blocks under the hands or practice bridge variations first.
- Relax the neck: Let the head hang naturally without twisting it side to side while you are in the pose.
- Exit slowly: The descent matters as much as the lift. Lowering with control protects the spine and shoulders.
FAQ
What muscles does Wheel Pose work?
Wheel Pose works the spinal erectors, glutes, shoulders, triceps, and chest. It also stretches the hip flexors, abdominals, and front body while challenging wrist and shoulder stability.
Is Wheel Pose good for posture?
Yes, it can support better posture when performed correctly. Since it opens the chest, extends the spine, and strengthens the posterior chain, it may help counter long periods of sitting. However, it should be paired with rows, core work, and easier mobility drills for balanced results.
Why does my lower back hurt in Wheel Pose?
Lower-back discomfort often happens when the chest and shoulders do not open enough, so the lumbar spine takes most of the bend. To improve this, warm up the shoulders, activate the glutes, keep the legs strong, and practice smaller backbend progressions.
Can beginners do Wheel Pose?
Beginners can work toward it, but the full pose is usually advanced. Start with glute bridges, yoga bridge pose, cobra pose, supported backbends, and wrist mobility. After those feel comfortable, partial Wheel Pose can be introduced gradually.
How long should I hold Wheel Pose?
Most people can begin with 5–10 second holds. As control improves, holds of 10–30 seconds may be used. Quality matters more than time, so stop before the shoulders collapse or the lower back becomes compressed.
Should my arms be completely straight?
Straight arms are common in a strong full Wheel Pose, but they are not required at first. If your elbows stay bent because of shoulder tightness, use blocks, practice shoulder mobility, and continue building strength before forcing the final position.
Recommended Equipment
- Non-Slip Yoga Mat — provides stable grip for the hands and feet during the lift.
- Yoga Blocks — useful for elevating the hands and reducing shoulder demand.
- Yoga Wheel — helps with supported backbend practice and chest opening progressions.
- Yoga Strap / Stretching Strap — supports shoulder mobility drills before deeper backbends.
- Wrist Support for Yoga — may help reduce wrist discomfort during hand-supported poses.
Choose equipment that improves control rather than forcing more range. If a tool causes pain or pressure, stop using it and return to a simpler variation.