Side Twist Stretch: Form, Benefits, Sets, Tips & FAQ
Learn the Side Twist Stretch to improve core control, oblique strength, shoulder stability, and side-body mobility with safe form cues.
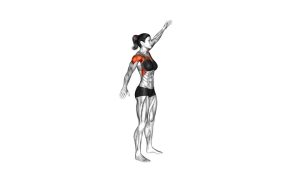
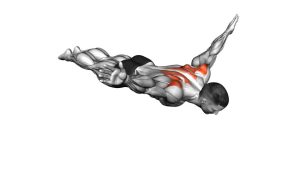
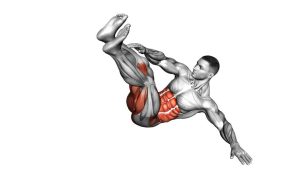
Side Twist Stretch
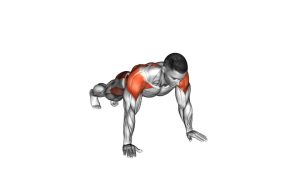
This exercise works best when each repetition feels smooth, stable, and deliberate. Start from a strong plank, shift your weight into one hand, then rotate your chest open until your body forms a side plank shape. As the top arm reaches overhead, keep the hips lifted and the waist long. This position creates a useful combination of strength and stretch through the obliques, lats, shoulders, hips, and side body.
Quick Overview
| Body Part | Obliques |
|---|---|
| Primary Muscle | Internal and external obliques |
| Secondary Muscle | Rectus abdominis, transverse abdominis, shoulders, serratus anterior, glutes, lats, hip stabilizers |
| Equipment | Bodyweight only; optional exercise mat |
| Difficulty | Intermediate because it requires plank strength, shoulder control, and rotational stability |
Sets & Reps (By Goal)
- Mobility and warm-up: 2 sets × 5–8 reps per side with a slow, smooth tempo.
- Core control: 3 sets × 6–10 reps per side, pausing briefly in the side plank position.
- Oblique endurance: 3–4 sets × 10–12 reps per side with steady breathing.
- Stretch-focused practice: 2–3 sets × 4–6 reps per side, holding the overhead reach for 3–5 seconds.
Progression rule: First improve control, then increase reps. Do not add speed until your hips stay lifted, your support shoulder remains stacked, and your return to plank stays quiet.
Setup / Starting Position
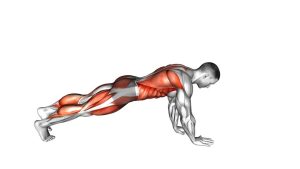
- Start in a high plank: Place your hands under your shoulders and extend your legs behind you.
- Set your base: Keep your feet slightly apart for better balance. A wider stance makes the twist easier.
- Brace your core: Pull your ribs down gently and keep your body in a straight line from head to heels.
- Press the floor away: Keep the support shoulder active instead of sinking into the joint.
- Prepare to rotate: Shift weight into one hand while keeping the neck neutral and the hips controlled.
Tip: If your wrists feel uncomfortable, warm them up first or use push-up handles to keep the wrists in a more neutral position.
Execution (Step-by-Step)
- Begin from plank: Keep both arms straight, your core tight, and your hips level.
- Shift your weight: Move your body weight into one hand without collapsing into the shoulder.
- Rotate the torso: Turn your chest open to the side as your hips rotate with control.
- Reach the top arm: Sweep the free arm upward and overhead to create a long side-body stretch.
- Lift the hips: Maintain a strong side plank shape. Avoid letting the waist sag toward the floor.
- Pause briefly: Hold the top position for 1–3 seconds while breathing smoothly.
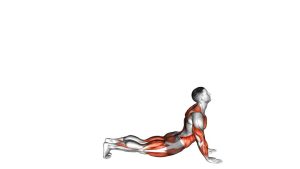
- Return with control: Bring the arm back down and rotate your chest toward the floor.
- Reset the plank: Rebuild your straight body line before performing the next repetition.
Pro Tips & Common Mistakes
- Rotate from the core: Let the rib cage and hips turn together. Do not simply swing the arm.
- Keep the support shoulder strong: Push the floor away so the shoulder blade stays controlled.
- Avoid dropping the hips: Sagging reduces oblique engagement and may stress the lower back.
- Use a wide foot stance: Wider feet improve balance and help beginners learn the movement safely.
- Reach long, not hard: The overhead arm should lengthen the side body without forcing the shoulder.
- Do not rush the return: The lowering phase is where many people lose control. Move slowly.
- Keep your neck relaxed: Look naturally toward the hand or slightly forward. Avoid straining the neck upward.
- Modify when needed: Perform the exercise from the knees if your full plank position breaks down.
FAQ
What muscles does the Side Twist Stretch work?
The Side Twist Stretch mainly works the obliques. It also trains the deep core, shoulders, serratus anterior, glutes, lats, and hip stabilizers because your body must rotate and stabilize at the same time.
Is the Side Twist Stretch a stretch or a strength exercise?
It is both. The overhead reach creates a stretch through the side body, while the side plank position builds strength in the obliques, shoulders, and hips.
Is this exercise good for beginners?
It can be challenging for complete beginners. Start with a knee-supported version or a basic side plank first. Once you can hold a stable plank, add the rotation and reach.
Why do my hips drop during the movement?
Your hips may drop because your obliques, glutes, or shoulder stabilizers are losing tension. Widen your feet, reduce the range of motion, or perform fewer reps with better control.
Should I do this exercise fast or slow?
Perform it slowly. A controlled tempo improves core engagement, reduces shoulder stress, and makes the stretch more effective.
Can I use this exercise in a warm-up?
Yes. Use low reps and smooth movement before core training, upper-body workouts, mobility sessions, or bodyweight circuits.
Recommended Equipment (Optional)
- Exercise Mat — provides comfort for the hands, knees, and feet during plank-based movements.
- Push-Up Handles — help keep the wrists more neutral during the support phase.
- Yoga Blocks — useful for modified mobility work and easier side-body stretching variations.
- Resistance Bands Set — helpful for pairing this drill with anti-rotation and upper-back strengthening work.
- Core Sliders — optional tools for advanced plank control and rotational core progressions.
Tip: Equipment is optional. The most important tools are a stable plank, controlled breathing, and clean rotation.