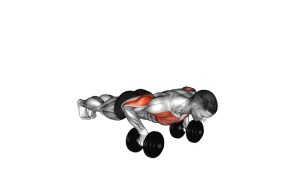
Kneeling Rotational Push-Up: Form, Benefits, Sets, Tips & FAQ
Learn the Kneeling Rotational Push-Up to build chest, shoulder, triceps, and core control with safe step-by-step form, sets, tips, FAQs, and equipment.
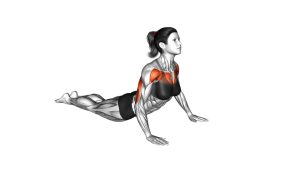
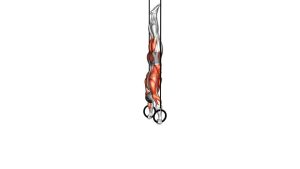
Kneeling Rotational Push-Up
This exercise is useful when you want a push-up variation that feels more accessible than a full rotational push-up, yet still trains upper-body strength and trunk control. First, you lower your chest toward the floor. Then, you press back up and open your torso to one side. As a result, the movement develops pressing strength while teaching your body to stay stable during rotation.
Quick Overview
| Body Part | Chest |
|---|---|
| Primary Muscle | Pectoralis major |
| Secondary Muscle | Anterior deltoids, triceps, serratus anterior, obliques, rectus abdominis, and deep core stabilizers |
| Equipment | Bodyweight only; exercise mat optional |
| Difficulty | Beginner to intermediate |
Sets & Reps (By Goal)
- Beginner technique practice: 2–3 sets × 5–8 reps per side with slow control
- Upper-body strength: 3–4 sets × 8–12 total reps with 60–90 seconds rest
- Core stability and rotation control: 2–4 sets × 6–10 reps per side with a brief pause at the top
- Warm-up activation: 1–2 sets × 6–8 total reps at an easy pace
Progression rule: Improve control first. After that, increase reps, alternate sides more smoothly, or pause longer in the rotated position before moving to harder push-up variations.
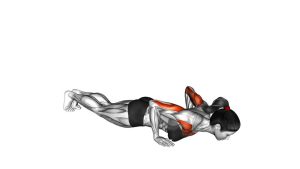
Setup / Starting Position
- Start on the floor: Place your knees on the ground and set your hands under or slightly wider than your shoulders.
- Create a straight line: Keep your body long from head to knees. Avoid letting your hips sag or your chest collapse.
- Brace lightly: Tighten your core enough to keep your torso steady, but continue breathing naturally.
- Set your gaze: Look slightly down so your neck stays neutral throughout the push-up.
- Prepare to rotate: Keep both palms grounded before the push-up. The arm should lift only after you press back to the top.
Tip: A soft exercise mat can make the kneeling position more comfortable and help you focus on clean movement.
Execution (Step-by-Step)
- Lower under control: Bend your elbows and bring your chest toward the floor while keeping your knees planted.
- Maintain alignment: Keep your head, ribs, hips, and knees moving as one connected line.
- Press back up: Push through both hands until your elbows extend and your torso returns to the top position.
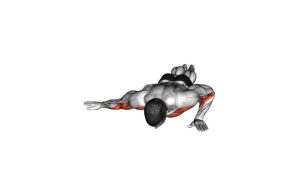
- Rotate after the press: Shift into the supporting hand and turn your chest open to one side.
- Reach the arm upward: Lift the opposite arm toward the ceiling while keeping the supporting shoulder strong.
- Control the return: Bring the lifted hand back to the floor and rotate your chest back down to the starting position.
- Repeat with control: Continue for the target reps, alternating sides if your workout plan requires it.
Pro Tips & Common Mistakes
- Keep the knees down: This is a kneeling variation, so use the knees to reduce load and improve control.
- Rotate from the upper body: Open the chest smoothly instead of yanking the arm upward.
- Do not rush the reach: Pause briefly at the top so your core and shoulder stabilize the position.
- Avoid hip sagging: If your hips drop, shorten the range or reduce reps.
- Protect the supporting shoulder: Press the floor away and avoid collapsing into the wrist or shoulder joint.
- Use even pressure: During the push-up, keep both hands active before transferring weight into one hand for the rotation.
- Control the elbow path: Let the elbows bend naturally, but avoid flaring them aggressively out to the sides.
- Move with steady breathing: Inhale as you lower, then exhale as you press and rotate.
FAQ
What muscles does the kneeling rotational push-up work?
It mainly works the chest, especially the pectoralis major. In addition, the shoulders, triceps, serratus anterior, obliques, and deep core muscles help control the press and rotation.
Is the kneeling rotational push-up good for beginners?
Yes. Because the knees stay on the floor, this version reduces the load compared with a full push-up. However, beginners should move slowly and master the basic kneeling push-up before adding a larger rotation.
Should I rotate during the lowering phase?
No. Lower and press first. Then rotate at the top. This sequence keeps the movement cleaner and makes it easier to control the shoulder, ribs, and hips.
Why do I feel this exercise in my core?
The core works to prevent your hips and lower back from twisting too much during the arm reach. Therefore, the exercise trains both pressing strength and rotational stability.
How can I make the kneeling rotational push-up harder?
First, add a longer pause in the rotated position. Next, increase reps or alternate sides smoothly. Once your form stays stable, you can progress toward a full rotational push-up from the toes.
Recommended Equipment (Optional)
- Exercise Mat — adds knee comfort and grip during floor-based push-up work
- Exercise Knee Pad — useful if kneeling positions feel uncomfortable on hard floors
- Push-Up Handles — can reduce wrist extension and improve hand comfort for some users
- Non-Slip Workout Mat — helps keep hands and knees stable during controlled reps
- Resistance Bands Set — useful for pairing this exercise with rows, pull-aparts, and shoulder stability work
Tip: Equipment is optional. The most important requirement is a stable floor surface where your hands and knees do not slide.